Difference between revisions of "Resource Book for MRP Cascade training - RMSA Subject Teachers Forum - IT for Change"
KOER admin (talk | contribs) (Created page with " '''''Rastriya Madhyamik Shiksha Abhiyan'' (''RMSA'')''' '''Karnataka ''' '''Subject Teacher Forum ''' '''State/Master Resource Person – Handout''' ...") |
|||
| (12 intermediate revisions by one other user not shown) | |||
| Line 1: | Line 1: | ||
| − | + | = Understanding the Resource Prototype = | |
| − | |||
| − | |||
| − | |||
| − | + | == Concept Map == | |
| − | |||
| − | |||
| − | + | === Why do we do Concept/Mind Mapping === | |
| − | |||
| − | ''' | + | '''Lateral |
| − | ''' | + | thinking''' is solving problems through a non-hierarchical and |
| + | creative approach, using reasoning that does not follow any | ||
| + | particular hierarchy or sequence and involving ideas that may not be | ||
| + | obtainable by using only traditional step-by-step logic. This also | ||
| + | enables the teacher to make new connections within the subject and | ||
| + | across subjects. | ||
| − | ''' | + | '''Vertical |
| − | + | thinking''' is a type of approach to problems that usually involves | |
| + | one being selective, analytical, and sequential. It could be said | ||
| + | that it is the opposite of lateral thinking. This is the type of | ||
| + | thinking we have been following in our teaching/learning processes. | ||
| − | + | We are | |
| − | + | now in a digital world which has made large amount of information | |
| + | available to us through the Internet. Therefore there is a need for | ||
| + | us to be able to process connect and make meaning of large amounts of | ||
| + | information. Hence we need to start thinking laterally rather than | ||
| + | vertically. | ||
| − | + | Mind | |
| − | + | mapping is a highly effective way of getting information in and out | |
| + | of your brain and to enable '''lateral thinking'''. Mind mapping is | ||
| + | a creative and logical means of mapping out ideas based on a central | ||
| + | theme. | ||
| − | + | <u>'''The five essential characteristics of Mind | |
| − | + | Mapping:'''</u> | |
| − | + | * [[Image:Resource%20Book_html_m43240de1.png]]The main idea, subject or focus is made clear in a central image. | |
| − | + | * The main themes ''radiate'' from the central image as 'branches'. | |
| − | + | * The branches comprise a key image or key word drawn or printed on its associated line. | |
| + | * Topics of lesser importance are represented as 'twigs' of the relevant branch. | ||
| + | * The branches form a connected nodal structure. | ||
| + | * Possible to get into details without losing sight of the overall picture While a mind map may have only one central theme, '''concept maps''' may have many interrelated main themes. Concept maps are tools for organizing and representing knowledge. They include concepts, usually enclosed in circles or boxes of some type, and relationships between concepts or propositions, indicated by a connecting line between two concepts. Words on these lines can be used to specify the nature of the relationships between different concepts. | ||
| − | + | Concept | |
| − | + | mapping can be used for for a number of different purposes | |
| − | + | * to generate ideas (e.g. brain storming) | |
| − | + | * to design a complex structure | |
| − | + | * to communicate complex ideas | |
| + | * to illustrate the relationships between different components or processes | ||
| + | * to aid learning by explicitly integrating new and old knowledge | ||
| + | * to assess understanding | ||
| + | * to diagnose misunderstanding | ||
| − | + | <u>'''Steps | |
| − | + | in constructing concept maps'''</u>''''''Select or Focus on a | |
| + | theme and then identify related key words or phrases. What is the | ||
| + | central word, concept, question or problem around which to build your | ||
| + | diagram or concept map? What are the concepts, ideas, descriptive | ||
| + | words or important questions that you can associate with the main | ||
| + | concept, topic, question or problem? | ||
| − | + | # Rank the concepts (key words) from the most abstract and inclusive to the most concrete and specific. | |
| − | + | # Cluster (group) concepts that function at similar level of abstraction and those that closely interrelated. | |
| − | + | # Arrange concepts in a diagrammatic representation. | |
| − | + | # Add linking lines and where appropriate label lines with a qualifying word or phrase. | |
| − | + | # Groups of people can work together on a concept map - this is a good way to "brainstorm" a problem or idea. | |
| − | |||
| − | |||
| − | |||
| − | + | For more information on concept maps please see | |
| − | + | [[http://www.smallstock.info/info/mindmap.htm]] | |
| − | + | === Concept Map of a theme === | |
| − | |||
| − | |||
| − | + | By | |
| − | + | using a public educational tool [[Freemind]] | |
| + | to build concept maps of themes in different subjects, we open up | ||
| + | possibilities to think beyond a specific hierarchy or in any | ||
| + | particular sequence. This allows us to make new connections to | ||
| + | address the topic more creatively. | ||
| − | + | One | |
| − | + | theme in the curriculum is selected for creating a concept map. The | |
| + | '''first step''' is to understand the concept map and get an overall | ||
| + | idea of what is covered in the resource material and how it is | ||
| + | organised. | ||
| − | + | == Theme Plan == | |
| − | |||
| − | |||
| − | + | Once | |
| − | + | the concept map is understood, we then work on a framework for the | |
| + | resource material. This framework is called the '''Theme Plan'''. The framework has been built on | ||
| + | the '''constructivist '''philosophy | ||
| + | of learning as recommended by the National Curriculum Framework 2005 | ||
| + | (NCF 2005). Bloom's Taxonomy that was built in 1956 used Skinner's | ||
| + | '''behaviourist '''learning | ||
| + | philosophy which classified knowledge, comprehension, application, | ||
| + | analysis , synthesis and evaluation as skills. With new learning | ||
| + | approaches emerging, Bloom's taxonomy was revised in 1999. This | ||
| + | revised taxonomy included | ||
| + | '''''Metacognitive Knowledge— Knowledge of thinking in | ||
| + | general and your thinking in particular. ''''' | ||
| − | + | This | |
| − | + | new constructivist philosophy and psychology of learning has been | |
| + | used to create the structure of the theme plan. The | ||
| + | theme plan is built keeping in mind children's assimilation of | ||
| + | concepts from 6<sup>th</sup> | ||
| + | standard though 10<sup>th</sup> | ||
| + | standard. This framework is in a spreadsheet format, with the | ||
| + | following columns: | ||
| − | + | <u>'''Theme'''</u>: | |
| − | + | This is the main theme of the | |
| + | prototype. | ||
| − | + | <u>'''Sub-Theme: | |
| − | + | '''</u>These are the sub-themes | |
| + | that the main theme has been divided into. | ||
| − | + | <u>'''Class'''</u>: | |
| − | + | In which class do you think the | |
| + | concept must be introduced - 6<sup>th</sup> | ||
| + | standard to 10<sup>th</sup> | ||
| + | standard. | ||
| − | + | <u>'''Learning | |
| − | + | Outcomes:'''</u> One of the | |
| + | basic ideas here is that the content is only a vehicle for achieving | ||
| + | learning outcomes. We want to look at why we are teaching a topic | ||
| + | and how to teach it. These questions have to be asked and answered | ||
| + | in all subject areas. | ||
| − | + | Learning | |
| − | + | outcomes are not only content based (factual; can be learned by | |
| + | rote). They are broken into '''''conceptual learning''''', '''''skill | ||
| + | learning''''' and the '''''content/knowledge learning'''''. | ||
| + | The content/knowledge learning part pertains to the factual | ||
| + | components, various definitions, procedural knowledge, theories, etc. | ||
| − | + | <u>'''Concept | |
| − | + | Learning/Idea to be Conveyed: '''</u>Concept learning outcomes | |
| + | look at what are the key discipline ideas in a topic or theme. These | ||
| + | allow the children to make a structure for their learning and help | ||
| + | them become continuous, life-long learners. They learn to abstract, | ||
| + | get to the core meaning and build upon that core understanding. | ||
| + | These concepts will be built according to the age of the student (NCF | ||
| + | calls this cognitive validity). For the teacher, a good way to | ||
| + | define a conceptual outcome is to ask this question : “ 20 years | ||
| + | from now; the student will forget all these definitions, formulae – | ||
| + | what is the key idea (s) that I want them to remember .” | ||
| − | + | <u>'''Skill | |
| − | + | Learning: '''</u><u></u>Skills | |
| + | are cognitive, | ||
| + | psycho-motor, linguistic and social abilities that are built over a | ||
| + | learning period. The skills can be directly related to the topic. | ||
| + | In this case, these will be called the applications of the concept/ | ||
| + | idea/ content. For example, building a dynamo or fixing a bulb or | ||
| + | recording an experiment are directly connected to the lesson being | ||
| + | taught. | ||
| − | + | But | |
| + | every lesson also has higher order skills which are important to | ||
| + | develop. For example, learning to observe carefully and accurately | ||
| + | or safety precautions around electricity are also skills that can be | ||
| + | developed. | ||
| − | + | Multiple | |
| − | + | skills can be developed through one topic/ theme. More than one | |
| + | topic can also be for addressing one skill. | ||
| − | + | <u>'''Knowledge | |
| − | + | Learning:'''</u><u> </u>The | |
| − | + | content/knowledge learning part pertains to the factual components, | |
| − | + | various definitions, procedural knowledge, theories, etc. | |
| − | + | <u>'''Activities/Evaluation: | |
| − | + | '''</u><u></u>The activity | |
| + | that is described for the sub-theme and class. The details of the | ||
| + | activity and the evaluation questions are provided in the Resource | ||
| + | Book, the theme plan will have a hyper-link to the resource book. | ||
| − | + | <u>'''Resources/Material: | |
| − | + | '''</u>The material and resources | |
| + | that would be required for the activity. | ||
| − | + | == Resource Book == | |
| − | |||
| − | |||
| − | |||
| − | |||
| − | + | The | |
| − | + | resource book will bring together the concept map and theme plan. It | |
| + | will include background material that will be required for teachers | ||
| + | to understand a theme and use the theme plan. The resource book will | ||
| + | also contain the overall curricular objectives of the theme for | ||
| + | school education The background material will tie in with overall | ||
| + | curricular objectives and not just the syllabus. The detailed | ||
| + | explanation of all the activities and the evaluation mentioned in the | ||
| + | theme plan will will be described in the resource book. | ||
| − | + | === Curricular Objectives === | |
| − | |||
| − | |||
| + | The | ||
| + | curricular objectives define/ describe what the learning outcomes of | ||
| + | the students are when being introduced to this topic. These allow | ||
| + | the teacher to define a concept in totality and not be limited only | ||
| + | to the syllabus. | ||
| − | |||
| − | |||
| − | + | === Background Material === | |
| − | + | ||
| + | The | ||
| + | background material is meant to be teacher material. As a teacher, | ||
| + | what should I know, how should I look at a topic to present it to the | ||
| + | children in the most appropriate way. | ||
| − | + | This | |
| − | + | includes detailed discussion of sub-themes, key terms to be | |
| + | introduced in a simple and accurate manner and additional resources | ||
| + | that can be used. | ||
| − | + | === Activities and Evaluation === | |
| − | |||
| − | |||
| − | + | The | |
| − | + | activities are discussed at the end of the resource book. These | |
| + | include experiments, simulations, discussions (after a video) and | ||
| + | site visits. This section also includes discussion questions for the | ||
| + | teacher to build the theme as well as evaluation questions. | ||
| − | + | == The Complete Resource for a theme – Collaborative resource creation == | |
| − | |||
| − | |||
| − | + | The | |
| − | + | concept map, theme plan and the resource book, once reviewed will be | |
| + | available on the web portal [[http://rmsa.karnatakaeducation.org.in/]]. | ||
| + | The resources for the theme can be enhanced and enriched by all | ||
| + | teachers. When a teacher wants to make a contribution to the | ||
| + | resource book, he or she has to say which theme they want to make the | ||
| + | contribution to and send it to the forum (Group Email). | ||
| − | + | Note, | |
| − | + | the teacher can contribute in the following ways : | |
| − | + | * Add an activity to an existing sub-theme. | |
| − | + | * Add a new sub-theme with the details of each column for each Theme Plan. | |
| − | + | * Add more background material to the resource book. Here the source of the background material must be provided | |
| − | + | The | |
| − | + | material will be reviewed by a panel and will be added to the | |
| + | resource book if the quality criteria is met. | ||
| − | + | == Sample Resources == | |
| − | |||
| − | |||
| − | + | === Science === | |
| − | |||
| − | |||
| − | + | There | |
| − | + | are two sample resource materials that have been built – on | |
| + | measurement and light. This explores the various concepts to be | ||
| + | introduced while teaching light along with how to address the | ||
| + | syllabus topics. The resource book on measurements introduces the | ||
| + | history of measurement and how to measure. These resources can be | ||
| + | found at - [[http://rmsa.karnatakaeducation.org.in/?q=Science]] | ||
| − | + | === Social Science === | |
| − | |||
| − | |||
| − | |||
| − | |||
| − | |||
| − | |||
| − | |||
| − | |||
| − | |||
| − | |||
| − | + | A | |
| − | + | similar resource book has been built for the Bhakthi movement. The | |
| + | focus here is to use the history and facts of the Bhakthi Movement to | ||
| + | move beyond the facts and look at social aspects, social structure | ||
| + | and organization. This resource can be found at the RMSA website, | ||
| + | [[http://rmsa.karnatakaeducation.org.in/?q=Social-Science]] | ||
| − | + | === Mathematics === | |
| − | |||
| − | |||
| − | + | Fractions | |
| − | + | are a very difficult concept to teach and are not well-understood. | |
| − | + | This resource document explores different methodologies and | |
| − | + | approaches to explaining fractions with a set of activities on how to | |
| − | + | introduce the topic in the classroom. This resource can be found at | |
| − | + | the following address: | |
| − | + | [[http://rmsa.karnatakaeducation.org.in/?q=maths]] | |
| − | + | . | |
| − | |||
| − | |||
| − | + | == Understanding the Resource Book - Kannada Translation == | |
| − | |||
| − | |||
| − | + | ಪ್ರಕಲ್ಪನೆಯ | |
| − | + | ನಕ್ಷೆ : | |
| − | + | FREEMIND | |
| − | + | ಎ೦ಬ | |
| + | ಸಾರ್ವಜನಿಕ ಶೈಕ್ಷನಿಕ ತಂತ್ರಾಂಶದ | ||
| + | ಸಹಾಯದಿಂ ದ ಬೇರೆ ಬೇರೆ ವಿಷಯಗಳ | ||
| + | ಪ್ರಕಲ್ಪನೆ ಗಳ ನಕ್ಷೆಯನ್ನು | ||
| + | ರಚಿಸುವುದರಿಂದ, | ||
| + | ಒಂದು | ||
| + | ವಿಷಯದ ಬಗೆಗೆ ಅನೇಕ ಆಯಾಮದ | ||
| + | ಚಿತ್ರಣವನ್ನು ಪಡೆಯ ಬಹುದಾಗಿದೆ. | ||
| + | ವಿಷಯದ | ||
| + | ಬಗೆಗಿನ ಸಾಂಪ್ರದಾಯಿಕ ಶ್ರೇಣೀಕ್ರುತ | ||
| + | ಯೋಜನೆಯ ಬದಲಿಗೆ, | ||
| + | ಈ | ||
| + | ಪ್ರಕಲ್ಪನೆಯ ನಕ್ಷೆಯಿಂದ | ||
| + | ಸ್ರಜನಾತ್ಮಕ ಯೋಜನೆ ಯು ಸಾಧ್ಯಾವಿದೆ. | ||
| − | + | ಪಠ್ಯಕ್ರಮದ | |
| − | + | ಯಾವುದಾದರೋಂದು ಪ್ರಾಕಲ್ಪನಾ | |
| − | + | ನಕ್ಷೆಯನ್ನು. | |
| + | ಗಮನಿಸಿದಾಗ, | ||
| + | ಅದು | ||
| + | ಆ ಸಂಪನ್ಮೋಲ ಸಾಹಿತ್ಯದ ಒಂದು | ||
| + | ಸಮಗ್ರ ಪಕ್ಷಿನೋಟ ದೋರೆಯುತ್ತದೆ | ||
| + | . | ||
| − | + | ಪಠ್ಯಸಾರ: | |
| − | + | ಪ್ರಕಲ್ಪನಾ | |
| − | + | ನಕ್ಷೆಯನ್ನು ಅರಿತ ನಂತರ, | |
| − | + | ಸಂಪನ್ಮೋಲ | |
| − | + | ಸಾಹಿತ್ಯ ರಚಿಸಲು ಒಂದು ಚೌಕಟ್ಟಿನ | |
| − | + | ಅಗತ್ಯವಿದೆ. | |
| − | + | ಈ | |
| − | + | ಚೌಕಟ್ಟನ್ನೆ ಪಠ್ಯಸಾರ ಎನ್ನಬಹುದು. | |
| − | + | ಈ | |
| − | + | ಚೌಕಟ್ಟು NCF | |
| − | + | ೨೦೦೫ರ | |
| − | + | ಅನ್ವಯದಂತೆ. | |
| − | + | ಕಲಿಕೆಯ | |
| − | + | ರಚನಾತ್ಮಕ ತತ್ವಶಾಸ್ತ್ರದ | |
| + | ತಳಹದಿಯ ಮೇಲೆ ರಚಿತವಾಗಿರುತ್ತದೆ. | ||
| − | + | ೧೯೫೬ರಲ್ಲಿ | |
| − | + | ರಚಿತವಾದ ಬ್ಲೊಮನ ವರ್ಗಿಕರಣದ | |
| + | ಶಾಸ್ತ್ರವು ಸ್ಕಿನ್ನರನ ವರ್ತನಾವಾದದ | ||
| + | ಆಧಾರವಾಗಿಟ್ಟುಕೋಂಡಿತ್ತು. | ||
| + | ಇದರಲ್ಲಿ | ||
| + | ಜ್ನನ, | ||
| + | ಗ್ರಹಿಕೆ | ||
| + | (ತಿಳುವಕೆ), | ||
| + | ಅನ್ವಯ, | ||
| + | ವಿಶ್ಲೇಷಣೆ, | ||
| + | ಸಂಶ್ಲೇಷಣೆ, | ||
| + | ಮತ್ತು | ||
| + | ಮೌಲ್ಯಮಾಪನಗಳನ್ನು ಉದ್ದಿಷ್ಠಗಳಾಗಿ | ||
| + | ಗುರುತಿಸಿದೆ. | ||
| + | ಆದರೆ | ||
| + | ೧೯೯೯ ರಲ್ಲಿ ಪುನರಚಿತವಾದ ಬ್ಲೂಮನ್ | ||
| + | ವರ್ಗಿಕರಣವು,ವಿಶಿಷ್ಟ | ||
| + | ಸ್ರುಜನಾತ್ಮಕ ಜ್ನಾನ(ಯಾವುದೇ | ||
| + | ಜ್ನನದ ಸಾಮಾನ್ಯ ಗ್ರಹಿಕೆ ಮತ್ತು | ||
| + | ನಿರ್ದಿಷ್ಠ ಗ್ರಹಿಕೆ)ಯನ್ನು | ||
| + | ಒಳಗೋಂಡಿರುತ್ತದೆ.ಈ | ||
| + | ಪಾಠಸಾರವು ರಚನಾತ್ಮಕ ತತ್ವಶಾಸ್ತ್ರ | ||
| + | ಮತ್ತು ಕಲಿಕೆಯ ಮನೋವಿಜ್ನಾನವನ್ನು | ||
| + | ಆಧರಿಸಿ ರಚಿಸಲ್ಪಟ್ಟಿರುತ್ತದೆ. | ||
| + | ೬ ರಿಂದ | ||
| + | ೧೦ನೇ ತರಗತಿವರೆಗಿನ ವಿದ್ಯಾರ್ಥಿಗಳ | ||
| + | ವಿಷಯ ಗ್ರಹಿಕಾ ಸಾಮರ್ಥ್ಯದ | ||
| + | ಆಧಾರದ ಮೇಲೆ ರಚಿತಗೋಂಡರುವ | ||
| + | ಇದು spreadsheet | ||
| + | ರೊಪದಲ್ಲಿರುತ್ತದೆ. | ||
| + | ಇದರ | ||
| + | ಹಂತಗಳು | ||
| − | + | ಈ | |
| + | ಕೆಳಗಿನಂತಿವೆ. | ||
| − | |||
| − | |||
| − | + | ೧. | |
| − | + | ಪಠ್ಯಸಾರ: | |
| − | + | ಇಡಿ | |
| − | + | ವಿಷಯವನ್ನು ಪ್ರತಿನಿಧಿಸುತ್ತದೆ | |
| − | |||
| − | |||
| − | + | ೨.ಉಪ | |
| − | + | ಪಠ್ಯಸಾರ:ವಿಷಯವನ್ನು | |
| + | ಹಲವು ಭಾಗಗಳಾಗಿ ವಿಂಗಡಿಸಾಗಿರುತ್ತದೆ. | ||
| − | + | ೩.ತರಗತಿ:೬ರಿಂದ | |
| − | + | ೧೦ನೇ ತರಗತಿವರೆಗೆ ಯಾವ ಉಪಪರಿಕಲ್ಪನೆ | |
| + | ಸೋಕ್ತವಾಗಿರುತ್ತದೆಯೋ ಆ ತರಗತಿ | ||
| − | + | ಕಲಿಕಾ | |
| − | + | ಫಲಗಳು:ಭೋಧಿಸುತ್ತಿರುವ | |
| + | ಪಠ್ಯವಸ್ತುವು, | ||
| + | ಕಲಿಕಾ | ||
| + | ಫಲಗಳುನ್ನು. | ||
| + | ಸಾಧಿಸಲು | ||
| + | ಇರುವಂತಹ ಒಂದು ಸಾಧನೆ. | ||
| + | ಕಲಿಸುವ | ||
| + | ಮೊದಲು ಏಕೆ ,ಏನು | ||
| + | ಮತ್ತು ಹೇಗೆ ಕಲಿಸಬೇಕು ಎ೦ಬ | ||
| + | ಪ್ರಶ್ನೆಗಳಿಗೆ ಉತ್ತರವನ್ನು | ||
| + | ಹುಡುಕುವ ಪ್ರಯತ್ನಮಾಡಬೇಕು. | ||
| − | + | ಕಲಿವಿನ | |
| − | + | ಫಲಗಳು ಕೇವಲ ಪಠ್ಯವಸ್ತುವಿಗೆ | |
| + | ಸಿಮೀತವಾಗದೆ,(ಉದಾ:ಕೇವಲ | ||
| + | ಕಂಠಪಾಠ ಕಲಿಕೆ) | ||
| + | ಅವುಗಳನ್ನು | ||
| + | ಸಮಗ್ರ ಪರಿಕಲ್ಪ ಕಲಿಕೆ, | ||
| + | ಕೌಶಲ್ಯ | ||
| + | ಕಲಿಕೆ ಮತ್ತು ವಿಷಯಗ್ರಹಣ | ||
| + | ಕಲಿಕೆಗಳಾಗಿ ವಿಭಾಗಿಸಬೇಕಾಗುತ್ತದೆ. | ||
| − | |||
| − | |||
| − | + | ಕಲಿಕೆ, | |
| − | + | ಕೌಶಲ್ಯ | |
| − | + | ಕಲಿಕೆ:ಇದು | |
| − | + | ಒಂದು ನಿರ್ದಿಷ್ಠ ವಿಷಯದ, | |
| − | + | ಮುಖ್ಯ | |
| − | + | ತತ್ವಗಳನ್ನು ಒಳಗೋಂಡಿರ ಬೇಕು. | |
| − | + | ಇದು | |
| − | + | ಕಲಿಕಾರ್ಥಿಯ ಕಲಿಕೆಗೆ ಅನುಕಲವಾಗಿದ್ದು | |
| − | + | ಜಿವನ ಪರ್ಯಾಂತ ಕಲಿಕೆಗೆ ಅನುಕಲ | |
| − | + | ಕಲ್ಪಿಸಿರ ಬೇಕು. | |
| − | + | ಕಲಿಕಾರ್ಥಿಯು. | |
| − | + | ಅಮೂರ್ತದಿಂದ | |
| − | + | ಕಲಿಕೆ ಪ್ರಾರಂಬಿಸಿ ವಿಷಯದ | |
| − | + | ಒಳಾರ್ಥವನ್ನು ತಿಳಿದುಕೋಂಡು | |
| + | ಅದರ ಸಹಾಯದಿಂದ ಉನ್ನತ ತಿಳುವಳಿಕೆಯನ್ನು | ||
| + | ಗಳಿಸುತ್ತಾನೆ . | ||
| + | ಈ | ||
| + | ಪರಿಕಲ್ಪನೆಗಳನ್ನು ಕಲಿಕಾರ್ಥಿಯ | ||
| + | ವಯಸ್ಸಿಗೆನುಗುಣವಾಗಿ(ಇದನ್ನು | ||
| + | NCF ಗ್ರಹಣ | ||
| + | ಸಿಂಧುತ್ವವೆಂದು ಕರೆಯುತ್ತದೆ) | ||
| + | ರಚಿತವಾಗಿರುತ್ತದೆ. | ||
| + | ಗಮನಿಸಬೆಕಾದ | ||
| + | ಅಂಶವೆಂದರೆ, | ||
| + | ಶಿಕ್ಷಕನು | ||
| + | ಕಲಿಕಾ ಫಲವನ್ನು ರಚಿಸುವಾಗ,ತತಕ್ಷಣದ | ||
| + | ಜ್ನನಕ್ಕೆ ಒತ್ತುಕೊಡದೆ. | ||
| + | ೨೦ | ||
| + | ವರ್ಷಗಳ ನಂತರ , | ||
| + | ಭೋಧನೆಯ | ||
| + | ಯಾವ ಮುಖ್ಯಾಂಶಗಳು ಕಲಿಕಾರ್ಥಿಯಲ್ಲಿ | ||
| + | ಉಳಿದಿರಬೇಕು ಎ೦ಬುದರ ಬಗ್ಗೆ | ||
| + | ಖಚಿತತೆ ಇರಬೇಕು | ||
| − | + | ಕೌಶಲ್ಯ | |
| − | + | ಕಲಿಕೆ: | |
| − | + | ಕೌಶಲ್ಯ | |
| − | + | ವೆಂದರೆ, | |
| − | + | ಭಾಷೆ | |
| − | + | ಮನೋ-ದೈಹಿಕ, | |
| − | + | ಜ್ನಾನಾತ್ಮಕ | |
| − | + | ,ಸಾಮಾಜಿಕ | |
| − | + | ಸಾಮರ್ಥ್ಯೆಗಳನ್ನು ಕಲಿಕಾ | |
| − | + | ಅವಧಿಯಲ್ಲಿಗಳಿಸುವುದು ಎ೦ದರ್ಥ. | |
| − | + | ಕೌಶಲ್ಯಗಳು | |
| − | + | ನೇರವಾಗಿ ಪಠ್ಯಕ್ಕೆ ಸಂಬಂದಿಸಿರಬಹುದು. | |
| − | + | ಇವುಗಳನ್ನು | |
| − | + | ಇಲ್ಲಿ ಪರಿಕಲ್ಪನೆ ಜ್ನಾನ ಅಥವ | |
| − | + | ಪಠ್ಯಾಜ್ನಾನದ ಅನ್ವಯಗಳೆಂದು | |
| − | + | ಕರೆಯಬಹುದು ಉದಾ: | |
| − | + | ಒಂದು | |
| − | + | ಡೈನೋವನ್ನು ತಯಾರಿಕೆ ಅಥವಾ | |
| − | + | ವಿದ್ಯುತ್ ದೀಪವನ್ನು jಜೋಡಿಸುವುದಾಗಲಿ | |
| − | + | ಅಥವ ಪ್ರಯೋಗದ ಫಲಿತಾಂಶಗಳನ್ನು | |
| − | + | ನೇರವಾಗಿ ದಾಖಲಿಸುವುದಾಗಲಿ,ಇವೆಲ್ಲವು | |
| − | + | ನೇರವಾಗಿ ಪಠ್ಯಕ್ಕೆ ಸಂಬಂಧಿಸಿದ | |
| + | ಕೌಶಲಗಳಾಗಿವೆ. | ||
| − | + | ಆದರೆ | |
| − | + | ಪ್ರತಿಯೂಂದು ಘಟಕವು ಇಷ್ಟೆ | |
| + | ಅಲ್ಲದೆ,ಇನ್ನೊ | ||
| + | ಹೆಚ್ಚಿನ ಕೌಶಲಗಳನ್ನು ಹೊಂದಿದ್ದು, | ||
| + | ಅವುಗಳನ್ನು | ||
| + | ಬೆಳಸಬೇಕಿದೆ. | ||
| − | + | ಉದಾ:ವಿದ್ಯುತ | |
| + | ದೀಪದ ಬಳಕೆಯಲ್ಲಿನ ಮುನ್ನಚ್ಚರಿಕೆಗಳು, | ||
| + | ಹಾಗೊ | ||
| + | ಪ್ರಯೋಗಗಳನ್ನು ನಡೆಸುವಾಗ | ||
| + | ತೆಗೆದುಕೋಳಬೇಕಾದ ಮುಂಜಾಗ್ರತಾ | ||
| + | ಕ್ರಮಗಳು ಮತ್ತು ನುಖರವಾದ | ||
| + | ಅಳತೆಯನ್ನು ದಾಖಲುಮಾಡಿಕೋಳೂವುದು, | ||
| − | + | ಜ್ನನ | |
| − | + | ಕಲಿಕೆ: | |
| + | ಜ್ನಾನವು | ||
| + | ನಿರ್ದಿಷ್ಟ ವ್ಯಾಖ್ಯೆಗಳು,ಸಿದ್ಧಾಂತಗಳು, | ||
| + | ಸತ್ಯಾಸಂಗತಿಗಳನ್ನು | ||
| + | ಒಳಗೊಂಡಿರುತ್ತದೆ. | ||
| − | |||
| − | |||
| − | + | ಚಟುವಟಿಕೆ/ಮೌಲ್ಯಮಾಪನ: | |
| − | + | ಚಟುವಟಿಕೆಯು | |
| − | + | ಉಪಘಟಕ ಮತ್ತು ತರಗತಿಯ ಆಧಾರದ | |
| − | + | ಮೇಲೆ ನಿರ್ದಾರಿತವಾಗಿದ್ದು,ಶಿಕ್ಷಕನಿಗೆ, | |
| − | + | ಬೋಧನಾ-ಕಲಿಕಾ | |
| − | + | ಪ್ರಕ್ರಿಯೆಯಲ್ಲಿ ಅನುಕೊಲ | |
| − | + | ಕಲ್ಪಿಸುತ್ತದೆ. | |
| − | + | ಸಂಪನ್ಮೊಲ | |
| − | + | ಸಾಹಿತ್ಯವು ಮೌಲ್ಯಮಾಪನ | |
| − | + | ಪ್ರಶ್ನೆಗಳನ್ನು ಒಳಗೊಂಡಿದ್ದು, | |
| − | + | ಪಠ್ಯಸಾರದ | |
| − | + | hyperlinkಗಳನ್ನು | |
| − | + | ಒಳಗೊಂಡಿರುತ್ತದೆ. | |
| − | |||
| − | |||
| − | |||
| − | + | ಸಂಪನ್ಮೊಲ | |
| − | + | ಸಾಹಿತ್ಯ: | |
| + | ಸಂಪನ್ಮೊಲ | ||
| + | ಸಾಹಿತ್ಯವು ಪ್ರಕಲ್ಪನಾ ನಕ್ಷೆ | ||
| + | ಮತ್ತು ಪಠ್ಯಸಾರವನ್ನು | ||
| + | ಒಳಗೋಂಡಿರುತ್ತದೆ. | ||
| + | ಇದರ | ||
| + | ಜೋತೆಗೆ ಪಠ್ಯವನ್ನು ಸಮಗ್ರವಾಗಿ | ||
| + | ಅರ್ಥೈಸಿಕೊಂಡು ಬೋಧನೆಯನ್ನು | ||
| + | ಸುಗಮವಾಗಿಸಲು ಅಗತ್ಯವಾದ | ||
| + | ಸಾಹಿತ್ಯವನ್ನು ಒಳಗೊಂಡಿರುತ್ತದೆ | ||
| + | . ಹಿನ್ನೆಲೆ | ||
| + | ಸಾಹಿತ್ಯವು, | ||
| + | ಶಾಲಾ | ||
| + | ಶಿಕ್ಷಣಕ್ಕೆ ಅಗತ್ಯವಾದ | ||
| + | ಪಠ್ಯಕ್ರಮದ ನಿರ್ದಿಷ್ಟಗಳನ್ನು | ||
| + | ಒಳಗೊಂಡಿರುವುದಲ್ಲದೆ, | ||
| + | ಕೇವಲ | ||
| + | ಪಠ್ಯವಸ್ತು ಮಾತ್ರವಲ್ಲ . | ||
| + | ಪಠ್ಯದ | ||
| + | ಎಲ್ಲಾ ಚಟುವಟಿಕೆಗಳು ಹಾಗೊ | ||
| + | ಮೌಲ್ಯಮಾಪನದ ಪ್ರಶ್ನೆಗಳನ್ನು | ||
| + | ಹಿನ್ನೆಲೆ ಸಹಿತ್ಯಾವು | ||
| + | ಒಳಗೊಂಡಿರಬೇಕು. | ||
| + | ಪಠ್ಯಗುರಿಗಳು | ||
| + | ಇವು ಕಲಿವಿನ ಫಲವನ್ನು ನಿರ್ದರಿಸುತ್ತವೆ | ||
| + | . ಇದು | ||
| + | ಕೇವಲ ಸೀಮಿತವಾಗದೆ. | ||
| + | ವಿಷಯದ | ||
| + | ಪರಿಪೋರ್ಣ ಗ್ರಹಿಕೆಗೆ ಸಹಾಯಕವಾಗುತ್ತದೆ. | ||
| − | |||
| − | |||
| − | + | ಹಿನ್ನೆಲೆ | |
| − | + | ಸಾಹಿತ್ಯಾ:ಇದನ್ನು | |
| − | + | ಶಿಕ್ಷಕರಿಗಾಗಿ ಸಿದ್ಡಪಡಿಸಲಾಗಿದ್ದು,ಶಿಕ್ಷಕನಾಗಿ | |
| − | + | ನಾನು ತಿಳಿದಿರಬೇಕು, | |
| − | + | ಒಂದು | |
| − | + | ವಿಷಯವನ್ನು ಯಾವ ಸರಿಯಾದ ರೀತಿಯಲ್ಲಿ | |
| + | ಪ್ರಸ್ತುತ ಪಡಿಸಿದರೆ, | ||
| + | ವಿದ್ಯಾರ್ಥಿಗಳಲ್ಲಿ | ||
| + | ಉತ್ತಮ ಕಲಿಕೆಯುಂಟಾಗುತ್ತದೆ | ||
| + | ಎ೦ಬುದರ ಚಿತ್ರಣ ದೊರುಕಬೇಕು. | ||
| + | ಎದು | ||
| + | ಒಂದು ವಿಶಯದ ಉಪಘಟಕಗಳನ್ನು , | ||
| + | ಮು | ||
| + | ಖ್ಯ ಪದಗಳು ಎತ್ಯಾದಿಗಳ ಬಗ್ಗೆ | ||
| + | ಸರಳವಾಗಿ , | ||
| + | ನಿಖರವಾಗಿ | ||
| + | ಮಾಹಿತಿಯನ್ನು ಒಳಗೊಂಡಿದ್ದು | ||
| + | ಹೆಚ್ಚಿನ ಸಂಪನ್ಮೊಲ ಸಮಾಗ್ರಿಯ | ||
| + | ಮಾಹಿತಿಯಿರ ಬೇಕು | ||
| − | |||
| − | |||
| − | + | ಚಟುವಟಿಕೆ | |
| − | + | ಮತ್ತು ಮೌಲ್ಯಮಾಪನ: | |
| − | + | ಸಂಪನ್ಮೊಲ | |
| − | + | ಸಹಿತ್ಯದ ಕೊನೆಯಲ್ಲಿ ಚಟುವಟಿಕೆಗಳಿದ್ದು, | |
| − | + | ಅದರಲ್ಲಿ | |
| − | + | ಚಟುವಟಿಕೆಗಳು simulations | |
| + | ವಿಡಿಯೋ | ||
| + | ಪ್ರದರ್ಶನದ ನಂತರ discussion | ||
| + | ಒಳಗೊಂಡಿರುತ್ತದೆ. | ||
| + | ಇದು | ||
| + | ಶಿಕ್ಷಕ ಮತ್ತು ವಿದ್ಯಾಥ್ಿ ಗಳ | ||
| + | ನಡುವೆ ಪರಸ್ಪರ discussion | ||
| + | ಅವಕಾಶ | ||
| + | ಕಲ್ಪಿಸಿ ವಿಷಯ ಗ್ರಹಿಕೆಗೆ | ||
| + | ಅನುಕೂಲವಾಗುವಂತೆ ಮೌಲ್ಯಮಾಪನ | ||
| + | ಪ್ರಶ್ನೆಗಳನ್ನು ಹೊಂದಿರಬೇಕು. | ||
| − | |||
| − | |||
| − | + | = Computer Literacy = | |
| − | |||
| − | |||
| − | + | == What is public Software == | |
| − | |||
| − | |||
| − | + | As | |
| − | + | our society becomes more and more digital, software, which is the | |
| − | + | 'building brick' of the digital society, becomes necessary for all. | |
| − | + | Basic software that is necessary for participating in the digital | |
| − | + | society needs to be provided to everyone as an universal right and | |
| − | + | entitlement should be seen as publicly owned software or '''Public | |
| − | + | software'''. As in the case of '''public education '''or public | |
| − | + | health, '''public institutions/ Governments''' are responsible to | |
| − | + | ensure that '''publicly owned software '''is available. This would | |
| − | + | ensure universal access to public software and also support public | |
| + | participation in its creation and sharing. | ||
| − | + | Just | |
| − | + | like government schools are open to all without discrimination (not | |
| + | necessary for private schools have many restrictions like fees, | ||
| + | parents background etc. ), public software is accessible to all | ||
| + | without discrimination while private software (also called | ||
| + | proprietary software) has restrictions where the user has to buy a | ||
| + | license to only use and cannot modify or share the software. Also | ||
| + | just like community has right to participate in government schools | ||
| + | (limited rights for parents in private schools) most public software | ||
| + | is community created (while in case of private software, the vendor | ||
| + | retains the important ownership rights). | ||
| − | + | Software | |
| − | + | required by all includes operating system, text / image / audio / | |
| + | video editors, email, web browser, search engine etc. Public software | ||
| + | needs to be [[free software]], providing the freedom to use, study, modify and share, | ||
| + | to ensure universal access as well as participation in its creation | ||
| + | and modification. | ||
| − | + | See | |
| − | + | [[http://public-software.in/FOSS-applications]] | |
| + | for a list of public software applications for general use of all | ||
| + | and also another list of public educational software tools for | ||
| + | teachers. | ||
| − | + | == What is GNU/Linux? == | |
| − | |||
| − | |||
| − | + | GNU | |
| − | + | Linux is a free and open source operating system software and hence | |
| + | is public software. Since the operating system is the basic software | ||
| + | that “runs your computer”, it needs to be available freely to | ||
| + | all, to ensure universal access. Free Software users always have the | ||
| + | freedom to share software, without restrictions. On a technical | ||
| + | level, Free Software guarantees the right to view and also modify | ||
| + | source code, or even use it as a basis to make a new program. This | ||
| + | has enabled Kannadigas to make Kannada version of Ubuntu GNU/Linux | ||
| + | system for benefit of Kannadigas. | ||
| − | + | == What is Ubuntu? == | |
| − | |||
| − | |||
| − | + | Ubuntu | |
| − | + | is a version of the GNU/Linux operating system. Ubuntu is a | |
| − | + | thoroughly modern operating system that provides you might find in | |
| − | + | Windows or Macintosh OS X, but without the drawbacks. It is quite | |
| − | + | simple, yet offers sophisticated features. | |
| − | |||
| − | + | Hardware | |
| − | + | support is excellent, with virtually every item of day-to-day | |
| + | hardware supported, including graphics/sound cards, printers, | ||
| + | wireless, USB memory sticks, cameras, iPods, and so-on. There’s no | ||
| + | need to fumble around with driver CD : practically everything will be | ||
| + | up and running straight after installation, although as with any | ||
| + | operating system you may have to configure the system to your own | ||
| + | needs. Ubuntu provides free upgrades every six months (april and | ||
| + | october) which means frequent improvements in its features. | ||
| − | + | == How to use Ubuntu == | |
| − | |||
| − | |||
| − | + | '''<u>Logging</u><u> | |
| − | + | in</u> :''' | |
| − | + | The | |
| − | + | first thing you’ll see, after the computer has finished its | |
| + | self-testing, is a boot menu. This lets you choose between Ubuntu and | ||
| + | Windows. The next thing you will see, after Ubuntu has finished the | ||
| + | first stage of booting, is the login screen. Simply click on your | ||
| + | username, type the password and hit Enter. Assuming both details are | ||
| + | correct, booting will finish, and the desktop will appear. | ||
| − | + | <u>'''The | |
| − | + | Desktop Layout '''</u> | |
| − | + | <u>'''Panels'''</u> : The two panels are visible | |
| − | + | —one at the top of the screen, and one at the bottom. The one at | |
| + | the top is concerned with presenting information, starting programs, | ||
| + | and configuring the system. | ||
| − | + | The | |
| − | + | panel at the bottom is where programs minimize to, and this panel | |
| + | also includes a Show Desktop button (left), a trash icon (right), and | ||
| + | a virtual desktop selector (right; of which more later). Files can be | ||
| + | dragged and dropped onto the trash icon, and clicking it lets you | ||
| + | view and empty the trash contents. | ||
| − | + | [[Image:Resource%20Book_html_m1fe6e117.png]]<u>'''Main | |
| − | + | menus '''</u> | |
| − | + | The | |
| − | + | three menus at the top of the screen (Applications, Places, System) | |
| + | are known as the main menus. They stay on-screen all the time. When | ||
| + | an application starts, its own menus appear within its program window | ||
| + | beneath. | ||
| − | + | The | |
| − | + | ''<u>'''Applications'''</u>'' menu at the top left provides | |
| + | access to software installed on the system. | ||
| − | + | The | |
| − | + | ''<u>'''Places'''</u>'' menu, alongside it, offers quick access | |
| + | to locations within the file system, or attached storage such as USB | ||
| + | memory sticks. Digital cameras and MP3 players are also listed here | ||
| + | when plugged-in. | ||
| − | + | The | |
| − | + | ''<u>'''System'''</u>'' menu, alongside the Places menu, offers | |
| + | control over your computer’s settings. It has two sub-menus, as | ||
| + | follows: | ||
| − | + | '''''Preferences:''''' | |
| − | + | This menu mostly lets you tweak settings relating to your particular | |
| + | user account and the operation of the desktop. You can also alter | ||
| + | some hardware settings, such as the screen resolution, but only those | ||
| + | that relate to your personal desktop configuration. | ||
| − | + | '''''Administration'''''''':''' | |
| − | + | This menu offers system-wide hardware configuration options, such as | |
| + | altering the time/date, and options for configuring the underlying | ||
| + | Ubuntu system, such as adding/removing software. | ||
| − | + | <u>'''Rebooting | |
| − | + | and shutting down'''</u> | |
| − | + | To | |
| − | + | shut-down or reboot the computer, click the Shut Down entry on the | |
| + | System menu (under Ubuntu 12.04, select the Quit entry). Then select | ||
| + | the relevant option from the dialog box that appears. | ||
| − | + | === Managing Files and Folders === | |
| − | |||
| − | |||
| − | + | <u>'''Files'''</u> | |
| − | |||
| − | + | [[Image:Resource%20Book_html_712a04ef.png]]Files | |
| − | + | are the most basic unit of data that users can store on a disk. Every | |
| + | program, image, video, song, and document is stored as a file. | ||
| − | + | <u>'''Folder'''</u> | |
| − | |||
| − | + | A | |
| − | + | folder is a collection of multiple files. Folders can also store | |
| + | other folders called sub-folders. Folders are also called | ||
| + | "directories" | ||
| − | + | <u>'''File | |
| − | + | system'''</u> | |
| − | + | A | |
| − | + | file system is a method of storing and organizing computer files and | |
| + | their data. | ||
| − | + | <u>'''File | |
| − | + | Manager or File Browser'''</u> | |
| − | + | A | |
| − | + | file manager or file browser is a computer program that provides a | |
| − | + | user interface to work with file systems. The most common operations | |
| − | + | used are create, open, edit, view, print, play, rename, move, copy, | |
| − | + | delete, etc . Files are typically displayed in a hierarchy. Ubuntu | |
| − | + | uses a file manager/browser called Nautilus. File browser is used to | |
| − | + | * Create folders and documents | |
| − | + | * Display your files and folders | |
| + | |||
| + | * Search and manage your files | ||
| + | |||
| + | This | ||
| + | file manager lets you organize your files into folders. Folders can | ||
| + | contain files and may also contain other folders. Using folders can | ||
| + | help you find your files more easily. | ||
| − | + | '''File | |
| − | + | browser '''also | |
| + | manages the desktop. The desktop lies behind all other visible items | ||
| + | on your screen. The desktop is an active component of the way you use | ||
| + | your computer. | ||
| − | + | ||
| + | Every | ||
| + | user has a Home Folder. The Home Folder contains all of the user's | ||
| + | files. The desktop is another folder. The desktop contains special | ||
| + | icons allowing easy access to the users Home Folder, Trash, and also | ||
| + | removable media such as floppy disks, CDs and USB flashdrives. | ||
| + | |||
| + | '''File | ||
| + | browser '''is | ||
| + | always running. To open a new File browser window(see previous | ||
| + | figure), double-click | ||
| + | on an appropriate icon on the desktop such as Home or Computer, or | ||
| + | choose an item from on the top panel. | ||
| + | |||
| + | In | ||
| + | Ubuntu, many things are files, such as word processor documents, | ||
| + | spreadsheets, photos, movies, and music. | ||
| − | + | Lets | |
| − | + | see how to create a new folder in our home folder and save a text | |
| + | file in it. | ||
| + | Step | ||
| + | 1: Click on places → home folder | ||
| − | + | ||
| + | The | ||
| + | file browser will open. | ||
| − | + | Step | |
| + | 2: On the menu bar, Click on New → Create Folder, You'll see a new | ||
| + | folder with ''untitled ''''folder ''as its name, you can | ||
| + | overwrite it with any folder name that you want and press enter. | ||
| + | This will create a new folder in your home directory | ||
| + | |||
| + | |||
| + | Step | ||
| + | 3: Now, double-click on this new folder, it will open the new | ||
| + | folder. On the menu bar, Click on New → Create Document → Empty | ||
| + | file. You'll see a new file with ''new file ''as its name, you | ||
| + | can overwrite it with any file name that you want and press enter. | ||
| + | Double-click on the file and you can edit the text in the same. | ||
| + | |||
| − | == | + | === How to Connect external devices === |
| − | === | + | ==== Connecting the Printer ==== |
| − | + | [[Image:Resource%20Book_html_m16b905a3.png]] | |
| − | |||
| − | |||
| − | |||
| − | |||
| − | |||
| − | |||
| − | |||
| − | ''' | + | # [[Image:Resource%20Book_html_3976403.png]]Click on the power button |
| − | + | # Select '''Printers''' | |
| − | + | # Make sure you have connected the printer to your system. | |
| − | + | # Click on the '''Add '''button and follow the instructions. | |
| − | |||
| − | |||
| − | |||
| − | |||
| − | |||
| − | |||
| − | |||
| − | |||
| − | + | PS: | |
| − | + | The '''Displays''' | |
| − | + | and '''Printers '''options | |
| − | + | are also available when you click on Applications → System Tools → | |
| − | + | System Settings or by clicking on the power button and selecting | |
| + | '''System Settings'''Printer | ||
| − | + | ==== Connecting to ProjectorsClick on the power button ==== | |
| − | |||
| − | |||
| − | + | # Select '''Displays''' | |
| − | + | # In the window that opens, you will see the connected displays. To see the same thing in the monitor and the projector screen, click on the '''Mirror display''' check box. | |
| − | + | # If the configuration looks fine (display is fine on both screens), Click on the '''Apply''' button. Select the '''Keep this configuration '''option when asked for. | |
| − | |||
| − | |||
| − | |||
| − | + | [[Image:Resource%20Book_html_7ac77986.png]] | |
| − | |||
| − | + | ||
| − | |||
| − | |||
| − | |||
| − | |||
| − | |||
| − | |||
| − | |||
| − | |||
| − | |||
| − | |||
| − | |||
| − | |||
| − | |||
| − | |||
| − | + | ||
| − | |||
| − | |||
| − | |||
| − | |||
| − | |||
| − | |||
| − | + | ||
| + | |||
| + | |||
| − | |||
| − | |||
| − | |||
| − | |||
| − | |||
| − | |||
| − | |||
| − | |||
| − | |||
| − | |||
| − | |||
| − | + | ||
| − | |||
| − | |||
| − | |||
| − | |||
| − | |||
| − | |||
| − | |||
| − | |||
| − | |||
| − | |||
| − | |||
| − | |||
| − | |||
| − | |||
| − | |||
| − | |||
| − | |||
| − | |||
| − | |||
| − | |||
| − | |||
| − | |||
| − | |||
| − | |||
| − | |||
| − | |||
| − | |||
| − | + | ==== Pen Drive ==== | |
| − | + | ||
| − | + | To | |
| − | + | make the pen drive work: | |
| − | |||
| − | + | * Connect the pen drive to the USB port. | |
| − | + | * Go to Ubuntu Menu '''Places > Home Folder ''' | |
| − | + | * You can access the pen drive from here | |
| − | + | ||
| − | + | ==== Burning a CD/DVD ==== | |
| − | + | ||
| − | + | To | |
| + | Burn a DVD/CD: | ||
| − | + | * Go to Ubuntu Menu '''Applications > Sound and Video > K3b''' | |
| − | + | * Follow instructions from here to create Data/Audio or Video CD/DVD. | |
| − | + | * You must have a CD/DVD Writer on your computer. | |
| − | + | ||
| − | + | == To install a new software in Edubuntu 12.04 == | |
| − | + | ||
| + | Edubuntu 12.04 uses Ubuntu software center (an | ||
| + | application to install and manage software) instead of traditional | ||
| + | synaptic package manager (Page 12 of your module describes the use of | ||
| + | Synaptic package manager which is used in the older versions of | ||
| + | Ubuntu and Edubuntu). | ||
| − | + | '''Click on Applications -> Ubuntu Software Center''' | |
| − | |||
| − | ''' | ||
| − | |||
| − | |||
| − | |||
| − | |||
| − | |||
| − | |||
| − | |||
| − | |||
| − | |||
| − | + | In the search box (on the top right corner of the | |
| − | + | window), Enter the name of the application and press enter. In the | |
| − | + | list click on the required application and then on the '''install''' | |
| − | + | button. | |
| − | + | ||
| − | + | [[File:Ubuntusofy-twarecenter.png | 500px]] | |
| − | |||
| − | |||
| − | |||
| − | |||
| + | == Open Office == | ||
| − | + | OpenOffice (same as LibreOffice) is a public software | |
| − | + | useful for making documents, spreadsheets and presentation files. | |
| − | + | OpenOffice Writer is very similar to MS Word. OpenOffice Calc is | |
| − | + | similar to Excel. OpenOffice Impress is like MS Powerpoint. | |
| − | + | OpenOffice works on both Windows and Ubuntu. | |
| − | + | Using OpenOffice writer, you can type reports, | |
| − | + | documents, edit them, format them well and save them in many document | |
| − | + | formats - .odt, .html, .doc (.xls, .ppt) , .docx (.xlsx, .pptx) etc. | |
| + | It also has an 'export to PDF' option for making PDF document with a | ||
| + | single click. | ||
| − | + | Department of Information Technology, Government of | |
| − | + | India has recommended the ODF format used in OpenOffice/LibreOffice | |
| − | + | as the standard for documents used in government. | |
| − | |||
| − | |||
| − | <u>''' | + | === Activity 1 === |
| − | '''</u> | + | |
| − | + | <u>'''Purpose'''</u> | |
| − | |||
| − | |||
| − | |||
| − | <u>''' | + | To |
| − | '''</u> | + | write a document using Open Office Writer |
| − | + | ||
| + | |||
| + | <u>'''Process'''</u> | ||
| − | = | + | # [[Image:Resource%20Book_html_279ff2d9.png]]Select '''Application > Office > OpenOffice.org Word Processor''' |
| + | # Type the following Passage into the Open Office Writer {| border="1" |- | '''What is Public Software''' Software developed for public service, and especially in government, has a unique context and objectives deriving from those of public service; with its imperative of providing public goods and ensuring equity and social justice. |} | ||
| + | # You can try the following option to format the text | ||
| + | ## Bold the heading | ||
| + | ## Make the heading centred | ||
| + | # | ||
| + | # Select Menu Option '''File > Save As '''to save the file, name the file About-Public-Software | ||
| + | # A file called ''About-Public-Software.odt'' will be created in your folder '''''Documents'''''. | ||
| + | |||
| + | === Activity 2 === | ||
| − | + | <u>'''Purpose'''</u> | |
| − | |||
| − | |||
| − | |||
| − | |||
| − | |||
| − | |||
| − | |||
| − | |||
| − | + | To | |
| + | create a table in Open Office Word Processor | ||
| + | |||
| − | + | <u>'''Process'''</u> | |
| − | |||
| − | |||
| − | |||
| − | |||
| − | + | # Select Application > Office > OpenOffice.org Word Processor | |
| + | # Select Menu Option '''File''' > '''Open''' (Ctrl +O) | ||
| + | # Open File About-Public Software.odt | ||
| + | # [[Image:Resource%20Book_html_m2a6f49db.png]]Select Menu Option '''Table > Insert >Table''' | ||
| + | # Insert a Table | ||
| + | # Select Columns = 3 Rows = 5 and Press Okay | ||
| + | # Enter the following data from the table below | ||
| + | # Save the file. | ||
| − | |||
| − | |||
| − | |||
| − | |||
This | This | ||
| − | + | is how the table will look. | |
| − | + | ||
| − | + | ||
| + | {| border="1" | ||
| + | |- | ||
| + | | | ||
| + | Questions | ||
| + | About Public Software | ||
| − | + | | | |
| + | Number | ||
| + | of Participants who are aware | ||
| + | |||
| − | + | | | |
| − | + | Number | |
| − | + | of People not aware | |
| − | |||
| − | |||
| − | + | |- | |
| + | | | ||
| + | What | ||
| + | is Public Software | ||
| + | |||
| − | + | | | |
| − | + | 15 | |
| − | |||
| − | |||
| − | |||
| − | |||
| − | |||
| − | + | | | |
| − | + | 5 | |
| − | + | |- | |
| − | + | | | |
| − | + | What | |
| + | is Open Office | ||
| + | |||
| − | + | | | |
| − | + | 12 | |
| − | |||
| − | + | | | |
| + | 8 | ||
| + | |||
| − | + | |- | |
| + | | | ||
| + | What | ||
| + | is Ubuntu | ||
| + | |||
| − | + | | | |
| − | + | 6 | |
| − | |||
| − | |||
| − | |||
| − | |||
| − | |||
| − | + | | | |
| + | 14 | ||
| + | |||
| − | + | |- | |
| − | + | | | |
| − | + | What | |
| − | + | is Computer Aided Learning | |
| − | |||
| − | |||
| − | + | | | |
| + | 4 | ||
| + | |||
| − | + | | | |
| − | + | 16 | |
| − | |||
| − | |||
| − | |||
| − | |||
| − | |||
| − | |||
| − | == | + | |} |
| + | === Peer review using OpenOffice === | ||
| − | + | For | |
| − | + | peer review of our resources, it is very useful to use the 'record | |
| + | changes' in OpenOffice. This helps us to make changes in a document | ||
| + | and also the changes can be automatically accepted '''WITHOUT''' | ||
| + | retyping the corrections. It saves a lot of time and also becomes a | ||
| + | digital record of peer review. | ||
| − | + | [[Image:Resource%20Book_html_m49374103.png]]To | |
| − | + | record changes, click on 'Edit – Changes' and check / tick the | |
| − | + | Record option. The Show option should also be checked/ticked | |
| − | |||
| − | |||
| − | |||
| − | |||
| − | |||
| − | |||
| − | |||
| − | |||
| − | |||
| − | |||
| − | |||
| − | |||
| − | + | Now | |
| − | + | any correction or change or deletion in the document will be shown | |
| − | + | separately in colour. The editor can make all changes in this way. | |
| − | + | More than one person can make changes to same document. The name of | |
| − | + | the editor will be shown when we move the cursor over the change. | |
| − | + | ||
| − | + | ||
| − | . | + | When |
| + | the author receives the document, she can 'accept' or 'reject' each | ||
| + | change by right-clicking on the change. To accept all changes, author | ||
| + | can click on 'Edit – Changes – Accept or Reject' . See image | ||
| + | below. | ||
| − | + | ''<u>Please use 'RECORD CHANGES' option to give your | |
| − | + | feedback on documents shared by other teachers in the Subject | |
| − | + | Teachers Forum, this makes sharing feedback and making required | |
| − | + | changes easy/automatic.</u>'' | |
| − | |||
| − | |||
| − | |||
| − | |||
| − | |||
| − | |||
| − | |||
| − | |||
| − | |||
| − | |||
| − | |||
| − | + | === Automatic Table of contents === | |
| − | + | ||
| − | + | OpenOffice | |
| − | + | can help you create table of contents, with page numbers, | |
| − | + | automatically. | |
| − | |||
| − | |||
| − | |||
| − | |||
| − | |||
| − | |||
| − | |||
| − | |||
| − | |||
| − | |||
| − | |||
| − | |||
| − | |||
| − | |||
| − | |||
| − | |||
| − | |||
| − | |||
| − | |||
| − | |||
| − | |||
| − | |||
| − | |||
| − | |||
| − | |||
| − | |||
| − | |||
| − | + | To | |
| − | + | do this, select / mark a heading in your document and then select the | |
| + | 'Heading 1' in top left corner in the formatting tool bar (usually | ||
| + | will be Text body or Default'). This will make that selected text, as | ||
| + | a 'Heading 1'. You can use Heading 2 for the next sub heading, | ||
| + | heading 3 for the next sub heading etc. | ||
| + | When | ||
| + | finished, you can go to the beginning of the document and click | ||
| + | 'Insert – Indexes and Tables - Indexes and Tables' to insert a | ||
| + | Table of Contents. | ||
| + | |||
| + | [[Image:Resource%20Book_html_789e625f.png]]If | ||
| + | you make any changes to the document headings, you can go to the | ||
| + | Table of Contents created, right click and select 'Update | ||
| + | Index/table'. See image above. | ||
| + | |||
| + | == Kannada in Edubuntu == | ||
| + | |||
| + | <u>'''Writing | ||
| + | Kannada Documents'''</u> | ||
| − | + | * Please use <u>only</u> UNICODE font - '''Lohit Kannada. '''It is already installed in Ubuntu, you have to install it in Windows. | |
| − | + | * All nudi fonts are <u>not </u>unicode, and '''UNICODE''' is the international and universal open standard that is being used. | |
| − | + | ||
| − | + | <u>'''Reading | |
| + | Kannada Documents'''</u> | ||
| − | + | * If you are not able to read Kannada documents , it is because the font is not installed, you will have to install the font, see the frequently asked questions link in the last section. | |
| − | + | ||
| − | + | {| border="1" | |
| + | |- | ||
| + | | | ||
| + | Operating | ||
| + | System | ||
| − | + | | | |
| − | + | Software | |
| − | |||
| − | + | | | |
| − | + | Font | |
| − | |||
| − | |||
| − | |||
| − | |||
| − | |||
| − | |||
| − | |||
| − | |||
| − | |||
| − | |||
| − | + | | | |
| − | + | Keyboard | |
| − | + | Mapping | |
| − | + | ||
| − | + | ||
| − | + | |- | |
| − | + | | | |
| − | + | Ubuntu | |
| − | + | ||
| + | |||
| + | | | ||
| + | IBus | ||
| + | |||
| + | |||
| + | | | ||
| + | '''Unicode'''- | ||
| + | Lohit Kannada | ||
| + | |||
| + | |||
| + | | | ||
| + | Kn-kgp – Nudi | ||
| + | kn-itrans – Baraha | ||
| + | |||
| + | kn-Inscript-Kannada | ||
| + | Keyboard | ||
| + | |||
| + | |- | ||
| + | | | ||
| + | Windows | ||
| − | + | | | |
| − | + | Nudi | |
| − | + | ||
| − | + | ||
| − | + | | | |
| − | + | ASCII - Nudi | |
| − | + | ||
| − | + | ||
| − | + | Unicode- | |
| − | + | Lohit Kannada, Tunga | |
| − | + | ||
| − | + | ||
| − | + | | | |
| − | + | Nudi | |
| − | |||
| − | |||
| − | |||
| − | |||
| − | |||
| − | |||
| − | |||
| − | |||
| − | |||
| − | |||
| − | |||
| − | |||
| − | |||
| − | |||
| − | |||
| − | |||
| − | |||
| − | |||
| − | |||
| − | + | |} | |
| − | + | Please | |
| − | + | see the video 'Kannada typing using LibreOffice Writer' available in | |
| − | + | the Resources CD. | |
| − | |||
| − | |||
| − | |||
| − | |||
| − | |||
| − | |||
| − | |||
| − | |||
| − | |||
| − | |||
| − | |||
| − | |||
| − | |||
| − | |||
| − | |||
| − | |||
| − | |||
| − | |||
| − | |||
| − | + | We will be using a new method Ibus for making | |
| − | + | Kannada documents. (In the previous versions we used SCIM). Below are | |
| − | + | the steps to configure Ibus and use it. | |
| − | |||
| − | |||
| − | |||
| − | + | # [[Image:Resource%20Book_html_3976403.png]]Click on the power button | |
| − | + | # Select '''Startup Applications''' | |
| − | + | ||
| − | + | [[Image:Resource%20Book_html_m2093ca5f.png]]''Picture | |
| − | + | 1'' | |
| − | + | ||
| − | |||
| − | + | # A window as shown in the Picture 2 will open. Click on the Add button on the right panel. Another small window 'Add Startup Program' will open. Enter the following details. [[Image:Resource%20Book_html_4ad57276.png]]''Picture 2'' Name: IbusCommand : ibus-daemon (''Please note: enter everything here in small letters)'''''Comment : IBus Input method ''' | |
| − | |||
| − | |||
| − | |||
| − | |||
| − | |||
| − | |||
| + | ''' Click on Add button.''' | ||
| + | |||
| + | # Click on the same power button and select '''System Settings.''' | ||
| + | # In the window that opens, select '''Language Support. '''A small window saying that '''not all languages are installed '''will appear. Select '''remind me later.''' [[Image:Resource%20Book_html_4b1019e3.png]]''Picture 3'' # In the Keyboard input method system, select ''''Ibus' '''from the drop down menu. And click on '''Close''' | ||
| + | # Restart the computer. | ||
| + | # Now when the computer restarts you'll see a small keyboard icon on the top panel as shown in the picture below [[Image:Resource%20Book_html_m6eb18eb7.png]]''Picture 4'' # Click on the keyboard icon and select '''Preferences''' [[Image:Resource%20Book_html_5f67dbe9.png]]''Picture 5'' | ||
| + | # In the IBus preference window that opens, select the tab that says ''''Input Method'''' and Tick the '''customise active input method '''box. | ||
| + | # Click on the '''Select an Input Method '''list bar and Choose the language that you wish to create documents with. In our case, we will be selecting Kannada. The option Kannada will have 3 choices : Kn-kgp, Kn-itrans and Kn-inscript. Kn-kgp use nudi keyboard layout, Kn-itrans uses baraha or transliteration keyboard layout. Kn-inscript uses the standard typewriter keyboard. You can select any of them and click on the '''Add '''button. You could add more languages if you wish to. | ||
| + | # [[Image:Resource%20Book_html_45d5a618.png]]''Picture 6'' Now click on the '''keyboard '''icon on the top panel and select '''Restart'''. | ||
| + | # [[Image:Resource%20Book_html_4f180d48.png]]Open an input window like LibreOffice Writer. Configure for typing in Kannada (Refer to page 17 in your module). Press Ctrl and space and start typing in Kannada. You can toggle between the first language in the list (in the picture shown, it is Kannada -itrans) and English using Ctrl and space keys. If you wish to choose any other language click on the keyboard icon on the top panel and select the language from the list. '' Kn-itrans method can be chosen if you need to use the transliteration key map (Baraha Style). Kn-kgp can be used to input method using the Kannada Ganaka parishat key-map (Nudi style). '' | ||
| + | |||
| + | Please | ||
| + | note that only Arkavattu works a little different here ( Eg to type | ||
| + | surya, we need to press sUrfy, instead of the usual sUyF). | ||
| + | |||
| + | === Setting up Kannada Language in OpenOffice.org, Ubuntu and Windows === | ||
| + | |||
| + | <u>'''First'''</u> | ||
| − | + | # Click on system → administration → Language support | |
| − | + | # Choose scim-immodule in the input method box. | |
| − | + | # Log off and login again to see the effects. | |
| − | + | ||
| − | + | <u>'''Next,'''</u> | |
| − | |||
| − | |||
| − | |||
| − | |||
| − | |||
| − | |||
| − | |||
| − | |||
| + | |||
| + | # Open OpenOffice.org Word processor by clicking on Application → Office → OpenOffice.org Word processor | ||
| + | # Click on Tools → Options → Language settings → Languages | ||
| + | # Check '''Enabled for Complex Text Layout(CTL)''' and Choose Kannada in '''Default languages for Documents (CTL)''' | ||
| + | # Click on OK | ||
| + | |||
| + | == Kannada Typing on Ubuntu in Kannada == | ||
| + | |||
| + | <u> '''ಉಬುಂಟು | ||
| + | ವಿನಲ್ಲಿ ಕನ್ನಡ ಟೈಪ್ ಮಾಡುವ | ||
| + | ವಿಧಾನ '''</u><u>''':'''</u> | ||
| − | |||
| − | + | * ಕನ್ನಡ ಟೈಪ್ ಮಾಡಲು ಯೂನಿಕೋಡ್ ಫಾಂಟ್ ಗಳನ್ನೇ ಬಳಸಿರಿ, | |
| − | + | ||
| − | + | '''''ಲೋಹಿತ್ | |
| − | + | ಕನ್ನಡ '''''ಒಂದು | |
| − | + | ಯೂನಿಕೋಡ್ ಫಾಂಟ್. | |
| − | + | ಇದು | |
| − | + | '''ಉಬುಂಟು''' ವಿನಲ್ಲಿ | |
| − | + | ಈಗಾಗಲೇ | |
| − | |||
| − | |||
| − | |||
| − | |||
| − | |||
| − | |||
| − | |||
| − | |||
| − | |||
| − | |||
| − | |||
| − | |||
| − | |||
| − | |||
| − | |||
| − | |||
| − | |||
| − | |||
| − | |||
| − | |||
| − | |||
| − | |||
| − | + | ಪ್ರತಿಷ್ಠಾಪಿಸಲ್ಪಟ್ಟಿದೆ. | |
| − | |||
| − | + | * ಎಲ್ಲಾ ನುಡಿ ಫಾಂಟ್ ಗಳು ಯೂನಿಕೋಡ್ ಫಾಂಟ್ ಗಳಲ್ಲ. '''<u>ಓಪನ್ ಆಫೀಸ್ ನಲ್ಲಿ ಕನ್ನಡಭಾಷೆಯನ್ನು ಅಣಿಗೊಳಿಸುವ ವಿಧಾನ</u>'''''':''' ಈ ಮುಂದೆ ಸೂಚಿಸುವಂತೆ ಕ್ಲಿಕ್ ಮಾಡುತ್ತಾ ಹೋಗಿರಿ. | |
| − | + | * '''System > Administration > Language support.''' | |
| − | + | * '''Input method''' ಬಾಕ್ಸ್ ನಲ್ಲಿ '''I-bus '''ನ್ನು ಆಯ್ಕೆ ಮಾಡಿರಿ. | |
| − | + | * ಲಾಗ್ ಆಫ್ ಮಾಡಿ ಮತ್ತೆ ಲಾಗ್ ಇನ್ ಆಗಿರಿ. | |
| − | + | * '''Application > Office > Open office.org''' ಮೂಲಕ '''Open office.org Word''' ಅಥವಾ '''Writer''' ಪುಟವನ್ನು ಆಯ್ಕೆ ಮಾಡಿರಿ. | |
| − | + | * ನಂತರ '''Tools > options > Language setting '''ಗೆ ಹೋಗಿ ಅದರ ಎಡಭಾಗದ ಬಾಕ್ಸ್ ನಲ್ಲಿರುವ '''+''' ಅಥವಾ '''>''' ನ್ನು ಒತ್ತಿರಿ, ಒತ್ತಿದೊಡನೆ ಕೆಳಗೆ ಗೋಚರಿಸುವ '''Languages''' ನ್ನು ಕ್ಲಿಕ್ಕಿಸಿ. | |
| − | + | * ನಂತರ ಬಲಭಾಗದಲ್ಲಿ ಗೋಚರಿಸುವ '''Enhanced Language support '''ನ ಕೆಳಕಾಣಿಸುವ '''Enabled for Complex Text Layout''' ನ್ನು ಟಿಕ್ ಮಾಡಿ, ನಂತರ ಮೇಲೆ ಕಾಣುವ '''CTL''' ನ ಎದುರಿರುವ ಜಾಗದ '''Default language''' ಜಾಗದಲ್ಲಿ '''kannada''' ಆಯ್ಕೆ ಮಾಡಿರಿ. '''OK''' ಮಾಡಿರಿ. | |
| − | + | * '''Open office.org Word''' ಅಥವಾ '''Writer''' ಪುಟಕ್ಕೆ ವಾಪಾಸು ಬನ್ನಿರಿ. '''Ctrl + Space bar '''ಕೀ ಒತ್ತಿದಾಗ ಸ್ಕ್ರೀನ್ ನ ಬಲತುದಿಯಲ್ಲಿ ಮೇಲೇಳುವ ಭಾಷೆಗಳ ಪಟ್ಟಿಯಲ್ಲಿ '''kannada'''ಕ್ಕೆ ಹೋಗಿ '''Kn-Kgp''' ಆಯ್ಕೆ ಮಾಡಿರಿ. '''ಆಗ ಕನ್ನಡ ಟೈಪ್ ಮಾಡಲು ಸಾಧ್ಯವಾಗುವುದು ''''''.'''ಅದೇ ಪುಟದಲ್ಲಿ ಮತ್ತೆ '''Ctrl + Space bar '''ಕೀ ಒತ್ತಿದಾಗ '''English''' ಟೈಪ್ ಮಾಡಬಹುದು. '''Ctrl + Space bar '''ಕೀ ಯನ್ನು ಇಚ್ಚಿತ ಭಾಷೆ ಆಯ್ಕೆಯ ಹೊಯ್ದಾಟದ ಕೀ ಯಂತೆ ಬಳಸಿರಿ. <u>'''ಕನ್ನಡ ಟೈಪ್ ಮಾಡಲು ಅಗತ್ಯವಾದ ಕೀಲಿ ಮಣೆ ವಿನ್ಯಾಸ''''''.'''</u> | |
| − | + | * [[Image:Resource%20Book_html_5f57ca84.gif]]CAPITAL ಅಕ್ಷರಗಳನ್ನು ಟೈಪಿಸಲು Shift ಅಥವಾ Caps Lock ಕೀ ಬಳಸಿರಿ. <u>'''ಒತ್ತಕ್ಷರಗಳನ್ನು ಟೈಪ್ ಮಾಡಲು ಸರಳ ವಿಧಾನ''''''.'''</u> | |
| − | + | * ಅಕ್ಷರ ಟೈಪ್ ಮಾಡಿರಿ, ಅದಕ್ಕೆ ಕೊಡಬೇಕಾದ ಒತ್ತನ್ನು '''f''' ಕೀ ಒತ್ತಿದ ನಂತರ ಒತ್ತಿರಿ. | |
| − | + | * ಉದಾ: ಉ '''ತ್ಕ '''ಟ = u '''t f k '''q. ಚೆ '''ಕ್''' = c e '''k f''' '''ಕೃ''' ತಿ = '''k R''' t I ಅ '''ರ್ಥ''' = a '''TF''' ರಾ'''ಷ್ಟ್ರ''' = r A '''x f q r ''' ಉ '''ತ್ಕೃ''' '''''ಷ್ಠ''''' = u '''t f k R''' '''''x f Q.''''' | |
| − | + | ||
| − | |||
| − | |||
| − | |||
| − | |||
| − | |||
| − | |||
| − | |||
| + | = Web Resources = | ||
| + | |||
| + | In | ||
| + | order to access the internet, please open the web browser Mozilla | ||
| + | Firefox. Go to Applications – Internet – Mozilla Firefox. | ||
| + | |||
| + | To | ||
| + | search for any topic of your choice, type [[www]][[.google.co.in]] | ||
| + | in the address bar. If you already know the name of the website, you | ||
| + | can type it in the address bar. For example, our website is | ||
| + | [[http://rmsa.karnatakaeducation.org.in]]. | ||
| + | |||
| + | (Please | ||
| + | make sure you are typing correctly; please do not make spelling | ||
| + | mistakes.). Please note: If you click on the 'kannada' option in the | ||
| + | above window, you can browse the web in Kannada. | ||
| − | + | [[Image:Resource%20Book_html_m4d3196a.jpg]] | |
| − | + | ||
| − | + | <u>'''Bookmarks'''</u> | |
| − | + | ||
| − | + | ||
| − | + | If | |
| − | + | you want to keep going to the same website again and again, you can | |
| − | + | add it to your bookmarks. This is a shortcut which will help you go | |
| − | + | to the site faster. | |
| − | |||
| − | |||
| − | |||
| − | |||
| − | |||
| − | |||
| − | |||
| + | To | ||
| + | do this, please see the menu options on the top left corner of your | ||
| + | browser. There will be an option called book marks. Please click on | ||
| + | it and click on 'bookmark this page'. Next time when you open your | ||
| + | browser, you can click on bookmarks and select the website instead of | ||
| + | typing it out. | ||
| + | |||
| + | <u>'''Copying | ||
| + | the website address '''</u> | ||
| + | |||
| + | If | ||
| + | you want to give the link of the website in your resource book, just | ||
| + | highlight the text of the page (which is in your address bar). Copy | ||
| + | the link and paste it in your document. | ||
| − | + | <u>'''Saving | |
| + | a web page '''</u> | ||
| + | |||
| − | + | If | |
| + | you want to save the contents of a webpage on your machine, in the | ||
| + | menu bar click on File – Save as (this is similar to how you save a | ||
| + | document. The only difference is that the file will be saved in .html | ||
| + | format and will be opened using the Firefox browser. | ||
| + | |||
| − | + | <u>'''Copying | |
| − | + | the contents of the webpage'''</u> | |
| − | ' | ||
| − | |||
| − | |||
| − | |||
| − | |||
| − | |||
| − | |||
| − | |||
| − | |||
| − | + | If | |
| − | like | + | you would like to copy the contents of the webpage, go to Edit – |
| − | + | Select All. Right click on the page, Select copy and then paste it on | |
| − | + | to the document. | |
| − | |||
| − | |||
| − | |||
| − | |||
| − | |||
| − | |||
| − | |||
| − | + | <u>'''Some | |
| − | + | useful websites: '''</u> | |
| − | |||
| − | |||
| − | |||
| − | |||
| − | + | [[http://rmsa.karnatakaeducation.org.in]] | |
| − | [[http:// | + | (RMSA's Subject teacher forums website where all your resources will |
| − | + | be available. | |
| − | |||
| − | |||
| − | + | [[www.kn.wikipedia.org]] | |
| − | + | (Kannada wikipedia) | |
| − | |||
| − | |||
| − | |||
| − | |||
| − | |||
| − | |||
| − | |||
| − | |||
| − | |||
| − | |||
| − | + | [[www.wikipedia.org]] | |
| + | (English Wikipedia) | ||
| + | |||
| − | + | [[www.khanacademy.org]] | |
| − | + | (Teaching Learning Videos) | |
| − | |||
| − | |||
| − | |||
| − | + | [[www.youtube.com]] | |
| − | + | (All Videos) | |
| − | |||
| − | |||
| − | |||
| − | |||
| − | |||
| − | |||
| − | |||
| − | + | [[www.kanaja.com]] | |
| − | |||
| − | |||
| − | |||
| − | + | [[www.gmail.com]] | |
| − | |||
| − | |||
| − | |||
| − | |||
| − | |||
| − | |||
| − | + | [[http://books.google.co.in/]] | |
| − | |||
| − | + | (Google | |
| − | + | books. You can find many books here on any subject of your choice) | |
| − | |||
| − | |||
| − | + | [[http://translate.google.com]] | |
| − | |||
| − | |||
| − | |||
| − | |||
| − | |||
| − | [[ | + | [[http://kannada.changathi.com/]] |
| − | |||
| − | + | == Email and mailing list == | |
| − | + | ||
| − | + | === How to create an email id === | |
| − | an | + | |
| − | + | To | |
| + | create an email id you can go to any of the following websites | ||
| − | + | [[www.gmail.com]] | |
| − | |||
| − | |||
| − | + | [[www.yahoomail.com]] | |
| − | |||
| − | |||
| − | |||
| − | |||
| − | + | [[www.rediffmail.com]] | |
| − | |||
| − | |||
| − | |||
| − | + | This | |
| − | + | handout will explain how to do this on [[www.gmail.com]] | |
| − | + | ||
| − | + | ||
| − | + | On | |
| + | the right side bottom of [[www.gmail.com]], | ||
| + | you will see the option 'Create a New Account'. | ||
| − | + | You | |
| − | + | will have to fill the next page that appears page to fill. (The | |
| − | + | picture on top is an example of the form that you have to fill.) | |
| − | + | Please fill it carefully. Make sure that you write down your username | |
| + | and password in a safe place so that you do not forget it. | ||
| − | + | The | |
| − | and | + | following step on gmail usually asks you to fill in your mobile |
| + | number. Once you do that, you will get an sms with a number in it. | ||
| + | Enter the number and then you are done. Your e-mail id is ready! | ||
| − | + | <u>'''How | |
| − | + | to email'''</u> | |
| − | |||
| − | |||
| − | + | # Open Mozilla Firefox. Type [[www.gmail.com]] (or other site where your mail is) in the address bar. | |
| + | # Enter your username and password CORRECTLY. | ||
| + | # To check your existing messages, go to Inbox. | ||
| + | # To compose a new message, go to 'Compose Mail'. These can be found on the left panel. | ||
| − | <u>''' | + | <u>'''The |
| + | Compose Mail Window'''</u> | ||
| − | + | The compose mail | |
| − | + | window will look like this. | |
| − | |||
| − | + | === Making a mailing list === | |
| − | |||
| − | + | State | |
| − | + | resource persons will give a list of the participants (after creating | |
| − | + | their email ids). This list should include the following data: | |
| − | |||
| − | + | # Name of participant | |
| − | + | # Block | |
| + | # District | ||
| + | # School | ||
| + | # Subject taught | ||
| + | # Classes taught | ||
| + | # Mobile Number | ||
| + | # Email Id | ||
| + | # Name of computer programme in the school | ||
| + | # Number of working computers | ||
| + | |||
| + | === Making a Google Group === | ||
| + | |||
| + | This | ||
| + | google group will help you keep in touch with all the participants | ||
| + | through email. All the participants email ids will be added to the | ||
| + | group and a group email list will be created. If you send a email to | ||
| + | this email list, it will go to all the teachers. | ||
| − | + | In | |
| − | + | order to make a google group, please go here: | |
| − | + | [[http://groups.google.com/]]. | |
| + | Click on the icon 'Create a group' . The next step is to put in your | ||
| + | username and password (please put same details as you put while | ||
| + | logging into your gmail). | ||
| − | + | Next | |
| − | + | step is to fill the form below. | |
| − | + | # Give a name for your group and create an email id (eg. [[bagalkotsciencestf@googlegroups.com]]). | |
| − | + | # Put a small description of what your group is about. | |
| − | + | # [[Image:Resource%20Book_html_7299073a.png]]Lastly tick the 'restricted' category so that only you can add members to the group.) After this, add all the participant email id in the next page and write an invitation message to welcome them to the group.Your google group is ready. To send all members a mail, please send it to [[bagalkotsciencestf@googlegroups.com]] (this is an example name). | |
| − | + | ||
| − | + | == Thunderbird Mail Client == | |
| − | + | ||
| + | * Thunderbird is a free, open-source, cross-platform application for managing email and news feeds. It is a local (rather than a web-based) email application that is powerful yet easy-to-use. | ||
| + | * Thunderbird is free. Also, it gives you control and ownership over your e-mail. | ||
| + | |||
| + | === Advantages of Using E-Mail Clients === | ||
| + | |||
| + | * First, using an email client can be a tremendous time-saver if you have multiple email accounts. | ||
| + | * If you want to check for new messages across all of your email addresses, then that means that you will have to log in to several different sites. | ||
| + | * Once you download and set-up an e-mail client like Outlook or Thunderbird, it will download your mails across all of your accounts, so that you can access them all at one easy place. | ||
| + | * One of the greatest advantages of using an e-mail client is that they allow you work with your e-mails even when you are offline (which will be demonstrated). | ||
| + | * You can group your messages/mails into folders. | ||
| + | |||
| + | === Configure Gmail on Thunderbird: === | ||
| + | |||
| + | * [[Image:Resource%20Book_html_5f61f6e9.png]]You can read your Gmail messages from a client or device that supports POP, like Microsoft Outlook or Mozilla Thunderbird. | ||
| + | * '''Enabling POP in Gmail''': | ||
| + | ** Sign in to Gmail. | ||
| + | ** Click the gear icon in the upper-right and select '''Mail settings''' at the top of any Gmail page. | ||
| + | ** Click '''Forwarding and POP/IMAP'''. | ||
| + | ** Select '''Enable POP for all mail''' or '''Enable POP for mail that arrives from now on'''. | ||
| + | * | ||
| + | |||
| + | === Adding Your Gmail Account to Thunderbird === | ||
| + | |||
| + | # To add a new mail account in Thunderbird, follow the steps: | ||
| + | |||
| + | * When you open Thunderbird for the first time, you need to create a mail account (your existing e-mail account). | ||
| + | * Go to '''File → New → Mail Account'''. | ||
| + | |||
| − | * | + | * The '''Mail Account Setup '''box will appear and you need to enter your details (User name, password, e-mail ID etc) as shown: |
| − | |||
| − | * | + | * Click '''Continue '''after you enter your details. The server starts verifying the details to setup setup your account. |
| − | |||
| − | |||
| − | |||
| − | |||
| − | + | [[Image:Resource%20Book_html_4c0e49b7.png]] | |
| − | + | ||
| − | |||
| − | |||
| − | |||
| − | |||
| − | |||
| − | |||
| − | |||
| − | |||
| − | |||
| − | |||
| − | |||
| − | |||
| − | |||
| − | |||
| − | |||
| − | |||
| − | |||
| − | + | [[Image:Resource%20Book_html_243ec58a.png]] | |
| − | + | ||
| − | |||
| − | |||
| − | |||
| − | |||
| − | |||
| − | |||
| − | |||
| − | |||
| − | |||
| − | |||
| − | |||
| − | |||
| − | |||
| − | |||
| − | |||
| − | |||
| − | + | ||
| − | + | * [[Image:Resource%20Book_html_m793fa7ad.png]]Once the details are verified, click '''Create Account'''. | |
| + | * Your account is now created and '''Thunderbird '''downloads your messages from the server. | ||
| − | + | <u>'''Filtering | |
| − | + | Messages'''</u> | |
| − | + | * Message filters are useful if you routinely want to perform certain actions on messages, according to criteria that you've specified. | |
| − | + | * For instance, you can have incoming mail automatically sorted into different folders, with certain messages labelled, marked as Junk, or even deleted. | |
| − | + | * Filters can be applied automatically to incoming mail, or you can run them manually when desired. (This will be demonstrated) | |
| − | |||
| + | === Gtalk – Web based Video and Voice Chat === | ||
| + | |||
| + | '''Google | ||
| + | Talk''' | ||
| + | is an instant messaging service that provides both text and voice | ||
| + | communication. People use the Internet for instant messaging, voice & | ||
| + | video chatting etc. | ||
| + | |||
| + | * GTalk is an equipment through which you can interact with people. | ||
| + | * If you have an account with Google, i.e. a Gmail ID, then you can use GTalk to message, audio/video chat with people from anywhere in the world. | ||
| + | * You can save a lot of time and money using video conferencing. | ||
| + | * You can avoid travelling to distant places to participate in meetings. | ||
| + | * You may attend a meeting from your houses or offices. | ||
| + | |||
| − | |||
| − | + | ==== Getting Started: ==== | |
| − | + | ||
| − | |||
| − | |||
| − | |||
| − | |||
| − | + | # Open Firefox Browser on you system | |
| + | # Go to [[www.gmail.com]] | ||
| + | # Login to your account using your Gmail ID. | ||
| − | + | [[Image:Resource%20Book_html_17d267fa.gif]] | |
| − | |||
| − | |||
| − | + | <u>'''Note:'''</u> | |
| − | |||
| − | |||
| + | |||
| + | To use GTalk, one must have a google | ||
| + | account. If you do not have a Google account, then: | ||
| + | |||
| + | |||
| + | * Go to [[www.gmail.com]] | ||
| + | * Click on the '''Create Account''' button in the top right corner of the window | ||
| + | * Enter the required details and create your account. | ||
| + | |||
| − | + | Once you login, you can see the list | |
| − | + | of contacts on the right side of the window. There are some coloured | |
| + | icons present in front of each of your contacts' names: | ||
| + | |||
| + | {| border="1" | ||
| + | |- | ||
| + | | | ||
| + | [[Image:Resource%20Book_html_m543d97c2.png]] | ||
| + | |||
| + | | | ||
| + | The | ||
| + | person is available | ||
| + | |||
| + | |- | ||
| + | | | ||
| + | [[Image:Resource%20Book_html_532b39b1.png]] | ||
| + | |||
| + | | | ||
| + | The | ||
| + | person is busy | ||
| + | |- | ||
| + | | | ||
| + | [[Image:Resource%20Book_html_43fc0024.png]] | ||
| + | |||
| + | | | ||
| + | The | ||
| + | person is idle | ||
| + | |||
| + | |- | ||
| + | | | ||
| + | [[Image:Resource%20Book_html_727730b7.png]] | ||
| + | |||
| + | | | ||
| + | The | ||
| + | person is offline (or Not Available) | ||
| + | |||
| + | |} | ||
| + | |||
| + | If you do not have any contacts added | ||
| + | in your contacts list, then you can add one or more by entering their | ||
| + | e-mail id in the search bar just above the chat (as shown in the | ||
| + | screen shot). | ||
| + | |||
| + | |||
| + | [[Image:Resource%20Book_html_m1f535609.png]] | ||
| + | |||
| + | |||
| + | To start a conversation with a person, | ||
| + | you must click on his/her name. | ||
| − | |||
| − | |||
| + | [[Image:Resource%20Book_html_m2e910d43.png]]After | ||
| + | clicking on the persons name, you will get a small chat box on the | ||
| + | bottom right corner of the window (as shown in the screen-shot). | ||
| + | |||
| + | |||
| + | |||
| + | |||
| + | |||
| + | |||
| + | ==== Instant Messaging: ==== | ||
| + | |||
| + | * Click on the rectangular box to start typing your message. | ||
| + | * After you have entered your message, press “Enter” to send your message instantly. | ||
| + | * When you hit '''Enter''', the other person receives your message instantly. | ||
| + | |||
| + | |||
| + | ==== Audio/Video Chatting: ==== | ||
| + | |||
| + | * To start an audio chat, you will require a microphone. | ||
| + | * To start a video chat, you will require a web-camera. | ||
| + | |||
| + | To start an audio or video chat, you | ||
| + | will need to first install the Voice and Video chat plug-in. | ||
| + | |||
| + | ==== Installing Voice and Video chat plug-in: ==== | ||
| + | |||
| + | In the chat box, click on the phone or | ||
| + | the video symbol. | ||
| + | |||
| + | [[Image:Resource%20Book_html_m49bd3c42.png]][[Image:Resource%20Book_html_44b32381.png]] | ||
| + | |||
| + | |||
| + | |||
| + | |||
| + | |||
| + | * Click ''''Click Here'''' which appears in the chat box. | ||
| + | * You will get a separate confirmation box. Click on “'''Get Started'''”. | ||
| + | * You will be redirected to a separate page. | ||
| + | * Click on “'''Install Voice and Video Chat'''” which appears on the right side of your page. | ||
| + | |||
| + | [[Image:Resource%20Book_html_3ddd880c.png]] | ||
| + | |||
| + | |||
| − | + | ||
| − | |||
| − | |||
| − | + | ||
| − | |||
| − | |||
| − | + | ||
| − | |||
| − | |||
| − | |||
| − | |||
| − | |||
| − | |||
| − | |||
| − | |||
| − | |||
| − | |||
| − | |||
| − | |||
| − | |||
| − | |||
| − | |||
| − | |||
| − | |||
| − | |||
| − | |||
| − | |||
| − | |||
| − | |||
| − | |||
| − | |||
| − | |||
| − | |||
| − | |||
| − | |||
| − | + | * Select your appropriate download package and click “Install voice and video chat”. It is usually the first one '32-bit .deb (For Debian/Ubuntu) | |
| − | |||
| − | |||
| − | |||
| − | |||
| − | + | [[Image:Resource%20Book_html_5f53f2b5.png]] | |
| − | |||
| − | |||
| − | |||
| − | |||
| − | + | * The package will be downloaded. | |
| − | + | * Right click on the downloaded file and select “Open with Ubuntu Software Center”. | |
| − | + | * This will open up Ubuntu Software Center. | |
| + | * Click “Install” which appears on the right side. | ||
| + | * This will install the plug-in for voice and video chat on Gtalk. | ||
| + | * This installation will take a while and this will install the features which are required for the audio and video chat. | ||
| + | * This will permanently install these features and you do not have to install them each time you want to start any audio/video chat. | ||
| + | * This is a one time installation! | ||
| + | = Computer Aided Educational Tools = | ||
| + | |||
| + | We are all witnessing widespread developments in IT | ||
| + | Education. More and more ICTs (Information Communication Technology) | ||
| + | are being used in almost all aspects of our lives. In our education | ||
| + | system all teaching-learning methods are witnessing a shift from | ||
| + | teacher centred teaching to a more learner centred one. The | ||
| + | possibility of making this shift is high by using computer aided | ||
| + | tools to bring to life abstract mathematics and science concepts. | ||
| + | |||
| + | National Curriculum Framework (NCF) 2005 talks of a | ||
| + | major shift in teaching education programme from passive reception to | ||
| + | active participation in learning. From learning within the four walls | ||
| + | of classrooms to learning in the wider social context. From knowledge | ||
| + | as “given” and fixed to knowledge as it evolves and is created. | ||
| + | From linear exposure to multiple and divergent exposure. Moving from | ||
| + | a teacher centred lecture driven classroom to more learner centred | ||
| + | classrooms. Using these computer aided tools as teaching-learning | ||
| + | aids will enable teachers to make these shifts suggested by the NCF | ||
| + | 2005. The children will be able to construct their own knowledge | ||
| + | via hands on experimentation by using these computer tools. To enable | ||
| + | children to connect these learnings and utilize the tools to the best | ||
| + | possible extent, it is essential for subject teachers to facilitate | ||
| + | this learning experience. | ||
| + | |||
| + | It is therefore important for the teacher to understand | ||
| + | how to use these various tools and become confident users of the same | ||
| + | to bring about maximum understanding of the subject using these tools | ||
| + | as aids. | ||
| + | '''Integrating tool with classroom lessons''' | ||
| − | + | ||
| + | There is no one fixed solution that works for | ||
| + | integration of computer aided tool usage with classroom chalk-talk | ||
| + | lessons. It depends on the teacher, her students and the availability | ||
| + | of computers. If the students have access to the computer in groups | ||
| + | in the computer period, then one could follow the process outlined | ||
| + | below. | ||
| − | + | * Introduce the topic in the classroom with regular chalk and talk process | |
| − | + | * Create an activity related to the topic to be done in the computer period in the lab. | |
| − | + | * Discuss the topic and learning in the classroom again after the students have done the activity. | |
| − | |||
| − | |||
| − | |||
| − | |||
| − | |||
| − | + | There may not be time available to cover each and every | |
| − | + | topic in this manner. The teachers must use their judgement to plan | |
| − | + | which topics they think are key or critical to integrate with the | |
| − | + | tool. | |
| − | |||
| − | + | == List of Tools and their usage == | |
| − | |||
| − | |||
| − | |||
| − | + | We give here some important tools and a brief | |
| − | + | description of how to incorporate them into lessons. | |
| − | |||
| − | |||
| − | |||
| − | |||
| − | |||
| − | |||
| − | |||
| − | |||
| − | |||
| − | |||
| − | |||
| − | |||
| − | |||
| − | |||
| − | |||
| − | |||
| − | |||
| − | |||
| − | |||
| − | |||
| − | |||
| − | |||
| − | |||
| − | |||
| − | |||
| − | |||
| − | |||
| − | |||
| − | |||
| − | |||
| − | |||
| − | |||
| − | |||
| − | |||
| − | |||
| − | |||
| − | |||
| − | |||
| − | |||
| − | |||
| − | |||
| − | |||
| − | |||
| − | |||
| − | |||
| − | |||
| − | |||
| − | |||
| − | |||
| − | |||
| − | |||
| − | |||
| − | |||
| − | |||
| − | |||
| − | |||
| − | |||
| − | |||
| − | |||
| − | |||
| − | |||
| − | |||
| − | |||
| − | |||
| − | |||
| − | |||
| − | |||
| − | |||
| − | |||
| − | |||
| − | |||
| − | |||
| − | |||
| − | |||
| − | |||
| − | |||
| − | |||
| − | |||
| − | |||
| − | |||
| − | |||
| − | |||
| − | |||
| − | |||
| − | |||
| − | |||
| − | |||
| − | |||
| − | |||
| − | |||
| − | |||
| − | |||
| − | |||
| − | |||
| − | |||
| − | |||
| − | |||
| − | |||
| − | |||
| − | |||
| − | |||
| − | |||
| − | |||
| − | |||
| − | |||
| − | |||
| − | |||
| − | |||
| − | |||
| − | |||
| − | |||
| − | |||
| − | |||
| − | |||
| − | |||
| − | |||
| − | |||
| − | |||
| − | |||
| − | |||
| − | |||
| − | |||
| − | |||
| − | |||
| − | |||
| − | |||
| − | |||
| − | |||
| − | |||
| − | |||
| − | |||
| − | |||
| − | |||
| − | |||
| − | |||
| − | |||
| − | |||
| − | |||
| − | |||
| − | |||
| − | |||
| − | |||
| − | |||
| − | |||
| − | |||
| − | |||
| − | |||
| − | |||
| − | |||
| − | |||
| − | |||
| − | |||
| − | |||
| − | |||
| − | |||
| − | |||
| − | |||
| − | |||
| − | |||
| − | |||
| − | |||
| − | |||
| − | |||
| − | |||
| − | |||
| − | |||
| − | |||
| − | |||
| − | |||
| − | |||
| − | |||
| − | |||
| − | |||
| − | |||
| − | |||
| − | |||
| − | |||
| − | |||
| − | |||
| − | |||
| − | |||
| − | |||
| − | |||
| − | |||
| − | |||
| − | |||
| − | |||
| − | |||
| − | |||
| − | |||
| − | |||
| − | |||
| − | |||
| − | |||
| − | |||
| − | |||
| − | |||
| − | |||
| − | |||
| − | |||
| − | |||
| − | |||
| − | |||
| − | |||
| − | |||
| − | |||
| − | |||
| − | |||
| − | |||
| − | |||
| − | |||
| − | |||
| − | |||
| − | |||
| − | |||
| − | |||
| − | |||
| − | |||
| − | |||
| − | |||
| − | |||
| − | |||
| − | |||
| − | |||
| − | |||
| − | |||
| − | |||
| − | |||
| − | |||
| − | |||
| − | |||
| − | |||
| − | |||
| − | |||
| − | |||
| − | |||
| − | |||
| − | |||
| − | |||
| − | |||
| − | |||
| − | |||
| − | |||
| − | |||
| − | |||
| − | |||
| − | |||
| − | |||
| − | |||
| − | |||
| − | |||
| − | |||
| − | |||
| − | |||
| − | |||
| − | |||
| − | |||
| − | |||
| − | |||
| − | |||
| − | |||
| − | |||
| − | |||
| − | |||
| − | |||
| − | |||
| − | |||
| − | |||
| − | |||
| − | |||
| − | |||
| − | We | ||
| − | |||
| − | |||
| − | |||
| − | |||
| − | |||
| − | |||
| − | |||
| − | |||
| − | |||
| − | |||
| − | |||
| − | |||
| − | |||
| − | |||
| − | |||
| − | |||
| − | |||
| − | |||
| − | |||
| − | |||
| − | |||
| − | |||
| − | |||
| − | |||
| − | |||
| − | |||
| − | |||
| − | |||
| − | |||
| − | |||
| − | |||
| − | |||
| − | |||
| − | |||
| − | |||
| − | |||
| − | |||
| − | |||
| − | |||
| − | |||
| − | |||
| − | |||
| − | |||
| − | |||
| − | |||
| − | |||
| − | |||
| − | |||
| − | |||
| − | |||
| − | |||
| − | |||
| − | |||
| − | |||
| − | |||
| − | |||
| − | |||
| − | |||
| − | |||
| − | |||
| − | |||
| − | |||
| − | |||
| − | |||
| − | |||
| − | |||
| − | |||
| − | |||
| − | |||
| − | |||
| − | |||
| − | |||
| − | |||
| − | |||
| − | |||
| − | |||
| − | |||
| − | |||
| − | |||
| − | |||
| − | |||
| − | |||
| − | |||
| − | |||
| − | |||
| − | |||
| − | |||
| − | |||
| − | |||
| − | |||
| − | |||
| − | |||
| − | |||
| − | |||
| − | |||
| − | |||
| − | |||
| − | |||
| − | |||
| − | |||
| − | |||
| − | |||
| − | |||
| − | |||
| − | |||
| − | |||
| − | |||
| − | |||
| − | |||
| − | |||
| − | |||
| − | |||
| − | |||
| − | |||
| − | |||
| − | |||
| − | |||
| − | |||
| − | |||
| − | |||
| − | |||
| − | |||
| − | |||
| − | |||
| − | |||
| − | |||
| − | |||
| − | |||
| − | |||
| − | |||
| − | |||
| − | |||
| − | |||
| − | |||
| − | |||
| − | |||
| − | |||
| − | |||
| − | |||
| − | |||
| − | |||
| − | |||
| − | |||
| − | |||
| − | |||
| − | |||
| − | |||
| − | |||
| − | |||
| − | |||
| − | |||
| − | |||
| − | |||
| − | |||
| − | |||
| − | |||
| − | |||
| − | |||
| − | |||
| − | |||
| − | |||
| − | |||
| − | |||
| − | |||
| − | |||
| − | |||
| − | |||
| − | |||
| − | |||
| − | |||
| − | |||
| − | |||
| − | |||
| − | |||
| − | |||
| − | |||
| − | |||
| − | |||
| − | |||
| − | |||
| − | |||
| − | |||
| − | |||
| − | |||
| − | |||
| − | |||
| − | |||
| − | |||
| − | |||
| − | |||
| − | |||
| − | |||
| − | |||
| − | |||
| − | |||
| − | |||
| − | |||
| − | |||
| − | |||
| − | |||
| − | |||
| − | |||
| − | |||
| − | |||
| − | |||
| − | |||
| − | |||
| − | |||
| − | |||
| − | |||
| − | |||
| − | |||
| − | |||
| − | |||
| − | |||
| − | |||
| − | |||
| − | |||
| − | |||
| − | |||
| − | |||
| − | |||
| − | |||
| − | |||
| − | |||
| − | |||
| − | |||
| − | |||
| − | |||
| − | |||
| − | |||
| − | |||
| − | |||
| − | |||
| − | |||
| − | |||
| − | |||
| − | |||
| − | |||
| − | |||
| − | |||
| − | |||
| − | |||
| − | |||
| − | |||
| − | |||
| − | |||
| − | |||
| − | |||
| − | |||
| − | |||
| − | |||
| − | |||
| − | |||
| − | |||
| − | |||
| − | |||
| − | |||
| − | |||
| − | |||
| − | |||
| − | |||
| − | |||
| − | |||
| − | |||
| − | |||
| − | |||
| − | |||
| − | |||
| − | |||
| − | |||
| − | |||
| − | |||
| − | |||
| − | |||
| − | |||
| − | |||
| − | |||
| − | |||
| − | |||
| − | |||
| − | |||
| − | |||
| − | |||
| − | |||
| − | |||
| − | |||
| − | |||
| − | |||
| − | |||
| − | |||
| − | |||
| − | |||
| − | |||
| − | |||
| − | |||
| − | |||
| − | |||
| − | |||
| − | |||
| − | |||
| − | |||
| − | |||
| − | |||
| − | |||
| − | |||
| − | |||
| − | |||
| − | |||
| − | |||
| − | |||
| − | |||
| − | |||
| − | |||
| − | |||
| − | |||
| − | |||
| − | |||
| − | |||
| − | |||
| − | |||
| − | |||
| − | |||
| − | |||
| − | |||
| − | |||
| − | |||
| − | |||
| − | |||
| − | |||
| − | |||
| − | |||
| − | |||
| − | |||
| − | |||
| − | |||
| − | |||
| − | |||
| − | |||
| − | |||
| − | |||
| − | |||
| − | |||
| − | |||
| − | |||
| − | |||
| − | |||
| − | |||
| − | |||
| − | |||
| − | |||
| − | |||
| − | |||
| − | |||
| − | |||
| − | |||
| − | |||
| − | |||
| − | |||
| − | |||
| − | |||
| − | |||
| − | |||
| − | |||
| − | |||
| − | |||
| − | |||
| − | |||
| − | |||
| − | |||
| − | |||
| − | |||
| − | |||
| − | |||
| − | |||
| − | |||
| − | |||
| − | |||
| − | |||
| − | |||
| − | |||
| − | |||
| − | |||
| − | |||
| − | |||
| − | |||
| − | |||
| − | |||
| − | |||
| − | |||
| − | |||
| − | |||
| − | |||
| − | |||
| − | |||
| − | |||
| − | |||
| − | |||
| − | |||
| − | |||
| − | |||
| − | |||
| − | |||
| − | |||
| − | |||
| − | |||
| − | |||
| − | |||
| − | |||
| − | |||
| − | |||
| − | |||
| − | |||
| − | |||
| − | |||
| − | |||
| − | |||
| − | |||
| − | |||
| − | |||
| − | |||
| − | |||
| − | |||
| − | |||
| − | |||
| − | |||
| − | |||
| − | |||
| − | |||
| − | |||
| − | |||
| − | |||
| − | |||
| − | |||
| − | |||
| − | |||
| − | |||
| − | |||
| − | |||
| − | |||
| − | |||
| − | |||
| − | |||
| − | |||
| − | |||
| − | |||
| − | |||
| − | |||
| − | |||
| − | |||
| − | |||
| − | |||
| − | |||
| − | |||
| − | |||
| − | |||
| − | |||
| − | |||
| − | |||
| − | |||
| − | |||
| − | |||
| − | |||
| − | |||
| − | |||
| − | |||
| − | |||
| − | |||
| − | |||
| − | |||
| − | |||
| − | |||
| − | |||
| − | |||
| − | |||
| − | |||
| − | |||
| − | |||
| − | |||
| − | |||
| − | |||
| − | |||
| − | |||
| − | |||
| − | |||
| − | |||
| − | |||
| − | |||
| − | |||
| − | |||
| − | |||
| − | |||
| − | |||
| − | |||
| − | |||
| − | |||
| − | |||
| − | |||
| − | |||
| − | |||
| − | |||
| − | |||
| − | |||
| − | |||
| − | |||
| − | |||
| − | |||
| − | |||
| − | |||
| − | |||
| − | |||
| − | |||
| − | |||
| − | |||
| − | |||
| − | |||
| − | |||
| − | |||
| − | |||
| − | |||
| − | |||
| − | |||
| − | |||
| − | |||
| − | |||
| − | |||
| − | |||
| − | |||
| − | |||
| − | |||
| − | |||
| − | |||
| − | |||
| − | |||
| − | |||
| − | |||
| − | |||
| − | |||
| − | |||
| − | |||
| − | |||
| − | |||
| − | |||
| − | |||
| − | |||
| − | |||
| − | |||
| − | |||
| − | |||
| − | |||
| − | |||
| − | |||
| − | |||
| − | |||
| − | |||
| − | |||
| − | |||
| − | |||
| − | |||
| − | |||
| − | |||
| − | |||
| − | |||
| − | |||
| − | |||
| − | |||
| − | |||
| − | |||
| − | |||
| − | |||
| − | |||
| − | |||
| − | |||
| − | |||
| − | |||
| − | |||
| − | |||
| − | |||
| − | |||
| − | |||
| − | |||
| − | |||
| − | |||
| − | |||
| − | |||
| − | |||
| − | |||
| − | |||
| − | |||
| − | |||
| − | |||
| − | |||
| − | |||
| − | |||
| − | |||
| − | |||
| − | |||
| − | |||
| − | |||
| − | |||
| − | |||
| − | |||
| − | |||
| − | |||
| − | |||
| − | |||
| − | |||
| − | |||
| − | |||
| − | |||
| − | |||
| − | |||
| − | |||
| − | |||
| − | |||
| − | |||
| − | |||
| − | |||
| − | |||
| − | |||
| − | |||
| − | |||
| − | |||
| − | |||
| − | |||
| − | |||
| − | |||
| − | |||
| − | |||
| − | |||
| − | |||
| − | |||
| − | |||
| − | |||
| − | |||
| − | |||
| − | |||
| − | |||
| − | |||
| − | |||
| − | |||
| − | |||
| − | |||
| − | |||
| − | |||
| − | |||
| − | |||
| − | |||
| − | |||
| − | |||
| − | |||
| − | |||
| − | |||
| − | |||
| − | |||
| − | |||
| − | |||
| − | |||
| − | |||
| − | |||
| − | |||
| − | |||
| − | |||
| − | |||
| − | |||
| − | |||
| − | |||
| − | |||
| − | |||
| − | |||
| − | |||
| − | + | == English == | |
| − | |||
| + | === Kanagram === | ||
| + | |||
| + | Kanagram is a computer application which can introduce children to | ||
| + | build their vocabularies and introduce them to new words. This | ||
| + | application comes with a pre-loaded list of words. However, teachers | ||
| + | and students can create new list of words. Given below is a step by | ||
| + | step procedure of using these applications. | ||
| + | [[Image:kanagram_html_m60c701d1.png|500px]]<br>'''Figure | ||
| + | 1''' | ||
| − | + | This figure shows the main screen of Kanagram. The word in the middle | |
| − | + | of the screen ''''haneetpl' '''has to be decoded and the answer is | |
| + | to be written in the white bar locaed at the bottom of the screen. | ||
| + | Clicking on ''''hint'''', located on the bottom left corner of the | ||
| + | screen will reveal the hint, which can help the person in identifying | ||
| + | the word. | ||
| + | [[Image:kanagram_html_m470e5859.png|500px]]<br> | ||
| − | + | There is much more that one can do with Kanagram, teachers can create | |
| − | + | their own word lists. | |
| − | + | [[Image:kanagram_html_m470e5859.png|500px]]<br> | |
| − | |||
| + | '''Figure | ||
| + | 2''' | ||
| − | |||
| − | |||
| − | |||
| − | |||
| − | + | # Click on the icon where the mouse pointer is kept in '''Figure 2. '''The 'Configure – Kanagram' window will open on the screen. | |
| − | + | # [[Image:kanagram_html_m5fde088b.png|500px]]<br> | |
| − | + | Click on 'Vocabularies' – this will reveal all the pre-loaded lists that already exist in the application. | |
| − | + | '''Figure | |
| + | 3''' | ||
| + | # Click on the option of 'Create New' and the 'Vocabulary Editor' will appear on the screen. | ||
| + | # Fill in columns Vocabulary name and Description to begin adding words to your word list. | ||
| + | # Click on 'New Word' and then add the word which you want | ||
| + | [[Image:kanagram_html_2ef43ce9.png|500px]]<br>'''Figure | ||
| + | 4''' | ||
| + | [[Image:kanagram_html_2f9f8c66.png|500px]]<br> | ||
| − | + | '''Figure | |
| − | + | 5''' | |
| − | |||
| − | |||
| − | |||
| − | |||
| − | |||
| − | |||
| − | |||
| − | |||
| − | |||
| − | |||
| − | |||
| − | |||
| − | |||
| − | |||
| − | |||
| − | |||
| − | |||
| − | |||
| − | |||
| − | |||
| − | |||
| − | |||
| − | |||
| − | |||
| − | |||
| − | |||
| − | |||
| − | |||
| − | |||
| − | |||
| − | |||
| − | + | When you have added enough words, click on 'Save' and close the | |
| − | + | window. The window appearing in '''Figure 5 '''will now have the new | |
| − | + | list which you have created. If you wish to add more words, click on | |
| − | to | + | 'Edit' after selecting the list to be edited. This will allow you to |
| − | + | add/remove words. | |
| − | |||
| − | |||
| − | + | [[Image:kanagram_html_679f8fa0.png|500px]]<br>'''Figure | |
| − | + | 6''' | |
| − | |||
| − | |||
| − | |||
| − | |||
| − | |||
| − | |||
| − | |||
| − | |||
| − | |||
| − | |||
| − | |||
| − | |||
| − | |||
| − | |||
| − | + | In the above picture you can see the newly added word list appearing | |
| − | + | on the screen. For a new list click on the top right icon. | |
| − | |||
| − | |||
| − | |||
| + | == Freemind == | ||
| − | + | [[Image:Resource%20Book_html_m3b072ae4.png]]<u>'''About | |
| − | |||
| − | [[Image: | ||
| − | <u>'''About | ||
Freemind'''</u> | Freemind'''</u> | ||
| Line 2,779: | Line 2,035: | ||
| − | [[Image: | + | [[Image:Resource%20Book_html_m77fc7a7c.png]]<u>'''How |
to use Freemind'''</u> | to use Freemind'''</u> | ||
| Line 2,823: | Line 2,079: | ||
| − | [[Image: | + | [[Image:Resource%20Book_html_m248a2ce9.png]] |
| − | |||
| − | |||
| − | == | + | == Science == |
'''Simulating | '''Simulating | ||
| Line 2,848: | Line 2,102: | ||
| − | === | + | === PhET === |
<u>'''How to install PhET'''</u> | <u>'''How to install PhET'''</u> | ||
| − | [[Image: | + | [[Image:Resource%20Book_html_49e13d8a.png]]Please |
| − | Please | ||
see the section [[Additional Installation Guidelines]] | see the section [[Additional Installation Guidelines]] | ||
| Line 2,867: | Line 2,120: | ||
| − | [[Image: | + | [[Image:Resource%20Book_html_154e3c60.png]]PhET |
Opens in the Firefox Web Browser. When you install the Ubuntu public | Opens in the Firefox Web Browser. When you install the Ubuntu public | ||
software, PhET simulations are already downloaded on your machine, so | software, PhET simulations are already downloaded on your machine, so | ||
| Line 2,887: | Line 2,140: | ||
| − | [[Image: | + | [[Image:Resource%20Book_html_m2e8dce7f.png]]Now |
| − | Now | ||
select '''Energy Skate Park''' . | select '''Energy Skate Park''' . | ||
| − | |||
| − | |||
| Line 2,912: | Line 2,162: | ||
<u>'''Lesson | <u>'''Lesson | ||
| − | plan using a simulation | + | plan using a simulation'''</u>The |
| − | '''</u>The | ||
simulation window will open which looks like this. | simulation window will open which looks like this. | ||
| − | [[Image: | + | [[Image:Resource%20Book_html_m33ff9c37.png]][[Image:Resource%20Book_html_m33ff9c37.png]]The |
| − | [[Image: | ||
simulation settings in more detail below. | simulation settings in more detail below. | ||
| Line 2,940: | Line 2,188: | ||
* Notice that in all these graphs the KE reaches zero; but the PE is never zero. The PE is never zero because we the lowest part of the track is still above the ground; we have defined the ground as the PE reference of zero. A snapshot of these graphs is given below. | * Notice that in all these graphs the KE reaches zero; but the PE is never zero. The PE is never zero because we the lowest part of the track is still above the ground; we have defined the ground as the PE reference of zero. A snapshot of these graphs is given below. | ||
| − | [[Image: | + | [[Image:Resource%20Book_html_m2f6da76f.png]] |
| − | |||
| − | |||
| − | |||
| − | |||
| − | |||
| − | |||
| − | |||
| − | |||
| − | |||
| − | |||
| − | |||
| − | |||
| − | |||
| − | |||
| − | |||
| − | |||
| − | |||
| − | |||
| − | |||
| − | |||
| − | [[Image: | + | [[Image:Resource%20Book_html_m184d8985.png]]Now |
we will look at what happens to the skater when you add track | we will look at what happens to the skater when you add track | ||
friction and we plot all these graphs. | friction and we plot all these graphs. | ||
| Line 2,990: | Line 2,218: | ||
| − | |||
| − | |||
| − | |||
| − | |||
| − | |||
| − | |||
| Line 3,006: | Line 2,228: | ||
| − | [[Image: | + | [[Image:Resource%20Book_html_m6b8d0fc.png]]Now |
you can reset the simulation and run it for different values of | you can reset the simulation and run it for different values of | ||
acceleration due to gravity. | acceleration due to gravity. | ||
| − | |||
| − | |||
| − | |||
| − | |||
| − | |||
| − | |||
| − | |||
| − | |||
| − | |||
| − | |||
| − | |||
| − | |||
| − | |||
| − | |||
| − | |||
| − | |||
| − | |||
| − | |||
| Line 3,067: | Line 2,271: | ||
| − | |||
| − | |||
| − | |||
| − | |||
| − | === | + | === Step === |
<u>'''About | <u>'''About | ||
| Line 3,112: | Line 2,312: | ||
| − | [[Image: | + | [[Image:Resource%20Book_html_739ba204.jpg]]Palette |
– which contains the objects, interactions and components | – which contains the objects, interactions and components | ||
| Line 3,151: | Line 2,351: | ||
* Observe the disk properties in the properties window and discuss | * Observe the disk properties in the properties window and discuss | ||
| − | |||
| − | |||
| − | [[Image: | + | [[Image:Resource%20Book_html_m53f01d9a.png]]<u>'''To |
save a simulation in STEP ''', </u> | save a simulation in STEP ''', </u> | ||
| Line 3,163: | Line 2,361: | ||
* Once you save a simulation, you can simply open a simulation and demonstrate. | * Once you save a simulation, you can simply open a simulation and demonstrate. | ||
| − | === | + | === K Tech Lab === |
<u>'''About | <u>'''About | ||
| Line 3,206: | Line 2,404: | ||
| − | [[Image: | + | [[Image:Resource%20Book_html_mf5bdd8d.png]][[Image:Resource%20Book_html_55b073f9.png]] |
| − | |||
| − | |||
| − | |||
| − | |||
| − | |||
| − | |||
| − | |||
| − | |||
| − | |||
| − | |||
| − | |||
| − | |||
| − | |||
| − | |||
| − | |||
| − | |||
| Line 3,241: | Line 2,423: | ||
| − | [[Image: | + | [[Image:Resource%20Book_html_m70144323.png]] |
| − | |||
| − | |||
| − | |||
| − | |||
| − | |||
| − | |||
| − | |||
| − | |||
| − | |||
| − | |||
| − | |||
| − | |||
| − | |||
| − | |||
| − | |||
| − | |||
| − | |||
| − | |||
| − | |||
| − | |||
| Line 3,322: | Line 2,484: | ||
| − | [[Image: | + | [[Image:Resource%20Book_html_c9a3ec1.png]]'''Automatic |
: '''Select 'Automatic' from the connection routing mode in the | : '''Select 'Automatic' from the connection routing mode in the | ||
toolbar. The pointer changes its shape when brought to the lead of | toolbar. The pointer changes its shape when brought to the lead of | ||
| Line 3,351: | Line 2,513: | ||
| − | [[Image: | + | [[Image:Resource%20Book_html_m415796e9.png]]'''Purpose: |
'''To learn to make a basic | '''To learn to make a basic | ||
circuit with battery, switch, signal lamp and voltmeter | circuit with battery, switch, signal lamp and voltmeter | ||
| Line 3,365: | Line 2,527: | ||
# Save a K Tech Lab Circuit file | # Save a K Tech Lab Circuit file | ||
| − | |||
| − | |||
| − | |||
| − | |||
| − | [[Image: | + | [[Image:Resource%20Book_html_3905cb44.png]]'''Save |
File : '''Select '''File > | File : '''Select '''File > | ||
Save '''and enter file name | Save '''and enter file name | ||
| Line 3,388: | Line 2,546: | ||
* Discuss this with reference to a torch. | * Discuss this with reference to a torch. | ||
| − | * [[Image: | + | * [[Image:Resource%20Book_html_439f8339.png]]Discuss what happens when the circuit is broken (switch is off), so children understand that a switch breaks a circuit. |
<u>'''Activity 2: Cells in Series/Parallel'''</u> | <u>'''Activity 2: Cells in Series/Parallel'''</u> | ||
| Line 3,402: | Line 2,560: | ||
# Drag and Drop 3batteries, switch (SPST), a signal lamp and voltmeter as shown in the figures in the work area. | # Drag and Drop 3batteries, switch (SPST), a signal lamp and voltmeter as shown in the figures in the work area. | ||
| − | # [[Image: | + | # [[Image:Resource%20Book_html_m54db48a4.png]]Use 'Automatic' connection and the mouse to connect the circuits as shown below, first the cells in series, then the cells in parallel. |
# Click on the switch to see the lamp glow. | # Click on the switch to see the lamp glow. | ||
# Observe the reading of the voltmeter when the switch is turned off/on versus on. | # Observe the reading of the voltmeter when the switch is turned off/on versus on. | ||
| Line 3,422: | Line 2,580: | ||
| − | |||
| − | |||
| Line 3,429: | Line 2,585: | ||
| − | # [[Image: | + | # [[Image:Resource%20Book_html_5e9678ce.png]]Drag and Drop a batteries, switch (SPST), an ammeter and voltmeter as shown in the figure here. |
# Use 'Automatic' connection and the mouse to connect the circuits as shown below. | # Use 'Automatic' connection and the mouse to connect the circuits as shown below. | ||
# Click on the switch and record the voltmeter and ammeter readings | # Click on the switch and record the voltmeter and ammeter readings | ||
| Line 3,437: | Line 2,593: | ||
# '''Save the file as Activity_3''' | # '''Save the file as Activity_3''' | ||
| − | == | + | == Social Science == |
| − | === | + | === KGeography === |
<u>'''About KGeography'''</u> | <u>'''About KGeography'''</u> | ||
| Line 3,469: | Line 2,625: | ||
| − | [[Image: | + | [[Image:Resource%20Book_html_4f980be1.jpg]] |
| − | |||
| − | |||
* To explore a continent or country click on '''File > Open Map '''and select a country and click '''OK''' | * To explore a continent or country click on '''File > Open Map '''and select a country and click '''OK''' | ||
| − | * [[Image: | + | * [[Image:Resource%20Book_html_325bfc6d.png]]Place mouse over the region in colour and left-click to view Name and Capital |
<u>'''Computer Lab Activity Ideas:'''</u> | <u>'''Computer Lab Activity Ideas:'''</u> | ||
| Line 3,482: | Line 2,636: | ||
# Point out the islands of India and talk about what islands are. | # Point out the islands of India and talk about what islands are. | ||
# Explore North South East West directions | # Explore North South East West directions | ||
| − | # [[Image: | + | # [[Image:Resource%20Book_html_m2a41030b.png]]Talk about what a capital of the state means, also talk about the capital of the country. |
# Ask if someone has to travel from place A to B (Bangalore, Karnataka to Puri, Orrisa) what states they need to pass and which direction they need to travel. | # Ask if someone has to travel from place A to B (Bangalore, Karnataka to Puri, Orrisa) what states they need to pass and which direction they need to travel. | ||
# Identify the smallest and largest states | # Identify the smallest and largest states | ||
| Line 3,493: | Line 2,647: | ||
* The window below will appear, select the number of questions (1 to 35) and select OK | * The window below will appear, select the number of questions (1 to 35) and select OK | ||
* The question will appear on the left hand panel | * The question will appear on the left hand panel | ||
| − | * [[Image: | + | * [[Image:Resource%20Book_html_53f83736.jpg]]When all questions are completed the results are shown below. Each state is marked by a distinct colour and the result shows the correct answer and what the user marked. |
| − | === | + | === Marble === |
Marble | Marble | ||
| Line 3,520: | Line 2,674: | ||
* Once this is complete, Marble will be available in Applications – Education – Marble. | * Once this is complete, Marble will be available in Applications – Education – Marble. | ||
| − | [[Image: | + | [[Image:Resource%20Book_html_493be2bd.png]]<u>'''How |
to Measure Distances'''</u> | to Measure Distances'''</u> | ||
| Line 3,535: | Line 2,689: | ||
* Use this window to play around with the time | * Use this window to play around with the time | ||
| − | [[Image: | + | [[Image:Resource%20Book_html_m43c5a353.png]] |
| − | |||
| − | |||
* How to Download new maps | * How to Download new maps | ||
* Go to file – Download Maps. Click “install” on the maps you want to download. (you need to be connected to the Internet for this). For more information on how to use Marble, please click [[http://docs.kde.org/development/en/kdeedu/marble/]] | * Go to file – Download Maps. Click “install” on the maps you want to download. (you need to be connected to the Internet for this). For more information on how to use Marble, please click [[http://docs.kde.org/development/en/kdeedu/marble/]] | ||
| − | === | + | === KStars === |
<u>'''About | <u>'''About | ||
| Line 3,559: | Line 2,711: | ||
| − | [[Image: | + | [[Image:Resource%20Book_html_m3916dc4.png]]<u>'''Activity |
1 Solar Eclipse '''</u> | 1 Solar Eclipse '''</u> | ||
| Line 3,576: | Line 2,728: | ||
# Select Bangalore, India as the location. | # Select Bangalore, India as the location. | ||
| − | [[Image: | + | [[Image:Resource%20Book_html_5aed9dc2.png]] |
| − | |||
| − | |||
| − | |||
| − | |||
# Set the time by selecting file menu option '''Time > Set Time '''or pressing '''Ctrl+S''' | # Set the time by selecting file menu option '''Time > Set Time '''or pressing '''Ctrl+S''' | ||
| − | |||
| − | |||
| − | [[Image: | + | [[Image:Resource%20Book_html_m738a9eb5.png]] |
| − | |||
| − | |||
| − | |||
| − | |||
| − | |||
| − | |||
| − | |||
| − | |||
| − | |||
| − | |||
# Press '''Ctrl+F and find the sun on the map.''' | # Press '''Ctrl+F and find the sun on the map.''' | ||
| − | [[Image: | + | [[Image:Resource%20Book_html_b0b522a.png]] |
| − | |||
| − | |||
| − | |||
| − | |||
| − | |||
| − | |||
| − | |||
| − | |||
| − | |||
| − | |||
| − | |||
| − | |||
| − | |||
| − | |||
| − | |||
| − | |||
| − | |||
| − | |||
| − | |||
| − | |||
| − | |||
| − | |||
| − | # Press the play/Pause button to start the simulation, and keep the time at 10seconds [[Image: | + | # Press the play/Pause button to start the simulation, and keep the time at 10seconds [[Image:Resource%20Book_html_m13abc4e6.png]] |
| − | |||
| − | |||
| − | |||
| − | |||
| − | |||
| − | |||
| − | |||
| − | |||
| − | |||
| − | |||
| − | |||
| − | |||
| − | |||
| − | |||
| − | |||
| − | |||
| − | |||
| − | |||
| Line 3,711: | Line 2,807: | ||
# Use the scale to place an orbit of any planet at 0 , when the planet is at position 0, note the clock measure and stop the clock when it comes back to zero position to measure how long the planet takes to complete one revolution. | # Use the scale to place an orbit of any planet at 0 , when the planet is at position 0, note the clock measure and stop the clock when it comes back to zero position to measure how long the planet takes to complete one revolution. | ||
| − | [[Image: | + | [[Image:Resource%20Book_html_7e52d523.png]] |
| − | |||
| − | |||
| − | |||
| − | |||
| − | |||
| − | |||
| − | |||
| − | |||
| − | |||
| − | |||
| − | |||
| − | |||
| − | |||
| − | |||
| − | |||
| − | |||
| − | |||
| − | |||
| − | == | + | == Mathematics == |
| − | === | + | === Geogebra === |
'''Introduction to Drawing in Geometry''' | '''Introduction to Drawing in Geometry''' | ||
| Line 3,808: | Line 2,886: | ||
| − | [[Image: | + | [[Image:Resource%20Book_html_m5bfc5045.gif]]On |
the desktop click '''Applications '''> '''Science''' > | the desktop click '''Applications '''> '''Science''' > | ||
'''Geogebra or Applications '''> '''Education'''> '''Geogebra.''' | '''Geogebra or Applications '''> '''Education'''> '''Geogebra.''' | ||
| Line 3,866: | Line 2,944: | ||
| − | [[Image: | + | [[Image:Resource%20Book_html_48e11462.png]]We |
can consider the Tool Bar to be like a compass box. Today we will | can consider the Tool Bar to be like a compass box. Today we will | ||
consider the Geogebra tools that correspond to using a pencil, a | consider the Geogebra tools that correspond to using a pencil, a | ||
| Line 3,872: | Line 2,950: | ||
| − | [[Image: | + | [[Image:Resource%20Book_html_m2e9355f9.png]]To |
see the list of related tools , click on the arrow at the bottom | see the list of related tools , click on the arrow at the bottom | ||
right hand corner of each tool as shown below. | right hand corner of each tool as shown below. | ||
| Line 3,883: | Line 2,961: | ||
* Open a toolbox by clicking on the lower part of a button and select another tool from this toolbox. | * Open a toolbox by clicking on the lower part of a button and select another tool from this toolbox. | ||
| − | [[Image: | + | [[Image:Resource%20Book_html_m1b350d49.png]]'''Graphic |
Window with Grids Displayed (Refer to above diagram,right)''' | Window with Grids Displayed (Refer to above diagram,right)''' | ||
| − | |||
| − | |||
* Place the mouse pointer over the '''graphic ''''''view '''area. Right Click and check the Grid option. To remove the grid view, un-check the option. See diagram below. | * Place the mouse pointer over the '''graphic ''''''view '''area. Right Click and check the Grid option. To remove the grid view, un-check the option. See diagram below. | ||
| − | |||
| − | |||
| − | |||
| − | |||
| − | |||
| − | |||
| Line 3,926: | Line 2,996: | ||
| − | [[Image: | + | [[Image:Resource%20Book_html_6308ecb2.png]] |
| − | |||
| − | |||
{| border="1" | {| border="1" | ||
| Line 3,961: | Line 3,029: | ||
# Open the File menu (Menu Bar) and select '''Save'''. | # Open the File menu (Menu Bar) and select '''Save'''. | ||
| − | # [[Image: | + | # [[Image:Resource%20Book_html_m18ab2ba9.gif]]Select the folder '''Your''' '''Name > Workshop > Geogebra''' in the pop-up dialogue window. |
# Type in a name for your Geogebra file. | # Type in a name for your Geogebra file. | ||
# Click the '''Save''' button to save the file. | # Click the '''Save''' button to save the file. | ||
| Line 3,972: | Line 3,040: | ||
| − | |||
| − | |||
| Line 3,993: | Line 3,059: | ||
| − | [[Image: | + | [[Image:Resource%20Book_html_774a7366.png]]<u>'''Purpose'''</u> |
| Line 4,045: | Line 3,111: | ||
# Select one of the vertices of the triangle (A,B or C) and move the points ('''Move '''tool) to change the shape of the triangles. | # Select one of the vertices of the triangle (A,B or C) and move the points ('''Move '''tool) to change the shape of the triangles. | ||
| − | [[Image: | + | [[Image:Resource%20Book_html_6bf5084f.png]] |
| − | |||
| − | |||
| − | |||
{| border="1" | {| border="1" | ||
| Line 4,096: | Line 3,159: | ||
|- | |- | ||
| | | | ||
| − | |||
| | | | ||
| − | |||
| | | | ||
| − | |||
| | | | ||
| − | |||
|} | |} | ||
| − | |||
| − | |||
| Line 4,129: | Line 3,186: | ||
| − | # Create a slider by clicking on the '''Slider t'''ool [[Image: | + | # Create a slider by clicking on the '''Slider t'''ool [[Image:Resource%20Book_html_7d501021.png]] |
# Select Radio Button: Number, Name: '''a''', min: '''3''', max:'''10''', Increment: '''1 '''and press '''''Apply.''''' | # Select Radio Button: Number, Name: '''a''', min: '''3''', max:'''10''', Increment: '''1 '''and press '''''Apply.''''' | ||
| − | [[Image: | + | [[Image:Resource%20Book_html_61634954.png]] |
| − | |||
| − | |||
| − | |||
| − | |||
| − | |||
| − | |||
| − | |||
| − | |||
| − | |||
| − | |||
| − | |||
| − | |||
| − | # [[Image: | + | # [[Image:Resource%20Book_html_55c8b87c.png]]Select the tool '''Regular Polygon '''and mark the two points A and B of one side of the polygon on the drawing pad. You will be prompted with a window as shown. Please put the '''slider name “a” '''in the box provided and press '''''OK.''''' |
| − | # Select the '''Insert Text '''tool and write the text: ''A polygon with three sides is called a TRAINGLE'' as shown in the figure along-side and press OK. [[Image: | + | # Select the '''Insert Text '''tool and write the text: ''A polygon with three sides is called a TRAINGLE'' as shown in the figure along-side and press OK. [[Image:Resource%20Book_html_m54a4f415.png]] |
# Right click on the text created and select object properties. Click the A'''dvanced''' tab. Enter '''a=3 '''in '''Condition to Show Object '''and press OK. | # Right click on the text created and select object properties. Click the A'''dvanced''' tab. Enter '''a=3 '''in '''Condition to Show Object '''and press OK. | ||
# Repeat steps 4 and 5 for as many polygons 7 more times to show up to 10 sided polygon. | # Repeat steps 4 and 5 for as many polygons 7 more times to show up to 10 sided polygon. | ||
# Select the '''move tool''' and demonstrate the different polygons. | # Select the '''move tool''' and demonstrate the different polygons. | ||
| − | [[Image: | + | [[Image:Resource%20Book_html_7be60ac8.png]] |
| − | |||
| − | |||
| − | |||
| − | |||
| − | |||
| − | |||
| − | |||
| − | |||
| − | |||
| − | |||
| − | |||
| − | |||
| − | |||
| − | |||
| − | |||
| − | |||
| − | |||
| − | |||
| − | |||
| − | |||
| − | |||
| − | |||
| − | |||
| − | |||
| − | |||
| − | |||
| − | |||
| − | |||
| − | |||
| − | |||
| − | |||
| − | |||
| − | |||
| − | |||
| − | |||
| − | |||
| − | |||
| − | |||
| Line 4,294: | Line 3,301: | ||
# Then explain the three parts described above. | # Then explain the three parts described above. | ||
| − | [[Image: | + | [[Image:Resource%20Book_html_6dd3dc69.png]][[Image:Resource%20Book_html_1ae59b43.png]] |
| − | |||
| − | |||
| − | |||
| − | |||
| − | |||
| − | |||
| − | |||
| − | |||
| − | |||
| − | |||
| − | |||
| − | |||
| − | |||
| − | |||
| − | |||
| − | |||
| − | |||
| − | |||
| Line 4,349: | Line 3,338: | ||
# Then explain the three parts described above. | # Then explain the three parts described above. | ||
| − | === | + | === KTurtle === |
<u>'''About Kturtle'''</u> | <u>'''About Kturtle'''</u> | ||
| Line 4,385: | Line 3,374: | ||
| − | [[Image: | + | [[Image:Resource%20Book_html_4f708185.png]] |
| − | |||
| − | |||
| − | |||
Open application '''Applications > Education > | Open application '''Applications > Education > | ||
Kturtle '''and introduce the user to the following windows, '''editor | Kturtle '''and introduce the user to the following windows, '''editor | ||
| Line 4,434: | Line 3,420: | ||
| − | [[Image: | + | [[Image:Resource%20Book_html_m7ea45336.png]]Reset |
| Line 4,458: | Line 3,444: | ||
| − | |||
| − | |||
| − | |||
| − | |||
| − | |||
| − | |||
| − | |||
| − | |||
| − | |||
| − | |||
| Line 4,539: | Line 3,515: | ||
|} | |} | ||
| − | |||
| − | |||
| Line 4,583: | Line 3,557: | ||
| − | [[Image: | + | [[Image:Resource%20Book_html_m1444cc7.png]] |
| − | |||
| − | |||
| − | |||
| − | |||
| − | |||
| − | |||
| − | |||
| − | |||
| − | |||
| − | |||
| − | |||
| − | |||
| − | |||
| − | |||
| − | |||
| − | |||
| − | |||
| − | |||
| − | |||
| − | |||
| − | |||
| − | |||
| − | |||
| Line 4,655: | Line 3,606: | ||
| − | [[Image: | + | [[Image:Resource%20Book_html_14df09e5.png]] |
| − | |||
| − | |||
{| border="1" | {| border="1" | ||
| Line 4,693: | Line 3,642: | ||
|} | |} | ||
| − | [[Image: | + | [[Image:Resource%20Book_html_35b61add.png]] |
| − | |||
| − | |||
{| border="1" | {| border="1" | ||
| Line 4,734: | Line 3,681: | ||
|} | |} | ||
| − | == | + | == Record My Desktop – A tool to record the desktop == |
* It is a free and open source screen-casting software. | * It is a free and open source screen-casting software. | ||
* It is a desktop session recorder for GNU/Linux. | * It is a desktop session recorder for GNU/Linux. | ||
| − | === | + | === Launching the Application === |
| − | [[Image: | + | [[Image:Resource%20Book_html_7df210a.gif]] |
| − | |||
<u>'''Note:'''</u> | <u>'''Note:'''</u> | ||
| Line 4,752: | Line 3,698: | ||
| − | |||
| Line 4,760: | Line 3,705: | ||
* This process shall take some time and upon completion, RecordMyDesktop will appear under Sound & Video. | * This process shall take some time and upon completion, RecordMyDesktop will appear under Sound & Video. | ||
| − | === | + | === The Main Window === |
| − | |||
| − | |||
* Once the application is launched, the main window of RecordMyDesktop appears (as shown in the screen shot). | * Once the application is launched, the main window of RecordMyDesktop appears (as shown in the screen shot). | ||
| − | [[Image: | + | [[Image:Resource%20Book_html_16c44a7a.png]] |
| − | |||
| − | |||
| − | |||
| − | |||
| − | |||
| − | |||
| − | |||
| − | |||
| − | |||
| − | |||
| − | |||
| − | |||
| Line 4,798: | Line 3,729: | ||
* Beneath the video and sound quality settings, there is a large button named “'''Advanced'''”. Clicking that will bring a new window, that will allow you to set a vast number of options, and fine tune the behaviour of the program. | * Beneath the video and sound quality settings, there is a large button named “'''Advanced'''”. Clicking that will bring a new window, that will allow you to set a vast number of options, and fine tune the behaviour of the program. | ||
| − | |||
| − | |||
| − | === | + | === Advanced Settings === |
| − | |||
| − | |||
| Line 4,815: | Line 3,742: | ||
| − | ==== | + | ==== Files ==== |
| − | [[Image: | + | [[Image:Resource%20Book_html_m74c3524.png]] |
| − | |||
| − | |||
| − | |||
| − | |||
| − | |||
| − | |||
| − | |||
| − | |||
| − | |||
| − | |||
| − | |||
| − | |||
| − | |||
| − | |||
| − | |||
| − | |||
| − | |||
| − | |||
| − | |||
| − | |||
| − | |||
| − | |||
| − | |||
| − | |||
| − | |||
| − | |||
| − | |||
| − | |||
| − | |||
| − | |||
| − | |||
| − | |||
| − | |||
| − | |||
| − | |||
| − | |||
| − | ==== | + | ==== Performance ==== |
| − | |||
| − | |||
| − | |||
| − | |||
| − | |||
| − | |||
| − | |||
| − | |||
| − | |||
| − | |||
| − | |||
| − | |||
| − | |||
| − | |||
| − | |||
| − | |||
| − | |||
| − | |||
| − | |||
| − | |||
| − | |||
| − | |||
| − | |||
| − | |||
| − | |||
| − | |||
| − | |||
| − | |||
| − | |||
| − | |||
| − | |||
| − | |||
| − | |||
| − | |||
| Line 4,963: | Line 3,820: | ||
| | | | ||
|} | |} | ||
| − | ==== | + | ==== Sound ==== |
| − | |||
| − | |||
| − | |||
| − | |||
| − | [[Image: | + | [[Image:Resource%20Book_html_m3f02ceb7.png]] |
| − | |||
| − | |||
| − | |||
| − | |||
| − | |||
| − | |||
| − | |||
| − | |||
| − | |||
| − | |||
| − | |||
| − | |||
| − | |||
| − | |||
| − | |||
| − | |||
| − | |||
| − | |||
| − | |||
| − | |||
| − | |||
| − | |||
| − | |||
| − | |||
| − | |||
| − | |||
| − | |||
| − | |||
| − | |||
| − | |||
| − | |||
| − | |||
| − | |||
| − | |||
| − | ==== | + | ==== Misc ==== |
| − | [[Image: | + | [[Image:Resource%20Book_html_4a8000fa.png]] |
| − | |||
| − | |||
| − | |||
| − | |||
| − | |||
| − | |||
| − | |||
| − | |||
| − | |||
| − | |||
| − | |||
| − | |||
| − | |||
| − | |||
| − | |||
| − | |||
| − | |||
| − | |||
| − | |||
| − | |||
| − | |||
| − | |||
| − | |||
| − | |||
| − | |||
| − | |||
| − | |||
| − | |||
| − | |||
| − | |||
| − | |||
| − | |||
| − | |||
| − | |||
| − | |||
| − | === | + | === Using RecordMyDesktop === |
| − | |||
| − | |||
| Line 5,124: | Line 3,906: | ||
| − | [[Image: | + | [[Image:Resource%20Book_html_m617b546f.png]] |
| − | |||
| − | |||
| − | === | + | === Start the recording === |
* To start the recording, click on “Record” in the main window (or) click on the red button and select “record”. | * To start the recording, click on “Record” in the main window (or) click on the red button and select “record”. | ||
* This will create a window along your desktop border indicating the recording has started. | * This will create a window along your desktop border indicating the recording has started. | ||
| − | * [[Image: | + | * [[Image:Resource%20Book_html_m7f200d0.png]]The red button will now be like a square button. |
| − | |||
| − | |||
| Line 5,142: | Line 3,920: | ||
* To resume the recording again, click on the parallel lines and select “continue recording”. | * To resume the recording again, click on the parallel lines and select “continue recording”. | ||
| − | === | + | === Stop the recording === |
| − | |||
| − | |||
| Line 5,152: | Line 3,928: | ||
* This will take some time and prepare your video to be viewed. | * This will take some time and prepare your video to be viewed. | ||
| − | [[Image: | + | [[Image:Resource%20Book_html_7cc71dff.gif]] |
| − | |||
| − | |||
<u>'''Note:'''</u> | <u>'''Note:'''</u> | ||
| Line 5,162: | Line 3,936: | ||
* If you do so, the recording will not be encoded and the video cannot be viewed. | * If you do so, the recording will not be encoded and the video cannot be viewed. | ||
| − | |||
| − | |||
| − | === | + | === Other Options === |
| − | ==== | + | ==== Show/Hide Main Window ==== |
| − | |||
| − | |||
| Line 5,177: | Line 3,947: | ||
* To make the main window visible again, select the same option. | * To make the main window visible again, select the same option. | ||
| − | ==== | + | ==== Select Area On Screen ==== |
| − | |||
| − | |||
| Line 5,186: | Line 3,954: | ||
* Use your mouse by dragging it to select the area you want to record. | * Use your mouse by dragging it to select the area you want to record. | ||
| − | ==== | + | ==== About ==== |
* Click on the red button on top panel and select “About”. | * Click on the red button on top panel and select “About”. | ||
* A small window will appear giving information about RecordMyDesktop. | * A small window will appear giving information about RecordMyDesktop. | ||
| − | ==== | + | ==== Quit ==== |
* To close the RecordMyDesktop application, click on “quit” in the main window (or) select the “quit” option under the red button options. | * To close the RecordMyDesktop application, click on “quit” in the main window (or) select the “quit” option under the red button options. | ||
| − | |||
| − | |||
| − | + | = Installation of Ubuntu = | |
| − | |||
| − | = | ||
| − | === | + | === Preface === |
This section will help you to understand the following: | This section will help you to understand the following: | ||
| Line 5,212: | Line 3,976: | ||
* ''Other configurations on Edubuntu (OpenOffice, Kannada setup etc)'' | * ''Other configurations on Edubuntu (OpenOffice, Kannada setup etc)'' | ||
| − | === | + | === What is Edubuntu? === |
''''' Edubuntu, '''''is | ''''' Edubuntu, '''''is | ||
| Line 5,222: | Line 3,986: | ||
* '''''LTSP - Linux Terminal Server Project (LTSP)''''' is a free and open source add-on package for Linux that allows many people to simultaneously use the same computer. | * '''''LTSP - Linux Terminal Server Project (LTSP)''''' is a free and open source add-on package for Linux that allows many people to simultaneously use the same computer. | ||
| − | === | + | === What are the requirements to setup Edubuntu? === |
* You will need the Edubuntu 12.04 LTSP DVD (''which has been given to you)'' | * You will need the Edubuntu 12.04 LTSP DVD (''which has been given to you)'' | ||
* '''''Hardware Requirements – minimum 1GB RAM and 160 GB Hard Disk''''' | * '''''Hardware Requirements – minimum 1GB RAM and 160 GB Hard Disk''''' | ||
| − | === | + | === How to install Edubuntu? === |
* Insert DVD in your CD/DVD-ROM device and reboot the computer in order to boot from the CD. | * Insert DVD in your CD/DVD-ROM device and reboot the computer in order to boot from the CD. | ||
| Line 5,236: | Line 4,000: | ||
# Using the arrow keys select '''Boot''' and press enter to access the '''Boot Device Priority''' menu. | # Using the arrow keys select '''Boot''' and press enter to access the '''Boot Device Priority''' menu. | ||
| − | [[Image: | + | [[Image:Resource%20Book_html_4b6d5278.png]] |
| − | |||
| − | |||
| − | |||
| − | |||
| − | |||
| − | |||
| − | |||
| − | |||
| − | |||
| − | |||
| − | |||
| − | |||
| − | |||
| − | |||
| − | |||
| − | |||
| − | |||
| − | |||
| − | |||
| − | # [[Image: | + | # [[Image:Resource%20Book_html_m7b424f41.png]]Press enter on the highlighted '''1st Boot Device''' and select '''CD/DVD ROM''' from the menu. |
| − | Press enter on the highlighted '''1st Boot Device''' and select '''CD/DVD ROM''' from the menu. | ||
| − | |||
| − | |||
# In this BIOS you have to press F10 to save and exit any changes that you have made. Press enter and the changes will be saved and you will exit the BIOS. | # In this BIOS you have to press F10 to save and exit any changes that you have made. Press enter and the changes will be saved and you will exit the BIOS. | ||
| − | [[Image: | + | [[Image:Resource%20Book_html_m2b0124a2.png]] |
| − | |||
| − | |||
| − | |||
| − | |||
| − | |||
| − | |||
| − | |||
| − | |||
| − | |||
| − | |||
| − | |||
| − | |||
| − | |||
| − | |||
| − | |||
| − | |||
| − | |||
| − | |||
| − | |||
| − | |||
| Line 5,331: | Line 4,053: | ||
| − | === | + | === Installation === |
| − | ==== | + | ==== Starting the Installation Process ==== |
Insert | Insert | ||
| Line 5,348: | Line 4,070: | ||
| − | |||
| − | |||
| − | |||
| − | |||
| − | |||
| − | |||
| − | |||
| − | |||
| − | |||
| − | |||
| − | |||
| − | |||
| Line 5,379: | Line 4,089: | ||
* | * | ||
| − | |||
| − | |||
| − | |||
| − | |||
| − | |||
| − | |||
| − | |||
| − | |||
| − | |||
| − | |||
| − | |||
| − | |||
| − | |||
| − | |||
| − | |||
| − | |||
| − | ==== | + | ==== Edubuntu Options and Partitioning ==== |
* On the Disk Setup page, you can choose how Edubuntu should be installed. | * On the Disk Setup page, you can choose how Edubuntu should be installed. | ||
| − | * [[Image: | + | * [[Image:Resource%20Book_html_387cb0d3.png]]Edubuntu installs a complete operating system to your computer. |
* You can choose to install Edubuntu side-by-side with your existing operating system, erase the entire disk and start from scratch. The preferred option would be to choose the option '''Install them side-by-side, choosing between them each start-up'''. Click '''Forward.''' | * You can choose to install Edubuntu side-by-side with your existing operating system, erase the entire disk and start from scratch. The preferred option would be to choose the option '''Install them side-by-side, choosing between them each start-up'''. Click '''Forward.''' | ||
| Line 5,438: | Line 4,132: | ||
| − | [[Image: | + | [[Image:Resource%20Book_html_2e3c45d1.png]] |
| − | |||
| − | |||
| − | ==== | + | ==== Select your keyboard layout ==== |
| − | * [[Image: | + | * [[Image:Resource%20Book_html_7be11ea6.png]]In this step, you have to choose the keyboard layout. The default keyboard layout is '''USA '''and it is selected by default in this step as shown below. |
* Click '''Forward '''(Default Keyboard Layout - USA). | * Click '''Forward '''(Default Keyboard Layout - USA). | ||
* Click on '''Forward.''' | * Click on '''Forward.''' | ||
| Line 5,450: | Line 4,142: | ||
* This will install Edubuntu along side Windows and you will be able to use both the operating systems without any loss of data. | * This will install Edubuntu along side Windows and you will be able to use both the operating systems without any loss of data. | ||
| − | ==== | + | ==== Enter User Details ==== |
| − | * [[Image: | + | * [[Image:Resource%20Book_html_m6455b633.png]]In the user setup dialog, you will be requested to set up the administrator user on the system. |
* The user name cannot start with a number, and must be lowercase letters only. | * The user name cannot start with a number, and must be lowercase letters only. | ||
* If you make mistakes, the installer will warn you about it. It is recommended that you require a password to log in to the system. | * If you make mistakes, the installer will warn you about it. It is recommended that you require a password to log in to the system. | ||
| − | ==== | + | ==== Installation Complete ==== |
* '''After the installation is complete, click on <u>Restart Now</u>''' | * '''After the installation is complete, click on <u>Restart Now</u>''' | ||
| Line 5,469: | Line 4,161: | ||
| − | ==== | + | ==== Additional Settings after Installation ==== |
* The tool '''PhET '''is already installed on your system now. To add it to the menu | * The tool '''PhET '''is already installed on your system now. To add it to the menu | ||
| Line 5,476: | Line 4,168: | ||
* | * | ||
| − | == | + | == FAQ == |
Please | Please | ||
Latest revision as of 11:44, 26 February 2015
Understanding the Resource Prototype
Concept Map
Why do we do Concept/Mind Mapping
Lateral thinking is solving problems through a non-hierarchical and creative approach, using reasoning that does not follow any particular hierarchy or sequence and involving ideas that may not be obtainable by using only traditional step-by-step logic. This also enables the teacher to make new connections within the subject and across subjects.
Vertical
thinking is a type of approach to problems that usually involves
one being selective, analytical, and sequential. It could be said
that it is the opposite of lateral thinking. This is the type of
thinking we have been following in our teaching/learning processes.
We are
now in a digital world which has made large amount of information
available to us through the Internet. Therefore there is a need for
us to be able to process connect and make meaning of large amounts of
information. Hence we need to start thinking laterally rather than
vertically.
Mind
mapping is a highly effective way of getting information in and out
of your brain and to enable lateral thinking. Mind mapping is
a creative and logical means of mapping out ideas based on a central
theme.
The five essential characteristics of Mind
Mapping:
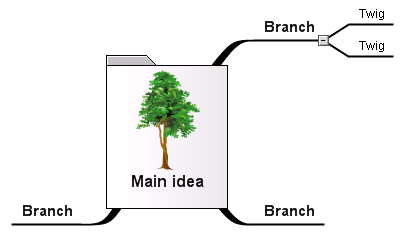 The main idea, subject or focus is made clear in a central image.
- The main themes radiate from the central image as 'branches'.
- The branches comprise a key image or key word drawn or printed on its associated line.
- Topics of lesser importance are represented as 'twigs' of the relevant branch.
- The branches form a connected nodal structure.
- Possible to get into details without losing sight of the overall picture While a mind map may have only one central theme, concept maps may have many interrelated main themes. Concept maps are tools for organizing and representing knowledge. They include concepts, usually enclosed in circles or boxes of some type, and relationships between concepts or propositions, indicated by a connecting line between two concepts. Words on these lines can be used to specify the nature of the relationships between different concepts.

Concept mapping can be used for for a number of different purposes
- to generate ideas (e.g. brain storming)
- to design a complex structure
- to communicate complex ideas
- to illustrate the relationships between different components or processes
- to aid learning by explicitly integrating new and old knowledge
- to assess understanding
- to diagnose misunderstanding
Steps in constructing concept maps'Select or Focus on a theme and then identify related key words or phrases. What is the central word, concept, question or problem around which to build your diagram or concept map? What are the concepts, ideas, descriptive words or important questions that you can associate with the main concept, topic, question or problem?
- Rank the concepts (key words) from the most abstract and inclusive to the most concrete and specific.
- Cluster (group) concepts that function at similar level of abstraction and those that closely interrelated.
- Arrange concepts in a diagrammatic representation.
- Add linking lines and where appropriate label lines with a qualifying word or phrase.
- Groups of people can work together on a concept map - this is a good way to "brainstorm" a problem or idea.
For more information on concept maps please see [[1]]
Concept Map of a theme
By using a public educational tool Freemind to build concept maps of themes in different subjects, we open up possibilities to think beyond a specific hierarchy or in any particular sequence. This allows us to make new connections to address the topic more creatively.
One
theme in the curriculum is selected for creating a concept map. The
first step is to understand the concept map and get an overall
idea of what is covered in the resource material and how it is
organised.
Theme Plan
Once the concept map is understood, we then work on a framework for the resource material. This framework is called the Theme Plan. The framework has been built on the constructivist philosophy of learning as recommended by the National Curriculum Framework 2005 (NCF 2005). Bloom's Taxonomy that was built in 1956 used Skinner's behaviourist learning philosophy which classified knowledge, comprehension, application, analysis , synthesis and evaluation as skills. With new learning approaches emerging, Bloom's taxonomy was revised in 1999. This revised taxonomy included Metacognitive Knowledge— Knowledge of thinking in general and your thinking in particular.
This
new constructivist philosophy and psychology of learning has been
used to create the structure of the theme plan. The
theme plan is built keeping in mind children's assimilation of
concepts from 6th
standard though 10th
standard. This framework is in a spreadsheet format, with the
following columns:
Theme:
This is the main theme of the
prototype.
Sub-Theme:
These are the sub-themes
that the main theme has been divided into.
Class:
In which class do you think the
concept must be introduced - 6th
standard to 10th
standard.
Learning
Outcomes: One of the
basic ideas here is that the content is only a vehicle for achieving
learning outcomes. We want to look at why we are teaching a topic
and how to teach it. These questions have to be asked and answered
in all subject areas.
Learning
outcomes are not only content based (factual; can be learned by
rote). They are broken into conceptual learning, skill
learning and the content/knowledge learning.
The content/knowledge learning part pertains to the factual
components, various definitions, procedural knowledge, theories, etc.
Concept
Learning/Idea to be Conveyed: Concept learning outcomes
look at what are the key discipline ideas in a topic or theme. These
allow the children to make a structure for their learning and help
them become continuous, life-long learners. They learn to abstract,
get to the core meaning and build upon that core understanding.
These concepts will be built according to the age of the student (NCF
calls this cognitive validity). For the teacher, a good way to
define a conceptual outcome is to ask this question : “ 20 years
from now; the student will forget all these definitions, formulae –
what is the key idea (s) that I want them to remember .”
Skill
Learning: Skills
are cognitive,
psycho-motor, linguistic and social abilities that are built over a
learning period. The skills can be directly related to the topic.
In this case, these will be called the applications of the concept/
idea/ content. For example, building a dynamo or fixing a bulb or
recording an experiment are directly connected to the lesson being
taught.
But
every lesson also has higher order skills which are important to
develop. For example, learning to observe carefully and accurately
or safety precautions around electricity are also skills that can be
developed.
Multiple
skills can be developed through one topic/ theme. More than one
topic can also be for addressing one skill.
Knowledge
Learning: The
content/knowledge learning part pertains to the factual components,
various definitions, procedural knowledge, theories, etc.
Activities/Evaluation:
The activity
that is described for the sub-theme and class. The details of the
activity and the evaluation questions are provided in the Resource
Book, the theme plan will have a hyper-link to the resource book.
Resources/Material:
The material and resources
that would be required for the activity.
Resource Book
The resource book will bring together the concept map and theme plan. It will include background material that will be required for teachers to understand a theme and use the theme plan. The resource book will also contain the overall curricular objectives of the theme for school education The background material will tie in with overall curricular objectives and not just the syllabus. The detailed explanation of all the activities and the evaluation mentioned in the theme plan will will be described in the resource book.
Curricular Objectives
The curricular objectives define/ describe what the learning outcomes of the students are when being introduced to this topic. These allow the teacher to define a concept in totality and not be limited only to the syllabus.
Background Material
The background material is meant to be teacher material. As a teacher, what should I know, how should I look at a topic to present it to the children in the most appropriate way.
This
includes detailed discussion of sub-themes, key terms to be
introduced in a simple and accurate manner and additional resources
that can be used.
Activities and Evaluation
The activities are discussed at the end of the resource book. These include experiments, simulations, discussions (after a video) and site visits. This section also includes discussion questions for the teacher to build the theme as well as evaluation questions.
The Complete Resource for a theme – Collaborative resource creation
The concept map, theme plan and the resource book, once reviewed will be available on the web portal [[2]]. The resources for the theme can be enhanced and enriched by all teachers. When a teacher wants to make a contribution to the resource book, he or she has to say which theme they want to make the contribution to and send it to the forum (Group Email).
Note,
the teacher can contribute in the following ways :
- Add an activity to an existing sub-theme.
- Add a new sub-theme with the details of each column for each Theme Plan.
- Add more background material to the resource book. Here the source of the background material must be provided
The material will be reviewed by a panel and will be added to the resource book if the quality criteria is met.
Sample Resources
Science
There are two sample resource materials that have been built – on measurement and light. This explores the various concepts to be introduced while teaching light along with how to address the syllabus topics. The resource book on measurements introduces the history of measurement and how to measure. These resources can be found at - [[3]]
Social Science
A similar resource book has been built for the Bhakthi movement. The focus here is to use the history and facts of the Bhakthi Movement to move beyond the facts and look at social aspects, social structure and organization. This resource can be found at the RMSA website, [[4]]
Mathematics
Fractions are a very difficult concept to teach and are not well-understood. This resource document explores different methodologies and approaches to explaining fractions with a set of activities on how to introduce the topic in the classroom. This resource can be found at the following address: [[5]] .
Understanding the Resource Book - Kannada Translation
ಪ್ರಕಲ್ಪನೆಯ ನಕ್ಷೆ :
FREEMIND
ಎ೦ಬ
ಸಾರ್ವಜನಿಕ ಶೈಕ್ಷನಿಕ ತಂತ್ರಾಂಶದ
ಸಹಾಯದಿಂ ದ ಬೇರೆ ಬೇರೆ ವಿಷಯಗಳ
ಪ್ರಕಲ್ಪನೆ ಗಳ ನಕ್ಷೆಯನ್ನು
ರಚಿಸುವುದರಿಂದ,
ಒಂದು
ವಿಷಯದ ಬಗೆಗೆ ಅನೇಕ ಆಯಾಮದ
ಚಿತ್ರಣವನ್ನು ಪಡೆಯ ಬಹುದಾಗಿದೆ.
ವಿಷಯದ
ಬಗೆಗಿನ ಸಾಂಪ್ರದಾಯಿಕ ಶ್ರೇಣೀಕ್ರುತ
ಯೋಜನೆಯ ಬದಲಿಗೆ,
ಈ
ಪ್ರಕಲ್ಪನೆಯ ನಕ್ಷೆಯಿಂದ
ಸ್ರಜನಾತ್ಮಕ ಯೋಜನೆ ಯು ಸಾಧ್ಯಾವಿದೆ.
ಪಠ್ಯಕ್ರಮದ
ಯಾವುದಾದರೋಂದು ಪ್ರಾಕಲ್ಪನಾ
ನಕ್ಷೆಯನ್ನು.
ಗಮನಿಸಿದಾಗ,
ಅದು
ಆ ಸಂಪನ್ಮೋಲ ಸಾಹಿತ್ಯದ ಒಂದು
ಸಮಗ್ರ ಪಕ್ಷಿನೋಟ ದೋರೆಯುತ್ತದೆ
.
ಪಠ್ಯಸಾರ:
ಪ್ರಕಲ್ಪನಾ
ನಕ್ಷೆಯನ್ನು ಅರಿತ ನಂತರ,
ಸಂಪನ್ಮೋಲ
ಸಾಹಿತ್ಯ ರಚಿಸಲು ಒಂದು ಚೌಕಟ್ಟಿನ
ಅಗತ್ಯವಿದೆ.
ಈ
ಚೌಕಟ್ಟನ್ನೆ ಪಠ್ಯಸಾರ ಎನ್ನಬಹುದು.
ಈ
ಚೌಕಟ್ಟು NCF
೨೦೦೫ರ
ಅನ್ವಯದಂತೆ.
ಕಲಿಕೆಯ
ರಚನಾತ್ಮಕ ತತ್ವಶಾಸ್ತ್ರದ
ತಳಹದಿಯ ಮೇಲೆ ರಚಿತವಾಗಿರುತ್ತದೆ.
೧೯೫೬ರಲ್ಲಿ
ರಚಿತವಾದ ಬ್ಲೊಮನ ವರ್ಗಿಕರಣದ
ಶಾಸ್ತ್ರವು ಸ್ಕಿನ್ನರನ ವರ್ತನಾವಾದದ
ಆಧಾರವಾಗಿಟ್ಟುಕೋಂಡಿತ್ತು.
ಇದರಲ್ಲಿ
ಜ್ನನ,
ಗ್ರಹಿಕೆ
(ತಿಳುವಕೆ),
ಅನ್ವಯ,
ವಿಶ್ಲೇಷಣೆ,
ಸಂಶ್ಲೇಷಣೆ,
ಮತ್ತು
ಮೌಲ್ಯಮಾಪನಗಳನ್ನು ಉದ್ದಿಷ್ಠಗಳಾಗಿ
ಗುರುತಿಸಿದೆ.
ಆದರೆ
೧೯೯೯ ರಲ್ಲಿ ಪುನರಚಿತವಾದ ಬ್ಲೂಮನ್
ವರ್ಗಿಕರಣವು,ವಿಶಿಷ್ಟ
ಸ್ರುಜನಾತ್ಮಕ ಜ್ನಾನ(ಯಾವುದೇ
ಜ್ನನದ ಸಾಮಾನ್ಯ ಗ್ರಹಿಕೆ ಮತ್ತು
ನಿರ್ದಿಷ್ಠ ಗ್ರಹಿಕೆ)ಯನ್ನು
ಒಳಗೋಂಡಿರುತ್ತದೆ.ಈ
ಪಾಠಸಾರವು ರಚನಾತ್ಮಕ ತತ್ವಶಾಸ್ತ್ರ
ಮತ್ತು ಕಲಿಕೆಯ ಮನೋವಿಜ್ನಾನವನ್ನು
ಆಧರಿಸಿ ರಚಿಸಲ್ಪಟ್ಟಿರುತ್ತದೆ.
೬ ರಿಂದ
೧೦ನೇ ತರಗತಿವರೆಗಿನ ವಿದ್ಯಾರ್ಥಿಗಳ
ವಿಷಯ ಗ್ರಹಿಕಾ ಸಾಮರ್ಥ್ಯದ
ಆಧಾರದ ಮೇಲೆ ರಚಿತಗೋಂಡರುವ
ಇದು spreadsheet
ರೊಪದಲ್ಲಿರುತ್ತದೆ.
ಇದರ
ಹಂತಗಳು
ಈ
ಕೆಳಗಿನಂತಿವೆ.
೧.
ಪಠ್ಯಸಾರ:
ಇಡಿ
ವಿಷಯವನ್ನು ಪ್ರತಿನಿಧಿಸುತ್ತದೆ
೨.ಉಪ
ಪಠ್ಯಸಾರ:ವಿಷಯವನ್ನು
ಹಲವು ಭಾಗಗಳಾಗಿ ವಿಂಗಡಿಸಾಗಿರುತ್ತದೆ.
೩.ತರಗತಿ:೬ರಿಂದ
೧೦ನೇ ತರಗತಿವರೆಗೆ ಯಾವ ಉಪಪರಿಕಲ್ಪನೆ
ಸೋಕ್ತವಾಗಿರುತ್ತದೆಯೋ ಆ ತರಗತಿ
ಕಲಿಕಾ
ಫಲಗಳು:ಭೋಧಿಸುತ್ತಿರುವ
ಪಠ್ಯವಸ್ತುವು,
ಕಲಿಕಾ
ಫಲಗಳುನ್ನು.
ಸಾಧಿಸಲು
ಇರುವಂತಹ ಒಂದು ಸಾಧನೆ.
ಕಲಿಸುವ
ಮೊದಲು ಏಕೆ ,ಏನು
ಮತ್ತು ಹೇಗೆ ಕಲಿಸಬೇಕು ಎ೦ಬ
ಪ್ರಶ್ನೆಗಳಿಗೆ ಉತ್ತರವನ್ನು
ಹುಡುಕುವ ಪ್ರಯತ್ನಮಾಡಬೇಕು.
ಕಲಿವಿನ
ಫಲಗಳು ಕೇವಲ ಪಠ್ಯವಸ್ತುವಿಗೆ
ಸಿಮೀತವಾಗದೆ,(ಉದಾ:ಕೇವಲ
ಕಂಠಪಾಠ ಕಲಿಕೆ)
ಅವುಗಳನ್ನು
ಸಮಗ್ರ ಪರಿಕಲ್ಪ ಕಲಿಕೆ,
ಕೌಶಲ್ಯ
ಕಲಿಕೆ ಮತ್ತು ವಿಷಯಗ್ರಹಣ
ಕಲಿಕೆಗಳಾಗಿ ವಿಭಾಗಿಸಬೇಕಾಗುತ್ತದೆ.
ಕಲಿಕೆ,
ಕೌಶಲ್ಯ
ಕಲಿಕೆ:ಇದು
ಒಂದು ನಿರ್ದಿಷ್ಠ ವಿಷಯದ,
ಮುಖ್ಯ
ತತ್ವಗಳನ್ನು ಒಳಗೋಂಡಿರ ಬೇಕು.
ಇದು
ಕಲಿಕಾರ್ಥಿಯ ಕಲಿಕೆಗೆ ಅನುಕಲವಾಗಿದ್ದು
ಜಿವನ ಪರ್ಯಾಂತ ಕಲಿಕೆಗೆ ಅನುಕಲ
ಕಲ್ಪಿಸಿರ ಬೇಕು.
ಕಲಿಕಾರ್ಥಿಯು.
ಅಮೂರ್ತದಿಂದ
ಕಲಿಕೆ ಪ್ರಾರಂಬಿಸಿ ವಿಷಯದ
ಒಳಾರ್ಥವನ್ನು ತಿಳಿದುಕೋಂಡು
ಅದರ ಸಹಾಯದಿಂದ ಉನ್ನತ ತಿಳುವಳಿಕೆಯನ್ನು
ಗಳಿಸುತ್ತಾನೆ .
ಈ
ಪರಿಕಲ್ಪನೆಗಳನ್ನು ಕಲಿಕಾರ್ಥಿಯ
ವಯಸ್ಸಿಗೆನುಗುಣವಾಗಿ(ಇದನ್ನು
NCF ಗ್ರಹಣ
ಸಿಂಧುತ್ವವೆಂದು ಕರೆಯುತ್ತದೆ)
ರಚಿತವಾಗಿರುತ್ತದೆ.
ಗಮನಿಸಬೆಕಾದ
ಅಂಶವೆಂದರೆ,
ಶಿಕ್ಷಕನು
ಕಲಿಕಾ ಫಲವನ್ನು ರಚಿಸುವಾಗ,ತತಕ್ಷಣದ
ಜ್ನನಕ್ಕೆ ಒತ್ತುಕೊಡದೆ.
೨೦
ವರ್ಷಗಳ ನಂತರ ,
ಭೋಧನೆಯ
ಯಾವ ಮುಖ್ಯಾಂಶಗಳು ಕಲಿಕಾರ್ಥಿಯಲ್ಲಿ
ಉಳಿದಿರಬೇಕು ಎ೦ಬುದರ ಬಗ್ಗೆ
ಖಚಿತತೆ ಇರಬೇಕು
ಕೌಶಲ್ಯ
ಕಲಿಕೆ:
ಕೌಶಲ್ಯ
ವೆಂದರೆ,
ಭಾಷೆ
ಮನೋ-ದೈಹಿಕ,
ಜ್ನಾನಾತ್ಮಕ
,ಸಾಮಾಜಿಕ
ಸಾಮರ್ಥ್ಯೆಗಳನ್ನು ಕಲಿಕಾ
ಅವಧಿಯಲ್ಲಿಗಳಿಸುವುದು ಎ೦ದರ್ಥ.
ಕೌಶಲ್ಯಗಳು
ನೇರವಾಗಿ ಪಠ್ಯಕ್ಕೆ ಸಂಬಂದಿಸಿರಬಹುದು.
ಇವುಗಳನ್ನು
ಇಲ್ಲಿ ಪರಿಕಲ್ಪನೆ ಜ್ನಾನ ಅಥವ
ಪಠ್ಯಾಜ್ನಾನದ ಅನ್ವಯಗಳೆಂದು
ಕರೆಯಬಹುದು ಉದಾ:
ಒಂದು
ಡೈನೋವನ್ನು ತಯಾರಿಕೆ ಅಥವಾ
ವಿದ್ಯುತ್ ದೀಪವನ್ನು jಜೋಡಿಸುವುದಾಗಲಿ
ಅಥವ ಪ್ರಯೋಗದ ಫಲಿತಾಂಶಗಳನ್ನು
ನೇರವಾಗಿ ದಾಖಲಿಸುವುದಾಗಲಿ,ಇವೆಲ್ಲವು
ನೇರವಾಗಿ ಪಠ್ಯಕ್ಕೆ ಸಂಬಂಧಿಸಿದ
ಕೌಶಲಗಳಾಗಿವೆ.
ಆದರೆ
ಪ್ರತಿಯೂಂದು ಘಟಕವು ಇಷ್ಟೆ
ಅಲ್ಲದೆ,ಇನ್ನೊ
ಹೆಚ್ಚಿನ ಕೌಶಲಗಳನ್ನು ಹೊಂದಿದ್ದು,
ಅವುಗಳನ್ನು
ಬೆಳಸಬೇಕಿದೆ.
ಉದಾ:ವಿದ್ಯುತ
ದೀಪದ ಬಳಕೆಯಲ್ಲಿನ ಮುನ್ನಚ್ಚರಿಕೆಗಳು,
ಹಾಗೊ
ಪ್ರಯೋಗಗಳನ್ನು ನಡೆಸುವಾಗ
ತೆಗೆದುಕೋಳಬೇಕಾದ ಮುಂಜಾಗ್ರತಾ
ಕ್ರಮಗಳು ಮತ್ತು ನುಖರವಾದ
ಅಳತೆಯನ್ನು ದಾಖಲುಮಾಡಿಕೋಳೂವುದು,
ಜ್ನನ
ಕಲಿಕೆ:
ಜ್ನಾನವು
ನಿರ್ದಿಷ್ಟ ವ್ಯಾಖ್ಯೆಗಳು,ಸಿದ್ಧಾಂತಗಳು,
ಸತ್ಯಾಸಂಗತಿಗಳನ್ನು
ಒಳಗೊಂಡಿರುತ್ತದೆ.
ಚಟುವಟಿಕೆ/ಮೌಲ್ಯಮಾಪನ:
ಚಟುವಟಿಕೆಯು
ಉಪಘಟಕ ಮತ್ತು ತರಗತಿಯ ಆಧಾರದ
ಮೇಲೆ ನಿರ್ದಾರಿತವಾಗಿದ್ದು,ಶಿಕ್ಷಕನಿಗೆ,
ಬೋಧನಾ-ಕಲಿಕಾ
ಪ್ರಕ್ರಿಯೆಯಲ್ಲಿ ಅನುಕೊಲ
ಕಲ್ಪಿಸುತ್ತದೆ.
ಸಂಪನ್ಮೊಲ
ಸಾಹಿತ್ಯವು ಮೌಲ್ಯಮಾಪನ
ಪ್ರಶ್ನೆಗಳನ್ನು ಒಳಗೊಂಡಿದ್ದು,
ಪಠ್ಯಸಾರದ
hyperlinkಗಳನ್ನು
ಒಳಗೊಂಡಿರುತ್ತದೆ.
ಸಂಪನ್ಮೊಲ
ಸಾಹಿತ್ಯ:
ಸಂಪನ್ಮೊಲ
ಸಾಹಿತ್ಯವು ಪ್ರಕಲ್ಪನಾ ನಕ್ಷೆ
ಮತ್ತು ಪಠ್ಯಸಾರವನ್ನು
ಒಳಗೋಂಡಿರುತ್ತದೆ.
ಇದರ
ಜೋತೆಗೆ ಪಠ್ಯವನ್ನು ಸಮಗ್ರವಾಗಿ
ಅರ್ಥೈಸಿಕೊಂಡು ಬೋಧನೆಯನ್ನು
ಸುಗಮವಾಗಿಸಲು ಅಗತ್ಯವಾದ
ಸಾಹಿತ್ಯವನ್ನು ಒಳಗೊಂಡಿರುತ್ತದೆ
. ಹಿನ್ನೆಲೆ
ಸಾಹಿತ್ಯವು,
ಶಾಲಾ
ಶಿಕ್ಷಣಕ್ಕೆ ಅಗತ್ಯವಾದ
ಪಠ್ಯಕ್ರಮದ ನಿರ್ದಿಷ್ಟಗಳನ್ನು
ಒಳಗೊಂಡಿರುವುದಲ್ಲದೆ,
ಕೇವಲ
ಪಠ್ಯವಸ್ತು ಮಾತ್ರವಲ್ಲ .
ಪಠ್ಯದ
ಎಲ್ಲಾ ಚಟುವಟಿಕೆಗಳು ಹಾಗೊ
ಮೌಲ್ಯಮಾಪನದ ಪ್ರಶ್ನೆಗಳನ್ನು
ಹಿನ್ನೆಲೆ ಸಹಿತ್ಯಾವು
ಒಳಗೊಂಡಿರಬೇಕು.
ಪಠ್ಯಗುರಿಗಳು
ಇವು ಕಲಿವಿನ ಫಲವನ್ನು ನಿರ್ದರಿಸುತ್ತವೆ
. ಇದು
ಕೇವಲ ಸೀಮಿತವಾಗದೆ.
ವಿಷಯದ
ಪರಿಪೋರ್ಣ ಗ್ರಹಿಕೆಗೆ ಸಹಾಯಕವಾಗುತ್ತದೆ.
ಹಿನ್ನೆಲೆ
ಸಾಹಿತ್ಯಾ:ಇದನ್ನು
ಶಿಕ್ಷಕರಿಗಾಗಿ ಸಿದ್ಡಪಡಿಸಲಾಗಿದ್ದು,ಶಿಕ್ಷಕನಾಗಿ
ನಾನು ತಿಳಿದಿರಬೇಕು,
ಒಂದು
ವಿಷಯವನ್ನು ಯಾವ ಸರಿಯಾದ ರೀತಿಯಲ್ಲಿ
ಪ್ರಸ್ತುತ ಪಡಿಸಿದರೆ,
ವಿದ್ಯಾರ್ಥಿಗಳಲ್ಲಿ
ಉತ್ತಮ ಕಲಿಕೆಯುಂಟಾಗುತ್ತದೆ
ಎ೦ಬುದರ ಚಿತ್ರಣ ದೊರುಕಬೇಕು.
ಎದು
ಒಂದು ವಿಶಯದ ಉಪಘಟಕಗಳನ್ನು ,
ಮು
ಖ್ಯ ಪದಗಳು ಎತ್ಯಾದಿಗಳ ಬಗ್ಗೆ
ಸರಳವಾಗಿ ,
ನಿಖರವಾಗಿ
ಮಾಹಿತಿಯನ್ನು ಒಳಗೊಂಡಿದ್ದು
ಹೆಚ್ಚಿನ ಸಂಪನ್ಮೊಲ ಸಮಾಗ್ರಿಯ
ಮಾಹಿತಿಯಿರ ಬೇಕು
ಚಟುವಟಿಕೆ
ಮತ್ತು ಮೌಲ್ಯಮಾಪನ:
ಸಂಪನ್ಮೊಲ
ಸಹಿತ್ಯದ ಕೊನೆಯಲ್ಲಿ ಚಟುವಟಿಕೆಗಳಿದ್ದು,
ಅದರಲ್ಲಿ
ಚಟುವಟಿಕೆಗಳು simulations
ವಿಡಿಯೋ
ಪ್ರದರ್ಶನದ ನಂತರ discussion
ಒಳಗೊಂಡಿರುತ್ತದೆ.
ಇದು
ಶಿಕ್ಷಕ ಮತ್ತು ವಿದ್ಯಾಥ್ಿ ಗಳ
ನಡುವೆ ಪರಸ್ಪರ discussion
ಅವಕಾಶ
ಕಲ್ಪಿಸಿ ವಿಷಯ ಗ್ರಹಿಕೆಗೆ
ಅನುಕೂಲವಾಗುವಂತೆ ಮೌಲ್ಯಮಾಪನ
ಪ್ರಶ್ನೆಗಳನ್ನು ಹೊಂದಿರಬೇಕು.
Computer Literacy
What is public Software
As our society becomes more and more digital, software, which is the 'building brick' of the digital society, becomes necessary for all. Basic software that is necessary for participating in the digital society needs to be provided to everyone as an universal right and entitlement should be seen as publicly owned software or Public software. As in the case of public education or public health, public institutions/ Governments are responsible to ensure that publicly owned software is available. This would ensure universal access to public software and also support public participation in its creation and sharing.
Just
like government schools are open to all without discrimination (not
necessary for private schools have many restrictions like fees,
parents background etc. ), public software is accessible to all
without discrimination while private software (also called
proprietary software) has restrictions where the user has to buy a
license to only use and cannot modify or share the software. Also
just like community has right to participate in government schools
(limited rights for parents in private schools) most public software
is community created (while in case of private software, the vendor
retains the important ownership rights).
Software
required by all includes operating system, text / image / audio /
video editors, email, web browser, search engine etc. Public software
needs to be free software, providing the freedom to use, study, modify and share,
to ensure universal access as well as participation in its creation
and modification.
See
[[6]]
for a list of public software applications for general use of all
and also another list of public educational software tools for
teachers.
What is GNU/Linux?
GNU Linux is a free and open source operating system software and hence is public software. Since the operating system is the basic software that “runs your computer”, it needs to be available freely to all, to ensure universal access. Free Software users always have the freedom to share software, without restrictions. On a technical level, Free Software guarantees the right to view and also modify source code, or even use it as a basis to make a new program. This has enabled Kannadigas to make Kannada version of Ubuntu GNU/Linux system for benefit of Kannadigas.
What is Ubuntu?
Ubuntu is a version of the GNU/Linux operating system. Ubuntu is a thoroughly modern operating system that provides you might find in Windows or Macintosh OS X, but without the drawbacks. It is quite simple, yet offers sophisticated features.
Hardware
support is excellent, with virtually every item of day-to-day
hardware supported, including graphics/sound cards, printers,
wireless, USB memory sticks, cameras, iPods, and so-on. There’s no
need to fumble around with driver CD : practically everything will be
up and running straight after installation, although as with any
operating system you may have to configure the system to your own
needs. Ubuntu provides free upgrades every six months (april and
october) which means frequent improvements in its features.
How to use Ubuntu
Logging in :
The
first thing you’ll see, after the computer has finished its
self-testing, is a boot menu. This lets you choose between Ubuntu and
Windows. The next thing you will see, after Ubuntu has finished the
first stage of booting, is the login screen. Simply click on your
username, type the password and hit Enter. Assuming both details are
correct, booting will finish, and the desktop will appear.
The
Desktop Layout
Panels : The two panels are visible
—one at the top of the screen, and one at the bottom. The one at
the top is concerned with presenting information, starting programs,
and configuring the system.
The
panel at the bottom is where programs minimize to, and this panel
also includes a Show Desktop button (left), a trash icon (right), and
a virtual desktop selector (right; of which more later). Files can be
dragged and dropped onto the trash icon, and clicking it lets you
view and empty the trash contents.
 Main
menus
Main
menus
The
three menus at the top of the screen (Applications, Places, System)
are known as the main menus. They stay on-screen all the time. When
an application starts, its own menus appear within its program window
beneath.
The
Applications menu at the top left provides
access to software installed on the system.
The
Places menu, alongside it, offers quick access
to locations within the file system, or attached storage such as USB
memory sticks. Digital cameras and MP3 players are also listed here
when plugged-in.
The
System menu, alongside the Places menu, offers
control over your computer’s settings. It has two sub-menus, as
follows:
Preferences:
This menu mostly lets you tweak settings relating to your particular
user account and the operation of the desktop. You can also alter
some hardware settings, such as the screen resolution, but only those
that relate to your personal desktop configuration.
Administration''':
This menu offers system-wide hardware configuration options, such as
altering the time/date, and options for configuring the underlying
Ubuntu system, such as adding/removing software.
Rebooting
and shutting down
To
shut-down or reboot the computer, click the Shut Down entry on the
System menu (under Ubuntu 12.04, select the Quit entry). Then select
the relevant option from the dialog box that appears.
Managing Files and Folders
Files
 Files
are the most basic unit of data that users can store on a disk. Every
program, image, video, song, and document is stored as a file.
Files
are the most basic unit of data that users can store on a disk. Every
program, image, video, song, and document is stored as a file.
Folder
A
folder is a collection of multiple files. Folders can also store
other folders called sub-folders. Folders are also called
"directories"
File
system
A
file system is a method of storing and organizing computer files and
their data.
File
Manager or File Browser
A
file manager or file browser is a computer program that provides a
user interface to work with file systems. The most common operations
used are create, open, edit, view, print, play, rename, move, copy,
delete, etc . Files are typically displayed in a hierarchy. Ubuntu
uses a file manager/browser called Nautilus. File browser is used to
- Create folders and documents
- Display your files and folders
- Search and manage your files
This file manager lets you organize your files into folders. Folders can contain files and may also contain other folders. Using folders can help you find your files more easily.
File
browser also
manages the desktop. The desktop lies behind all other visible items
on your screen. The desktop is an active component of the way you use
your computer.
Every
user has a Home Folder. The Home Folder contains all of the user's
files. The desktop is another folder. The desktop contains special
icons allowing easy access to the users Home Folder, Trash, and also
removable media such as floppy disks, CDs and USB flashdrives.
File
browser is
always running. To open a new File browser window(see previous
figure), double-click
on an appropriate icon on the desktop such as Home or Computer, or
choose an item from on the top panel.
In
Ubuntu, many things are files, such as word processor documents,
spreadsheets, photos, movies, and music.
Lets
see how to create a new folder in our home folder and save a text
file in it.
Step
1: Click on places → home folder
The
file browser will open.
Step
2: On the menu bar, Click on New → Create Folder, You'll see a new
folder with untitled 'folder as its name, you can
overwrite it with any folder name that you want and press enter.
This will create a new folder in your home directory
Step
3: Now, double-click on this new folder, it will open the new
folder. On the menu bar, Click on New → Create Document → Empty
file. You'll see a new file with new file as its name, you
can overwrite it with any file name that you want and press enter.
Double-click on the file and you can edit the text in the same.
How to Connect external devices
Connecting the Printer

 Click on the power button
- Select Printers
- Make sure you have connected the printer to your system.
- Click on the Add button and follow the instructions.
PS: The Displays and Printers options are also available when you click on Applications → System Tools → System Settings or by clicking on the power button and selecting System SettingsPrinter
Connecting to ProjectorsClick on the power button
- Select Displays
- In the window that opens, you will see the connected displays. To see the same thing in the monitor and the projector screen, click on the Mirror display check box.
- If the configuration looks fine (display is fine on both screens), Click on the Apply button. Select the Keep this configuration option when asked for.

Pen Drive
To make the pen drive work:
- Connect the pen drive to the USB port.
- Go to Ubuntu Menu Places > Home Folder
- You can access the pen drive from here
Burning a CD/DVD
To Burn a DVD/CD:
- Go to Ubuntu Menu Applications > Sound and Video > K3b
- Follow instructions from here to create Data/Audio or Video CD/DVD.
- You must have a CD/DVD Writer on your computer.
To install a new software in Edubuntu 12.04
Edubuntu 12.04 uses Ubuntu software center (an application to install and manage software) instead of traditional synaptic package manager (Page 12 of your module describes the use of Synaptic package manager which is used in the older versions of Ubuntu and Edubuntu).
Click on Applications -> Ubuntu Software Center
In the search box (on the top right corner of the
window), Enter the name of the application and press enter. In the
list click on the required application and then on the install
button.

Open Office
OpenOffice (same as LibreOffice) is a public software useful for making documents, spreadsheets and presentation files. OpenOffice Writer is very similar to MS Word. OpenOffice Calc is similar to Excel. OpenOffice Impress is like MS Powerpoint. OpenOffice works on both Windows and Ubuntu.
Using OpenOffice writer, you can type reports,
documents, edit them, format them well and save them in many document
formats - .odt, .html, .doc (.xls, .ppt) , .docx (.xlsx, .pptx) etc.
It also has an 'export to PDF' option for making PDF document with a
single click.
Department of Information Technology, Government of
India has recommended the ODF format used in OpenOffice/LibreOffice
as the standard for documents used in government.
Activity 1
Purpose
To
write a document using Open Office Writer
Process
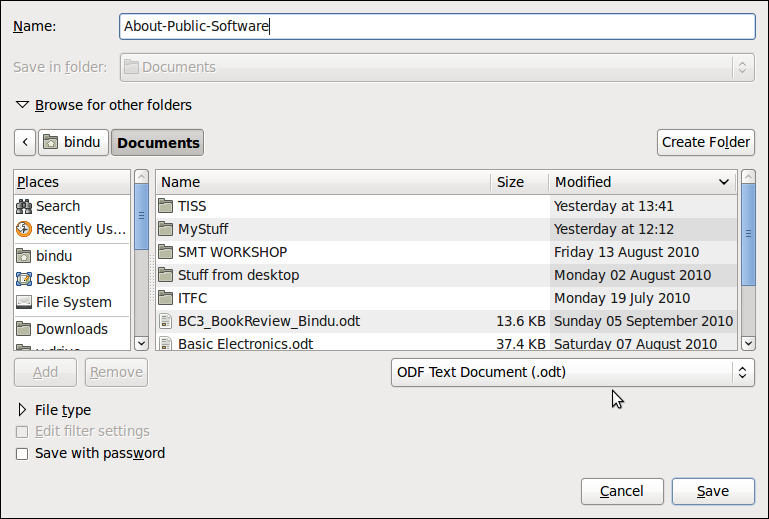 Select Application > Office > OpenOffice.org Word Processor
- Type the following Passage into the Open Office Writer {| border="1" |- | What is Public Software Software developed for public service, and especially in government, has a unique context and objectives deriving from those of public service; with its imperative of providing public goods and ensuring equity and social justice. |}
- You can try the following option to format the text
- Bold the heading
- Make the heading centred
- Select Menu Option File > Save As to save the file, name the file About-Public-Software
- A file called About-Public-Software.odt will be created in your folder Documents.

Activity 2
Purpose
To
create a table in Open Office Word Processor
Process
- Select Application > Office > OpenOffice.org Word Processor
- Select Menu Option File > Open (Ctrl +O)
- Open File About-Public Software.odt
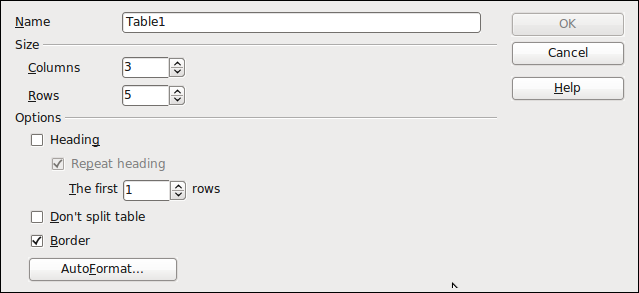 Select Menu Option Table > Insert >Table
- Insert a Table
- Select Columns = 3 Rows = 5 and Press Okay
- Enter the following data from the table below
- Save the file.

This is how the table will look.
|
Questions About Public Software
|
Number of Participants who are aware
|
Number of People not aware
|
|
What is Public Software
|
15
|
5
|
|
What is Open Office
|
12
|
8
|
|
What is Ubuntu
|
6
|
14
|
|
What is Computer Aided Learning
|
4
|
16
|
Peer review using OpenOffice
For peer review of our resources, it is very useful to use the 'record changes' in OpenOffice. This helps us to make changes in a document and also the changes can be automatically accepted WITHOUT retyping the corrections. It saves a lot of time and also becomes a digital record of peer review.
 To
record changes, click on 'Edit – Changes' and check / tick the
Record option. The Show option should also be checked/ticked
To
record changes, click on 'Edit – Changes' and check / tick the
Record option. The Show option should also be checked/ticked
Now
any correction or change or deletion in the document will be shown
separately in colour. The editor can make all changes in this way.
More than one person can make changes to same document. The name of
the editor will be shown when we move the cursor over the change.
When
the author receives the document, she can 'accept' or 'reject' each
change by right-clicking on the change. To accept all changes, author
can click on 'Edit – Changes – Accept or Reject' . See image
below.
Please use 'RECORD CHANGES' option to give your
feedback on documents shared by other teachers in the Subject
Teachers Forum, this makes sharing feedback and making required
changes easy/automatic.
Automatic Table of contents
OpenOffice can help you create table of contents, with page numbers, automatically.
To
do this, select / mark a heading in your document and then select the
'Heading 1' in top left corner in the formatting tool bar (usually
will be Text body or Default'). This will make that selected text, as
a 'Heading 1'. You can use Heading 2 for the next sub heading,
heading 3 for the next sub heading etc.
When
finished, you can go to the beginning of the document and click
'Insert – Indexes and Tables - Indexes and Tables' to insert a
Table of Contents.
 If
you make any changes to the document headings, you can go to the
Table of Contents created, right click and select 'Update
Index/table'. See image above.
If
you make any changes to the document headings, you can go to the
Table of Contents created, right click and select 'Update
Index/table'. See image above.
Kannada in Edubuntu
Writing Kannada Documents
- Please use only UNICODE font - Lohit Kannada. It is already installed in Ubuntu, you have to install it in Windows.
- All nudi fonts are not unicode, and UNICODE is the international and universal open standard that is being used.
Reading Kannada Documents
- If you are not able to read Kannada documents , it is because the font is not installed, you will have to install the font, see the frequently asked questions link in the last section.
|
Operating System
|
Software
|
Font
|
Keyboard Mapping
|
|
Ubuntu
|
IBus
|
Unicode- Lohit Kannada
|
Kn-kgp – Nudi
|
|
Windows
|
Nudi
|
ASCII - Nudi
|
Nudi
|
Please see the video 'Kannada typing using LibreOffice Writer' available in the Resources CD.
We will be using a new method Ibus for making
Kannada documents. (In the previous versions we used SCIM). Below are
the steps to configure Ibus and use it.
- Click on the power button
- Select Startup Applications
 Picture
1
Picture
1
- A window as shown in the Picture 2 will open. Click on the Add button on the right panel. Another small window 'Add Startup Program' will open. Enter the following details.
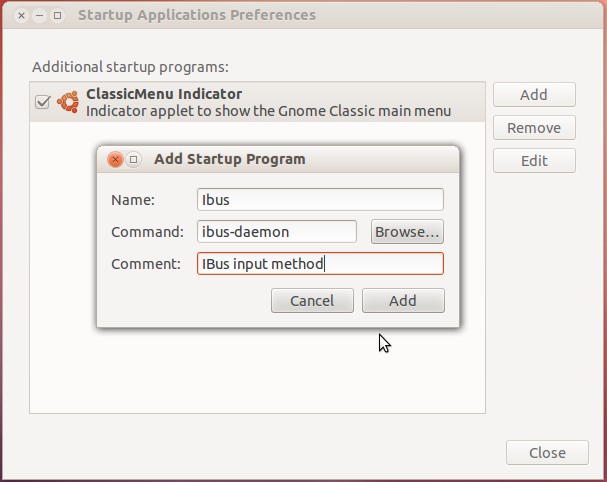 Picture 2 Name: IbusCommand : ibus-daemon (Please note: enter everything here in small letters)Comment : IBus Input method

Click on Add button.
- Click on the same power button and select System Settings.
- In the window that opens, select Language Support. A small window saying that not all languages are installed will appear. Select remind me later.
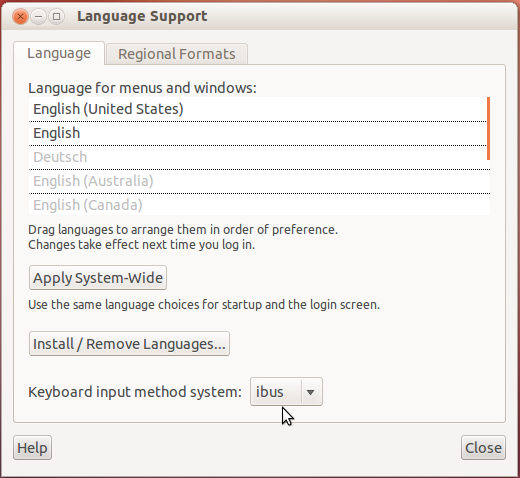 Picture 3 # In the Keyboard input method system, select 'Ibus' from the drop down menu. And click on Close
 - Restart the computer.
- Now when the computer restarts you'll see a small keyboard icon on the top panel as shown in the picture below
 Picture 4 # Click on the keyboard icon and select Preferences
 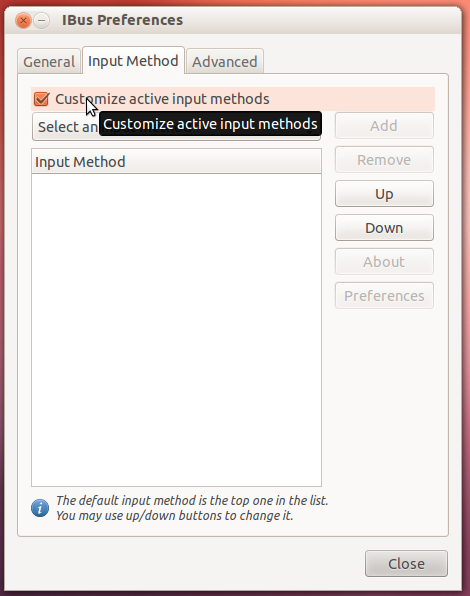 Picture 5
 - In the IBus preference window that opens, select the tab that says 'Input Method' and Tick the customise active input method box.
- Click on the Select an Input Method list bar and Choose the language that you wish to create documents with. In our case, we will be selecting Kannada. The option Kannada will have 3 choices : Kn-kgp, Kn-itrans and Kn-inscript. Kn-kgp use nudi keyboard layout, Kn-itrans uses baraha or transliteration keyboard layout. Kn-inscript uses the standard typewriter keyboard. You can select any of them and click on the Add button. You could add more languages if you wish to.
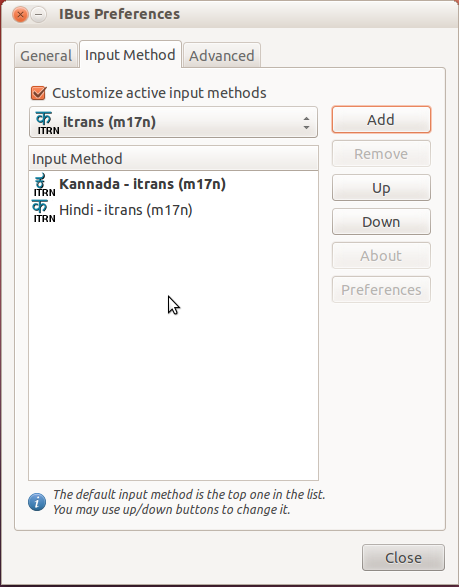 Picture 6 Now click on the keyboard icon on the top panel and select Restart.
 Open an input window like LibreOffice Writer. Configure for typing in Kannada (Refer to page 17 in your module). Press Ctrl and space and start typing in Kannada. You can toggle between the first language in the list (in the picture shown, it is Kannada -itrans) and English using Ctrl and space keys. If you wish to choose any other language click on the keyboard icon on the top panel and select the language from the list. Kn-itrans method can be chosen if you need to use the transliteration key map (Baraha Style). Kn-kgp can be used to input method using the Kannada Ganaka parishat key-map (Nudi style).


Please note that only Arkavattu works a little different here ( Eg to type surya, we need to press sUrfy, instead of the usual sUyF).
Setting up Kannada Language in OpenOffice.org, Ubuntu and Windows
First
- Click on system → administration → Language support
- Choose scim-immodule in the input method box.
- Log off and login again to see the effects.
Next,
- Open OpenOffice.org Word processor by clicking on Application → Office → OpenOffice.org Word processor
- Click on Tools → Options → Language settings → Languages
- Check Enabled for Complex Text Layout(CTL) and Choose Kannada in Default languages for Documents (CTL)
- Click on OK
Kannada Typing on Ubuntu in Kannada
ಉಬುಂಟು ವಿನಲ್ಲಿ ಕನ್ನಡ ಟೈಪ್ ಮಾಡುವ ವಿಧಾನ :
- ಕನ್ನಡ ಟೈಪ್ ಮಾಡಲು ಯೂನಿಕೋಡ್ ಫಾಂಟ್ ಗಳನ್ನೇ ಬಳಸಿರಿ,
ಲೋಹಿತ್ ಕನ್ನಡ ಒಂದು ಯೂನಿಕೋಡ್ ಫಾಂಟ್. ಇದು ಉಬುಂಟು ವಿನಲ್ಲಿ ಈಗಾಗಲೇ
ಪ್ರತಿಷ್ಠಾಪಿಸಲ್ಪಟ್ಟಿದೆ.
- ಎಲ್ಲಾ ನುಡಿ ಫಾಂಟ್ ಗಳು ಯೂನಿಕೋಡ್ ಫಾಂಟ್ ಗಳಲ್ಲ. ಓಪನ್ ಆಫೀಸ್ ನಲ್ಲಿ ಕನ್ನಡಭಾಷೆಯನ್ನು ಅಣಿಗೊಳಿಸುವ ವಿಧಾನ':' ಈ ಮುಂದೆ ಸೂಚಿಸುವಂತೆ ಕ್ಲಿಕ್ ಮಾಡುತ್ತಾ ಹೋಗಿರಿ.
- System > Administration > Language support.
- Input method ಬಾಕ್ಸ್ ನಲ್ಲಿ I-bus ನ್ನು ಆಯ್ಕೆ ಮಾಡಿರಿ.
- ಲಾಗ್ ಆಫ್ ಮಾಡಿ ಮತ್ತೆ ಲಾಗ್ ಇನ್ ಆಗಿರಿ.
- Application > Office > Open office.org ಮೂಲಕ Open office.org Word ಅಥವಾ Writer ಪುಟವನ್ನು ಆಯ್ಕೆ ಮಾಡಿರಿ.
- ನಂತರ Tools > options > Language setting ಗೆ ಹೋಗಿ ಅದರ ಎಡಭಾಗದ ಬಾಕ್ಸ್ ನಲ್ಲಿರುವ + ಅಥವಾ > ನ್ನು ಒತ್ತಿರಿ, ಒತ್ತಿದೊಡನೆ ಕೆಳಗೆ ಗೋಚರಿಸುವ Languages ನ್ನು ಕ್ಲಿಕ್ಕಿಸಿ.
- ನಂತರ ಬಲಭಾಗದಲ್ಲಿ ಗೋಚರಿಸುವ Enhanced Language support ನ ಕೆಳಕಾಣಿಸುವ Enabled for Complex Text Layout ನ್ನು ಟಿಕ್ ಮಾಡಿ, ನಂತರ ಮೇಲೆ ಕಾಣುವ CTL ನ ಎದುರಿರುವ ಜಾಗದ Default language ಜಾಗದಲ್ಲಿ kannada ಆಯ್ಕೆ ಮಾಡಿರಿ. OK ಮಾಡಿರಿ.
- Open office.org Word ಅಥವಾ Writer ಪುಟಕ್ಕೆ ವಾಪಾಸು ಬನ್ನಿರಿ. Ctrl + Space bar ಕೀ ಒತ್ತಿದಾಗ ಸ್ಕ್ರೀನ್ ನ ಬಲತುದಿಯಲ್ಲಿ ಮೇಲೇಳುವ ಭಾಷೆಗಳ ಪಟ್ಟಿಯಲ್ಲಿ kannadaಕ್ಕೆ ಹೋಗಿ Kn-Kgp ಆಯ್ಕೆ ಮಾಡಿರಿ. ಆಗ ಕನ್ನಡ ಟೈಪ್ ಮಾಡಲು ಸಾಧ್ಯವಾಗುವುದು '.ಅದೇ ಪುಟದಲ್ಲಿ ಮತ್ತೆ Ctrl + Space bar ಕೀ ಒತ್ತಿದಾಗ English ಟೈಪ್ ಮಾಡಬಹುದು. Ctrl + Space bar ಕೀ ಯನ್ನು ಇಚ್ಚಿತ ಭಾಷೆ ಆಯ್ಕೆಯ ಹೊಯ್ದಾಟದ ಕೀ ಯಂತೆ ಬಳಸಿರಿ. ಕನ್ನಡ ಟೈಪ್ ಮಾಡಲು ಅಗತ್ಯವಾದ ಕೀಲಿ ಮಣೆ ವಿನ್ಯಾಸ'.
 CAPITAL ಅಕ್ಷರಗಳನ್ನು ಟೈಪಿಸಲು Shift ಅಥವಾ Caps Lock ಕೀ ಬಳಸಿರಿ. 'ಒತ್ತಕ್ಷರಗಳನ್ನು ಟೈಪ್ ಮಾಡಲು ಸರಳ ವಿಧಾನ'.
- ಅಕ್ಷರ ಟೈಪ್ ಮಾಡಿರಿ, ಅದಕ್ಕೆ ಕೊಡಬೇಕಾದ ಒತ್ತನ್ನು f ಕೀ ಒತ್ತಿದ ನಂತರ ಒತ್ತಿರಿ.
- ಉದಾ: ಉ ತ್ಕ ಟ = u t f k q. ಚೆ ಕ್ = c e k f ಕೃ ತಿ = k R t I ಅ ರ್ಥ = a TF ರಾಷ್ಟ್ರ = r A x f q r ಉ ತ್ಕೃ ಷ್ಠ = u t f k R x f Q.

Web Resources
In order to access the internet, please open the web browser Mozilla Firefox. Go to Applications – Internet – Mozilla Firefox.
To
search for any topic of your choice, type www.google.co.in
in the address bar. If you already know the name of the website, you
can type it in the address bar. For example, our website is
[[7]].
(Please
make sure you are typing correctly; please do not make spelling
mistakes.). Please note: If you click on the 'kannada' option in the
above window, you can browse the web in Kannada.

Bookmarks
If
you want to keep going to the same website again and again, you can
add it to your bookmarks. This is a shortcut which will help you go
to the site faster.
To
do this, please see the menu options on the top left corner of your
browser. There will be an option called book marks. Please click on
it and click on 'bookmark this page'. Next time when you open your
browser, you can click on bookmarks and select the website instead of
typing it out.
Copying
the website address
If
you want to give the link of the website in your resource book, just
highlight the text of the page (which is in your address bar). Copy
the link and paste it in your document.
Saving
a web page
If
you want to save the contents of a webpage on your machine, in the
menu bar click on File – Save as (this is similar to how you save a
document. The only difference is that the file will be saved in .html
format and will be opened using the Firefox browser.
Copying
the contents of the webpage
If
you would like to copy the contents of the webpage, go to Edit –
Select All. Right click on the page, Select copy and then paste it on
to the document.
Some
useful websites:
[[8]]
(RMSA's Subject teacher forums website where all your resources will
be available.
www.kn.wikipedia.org
(Kannada wikipedia)
www.wikipedia.org
(English Wikipedia)
www.khanacademy.org
(Teaching Learning Videos)
www.youtube.com
(All Videos)
[[9]]
(Google
books. You can find many books here on any subject of your choice)
[[10]]
[[11]]
Email and mailing list
How to create an email id
To create an email id you can go to any of the following websites
This
handout will explain how to do this on www.gmail.com
On
the right side bottom of www.gmail.com,
you will see the option 'Create a New Account'.
You
will have to fill the next page that appears page to fill. (The
picture on top is an example of the form that you have to fill.)
Please fill it carefully. Make sure that you write down your username
and password in a safe place so that you do not forget it.
The
following step on gmail usually asks you to fill in your mobile
number. Once you do that, you will get an sms with a number in it.
Enter the number and then you are done. Your e-mail id is ready!
How
to email
- Open Mozilla Firefox. Type www.gmail.com (or other site where your mail is) in the address bar.
- Enter your username and password CORRECTLY.
- To check your existing messages, go to Inbox.
- To compose a new message, go to 'Compose Mail'. These can be found on the left panel.
The Compose Mail Window
The compose mail
window will look like this.
Making a mailing list
State resource persons will give a list of the participants (after creating their email ids). This list should include the following data:
- Name of participant
- Block
- District
- School
- Subject taught
- Classes taught
- Mobile Number
- Email Id
- Name of computer programme in the school
- Number of working computers
Making a Google Group
This google group will help you keep in touch with all the participants through email. All the participants email ids will be added to the group and a group email list will be created. If you send a email to this email list, it will go to all the teachers.
In
order to make a google group, please go here:
[[12]].
Click on the icon 'Create a group' . The next step is to put in your
username and password (please put same details as you put while
logging into your gmail).
Next
step is to fill the form below.
- Give a name for your group and create an email id (eg. bagalkotsciencestf@googlegroups.com).
- Put a small description of what your group is about.
 Lastly tick the 'restricted' category so that only you can add members to the group.) After this, add all the participant email id in the next page and write an invitation message to welcome them to the group.Your google group is ready. To send all members a mail, please send it to bagalkotsciencestf@googlegroups.com (this is an example name).

Thunderbird Mail Client
- Thunderbird is a free, open-source, cross-platform application for managing email and news feeds. It is a local (rather than a web-based) email application that is powerful yet easy-to-use.
- Thunderbird is free. Also, it gives you control and ownership over your e-mail.
Advantages of Using E-Mail Clients
- First, using an email client can be a tremendous time-saver if you have multiple email accounts.
- If you want to check for new messages across all of your email addresses, then that means that you will have to log in to several different sites.
- Once you download and set-up an e-mail client like Outlook or Thunderbird, it will download your mails across all of your accounts, so that you can access them all at one easy place.
- One of the greatest advantages of using an e-mail client is that they allow you work with your e-mails even when you are offline (which will be demonstrated).
- You can group your messages/mails into folders.
Configure Gmail on Thunderbird:
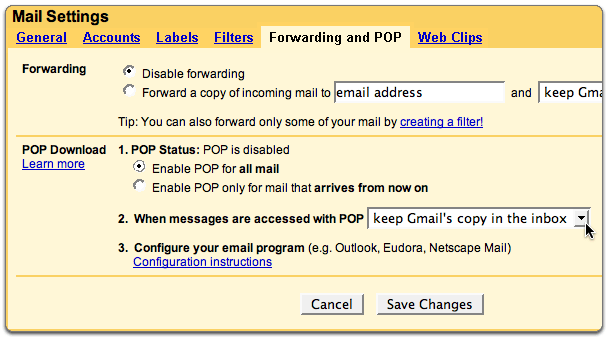 You can read your Gmail messages from a client or device that supports POP, like Microsoft Outlook or Mozilla Thunderbird.
- Enabling POP in Gmail:
- Sign in to Gmail.
- Click the gear icon in the upper-right and select Mail settings at the top of any Gmail page.
- Click Forwarding and POP/IMAP.
- Select Enable POP for all mail or Enable POP for mail that arrives from now on.

Adding Your Gmail Account to Thunderbird
- To add a new mail account in Thunderbird, follow the steps:
- When you open Thunderbird for the first time, you need to create a mail account (your existing e-mail account).
- Go to File → New → Mail Account.
- The Mail Account Setup box will appear and you need to enter your details (User name, password, e-mail ID etc) as shown:
- Click Continue after you enter your details. The server starts verifying the details to setup setup your account.


 Once the details are verified, click Create Account.
- Your account is now created and Thunderbird downloads your messages from the server.

Filtering Messages
- Message filters are useful if you routinely want to perform certain actions on messages, according to criteria that you've specified.
- For instance, you can have incoming mail automatically sorted into different folders, with certain messages labelled, marked as Junk, or even deleted.
- Filters can be applied automatically to incoming mail, or you can run them manually when desired. (This will be demonstrated)
Gtalk – Web based Video and Voice Chat
Google Talk is an instant messaging service that provides both text and voice communication. People use the Internet for instant messaging, voice & video chatting etc.
- GTalk is an equipment through which you can interact with people.
- If you have an account with Google, i.e. a Gmail ID, then you can use GTalk to message, audio/video chat with people from anywhere in the world.
- You can save a lot of time and money using video conferencing.
- You can avoid travelling to distant places to participate in meetings.
- You may attend a meeting from your houses or offices.
Getting Started:
- Open Firefox Browser on you system
- Go to www.gmail.com
- Login to your account using your Gmail ID.

Note:
To use GTalk, one must have a google
account. If you do not have a Google account, then:
- Go to www.gmail.com
- Click on the Create Account button in the top right corner of the window
- Enter the required details and create your account.
Once you login, you can see the list of contacts on the right side of the window. There are some coloured icons present in front of each of your contacts' names:
|
|
The person is available
|
|
|
The person is busy
|
|
|
The person is idle
|
|
|
The person is offline (or Not Available)
|
If you do not have any contacts added
in your contacts list, then you can add one or more by entering their
e-mail id in the search bar just above the chat (as shown in the
screen shot).
![]()
To start a conversation with a person, you must click on his/her name.
 After
clicking on the persons name, you will get a small chat box on the
bottom right corner of the window (as shown in the screen-shot).
After
clicking on the persons name, you will get a small chat box on the
bottom right corner of the window (as shown in the screen-shot).
Instant Messaging:
- Click on the rectangular box to start typing your message.
- After you have entered your message, press “Enter” to send your message instantly.
- When you hit Enter, the other person receives your message instantly.
Audio/Video Chatting:
- To start an audio chat, you will require a microphone.
- To start a video chat, you will require a web-camera.
To start an audio or video chat, you will need to first install the Voice and Video chat plug-in.
Installing Voice and Video chat plug-in:
In the chat box, click on the phone or the video symbol.


- Click 'Click Here' which appears in the chat box.
- You will get a separate confirmation box. Click on “Get Started”.
- You will be redirected to a separate page.
- Click on “Install Voice and Video Chat” which appears on the right side of your page.

- Select your appropriate download package and click “Install voice and video chat”. It is usually the first one '32-bit .deb (For Debian/Ubuntu)

- The package will be downloaded.
- Right click on the downloaded file and select “Open with Ubuntu Software Center”.
- This will open up Ubuntu Software Center.
- Click “Install” which appears on the right side.
- This will install the plug-in for voice and video chat on Gtalk.
- This installation will take a while and this will install the features which are required for the audio and video chat.
- This will permanently install these features and you do not have to install them each time you want to start any audio/video chat.
- This is a one time installation!
Computer Aided Educational Tools
We are all witnessing widespread developments in IT Education. More and more ICTs (Information Communication Technology) are being used in almost all aspects of our lives. In our education system all teaching-learning methods are witnessing a shift from teacher centred teaching to a more learner centred one. The possibility of making this shift is high by using computer aided tools to bring to life abstract mathematics and science concepts.
National Curriculum Framework (NCF) 2005 talks of a
major shift in teaching education programme from passive reception to
active participation in learning. From learning within the four walls
of classrooms to learning in the wider social context. From knowledge
as “given” and fixed to knowledge as it evolves and is created.
From linear exposure to multiple and divergent exposure. Moving from
a teacher centred lecture driven classroom to more learner centred
classrooms. Using these computer aided tools as teaching-learning
aids will enable teachers to make these shifts suggested by the NCF
2005. The children will be able to construct their own knowledge
via hands on experimentation by using these computer tools. To enable
children to connect these learnings and utilize the tools to the best
possible extent, it is essential for subject teachers to facilitate
this learning experience.
It is therefore important for the teacher to understand
how to use these various tools and become confident users of the same
to bring about maximum understanding of the subject using these tools
as aids.
Integrating tool with classroom lessons
There is no one fixed solution that works for
integration of computer aided tool usage with classroom chalk-talk
lessons. It depends on the teacher, her students and the availability
of computers. If the students have access to the computer in groups
in the computer period, then one could follow the process outlined
below.
- Introduce the topic in the classroom with regular chalk and talk process
- Create an activity related to the topic to be done in the computer period in the lab.
- Discuss the topic and learning in the classroom again after the students have done the activity.
There may not be time available to cover each and every topic in this manner. The teachers must use their judgement to plan which topics they think are key or critical to integrate with the tool.
List of Tools and their usage
We give here some important tools and a brief description of how to incorporate them into lessons.
English
Kanagram
Kanagram is a computer application which can introduce children to build their vocabularies and introduce them to new words. This application comes with a pre-loaded list of words. However, teachers and students can create new list of words. Given below is a step by step procedure of using these applications.

Figure
1
This figure shows the main screen of Kanagram. The word in the middle
of the screen 'haneetpl' has to be decoded and the answer is
to be written in the white bar locaed at the bottom of the screen.
Clicking on 'hint', located on the bottom left corner of the
screen will reveal the hint, which can help the person in identifying
the word.

There is much more that one can do with Kanagram, teachers can create
their own word lists.
Figure
2
- Click on the icon where the mouse pointer is kept in Figure 2. The 'Configure – Kanagram' window will open on the screen.
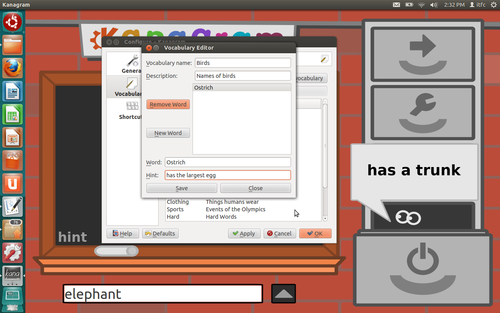

Click on 'Vocabularies' – this will reveal all the pre-loaded lists that already exist in the application.
Figure 3
- Click on the option of 'Create New' and the 'Vocabulary Editor' will appear on the screen.
- Fill in columns Vocabulary name and Description to begin adding words to your word list.
- Click on 'New Word' and then add the word which you want

Figure
4

Figure
5
When you have added enough words, click on 'Save' and close the
window. The window appearing in Figure 5 will now have the new
list which you have created. If you wish to add more words, click on
'Edit' after selecting the list to be edited. This will allow you to
add/remove words.

Figure
6
In the above picture you can see the newly added word list appearing
on the screen. For a new list click on the top right icon.
Freemind
 About
Freemind
About
Freemind
Freemind is primarily a tool for creating and editing
mind maps. It can be used by teachers to plan lessons, plan stories,
organize their academic year etc...
Resources of mind maps available for teachers
www.gnowledge.org
has many mind maps created for teaching various topics in many
subjects that can help you plan lessons and also get new ideas.
How to Install Freemind
Please see section on how to Install New Software in this document.
 How
to use Freemind
How
to use Freemind
To Open from the desktop menu select Applications >
Office > Freemind
Once Freemind is open for Help select menu option Help >
Documentation
To create a mind map, first select the mode as Modes
> Mindmap (shortcut ALT+1)
then select FILE > NEW (shortcut Ctrl+N). You
should see a screen as follows:
To save select menu option FILE > SAVE AS to
see the window below, select the folder
/home/bindu/Documents/ITFC/TCoL) to save file and also the name
(story) of the mind map.
Note: [./ -
means current folder; .//
- means parent folder]
To start writing the mind map use the following options
selecting from the menu option
Edit > Edit (Shortcut F2)
Edit > Edit a Long Node (Shortcut Alt +Enter)
Edit > New Child Node (Shortcut Insert)

Science
Simulating Experiments using a Computer Tool
Science is best learnt by doing and observing. When for
different reasons the students do not have access to physics
laboratory, making use of computer aided tools to simulate these
phenomenon provide students with a virtual laboratory. Using these
tools that simulate a science lab is useful to bring children closer
to visualize the concepts better and therefore understand some of the
complex and abstract phenomenon.
Audio visual aids played an important role to classroom
teaching and learning. But in the present context of constructivist
learning, interactive software becomes very relevant as it enables
children to construct their own experiments and observe the results.
PhET
How to install PhET
 Please
see the section Additional Installation Guidelines
Please
see the section Additional Installation Guidelines
PhET is a tool that has several science
simulations already built-in. There are simulations in Physics,
Chemistry and Biology. The power of this tool is that it is possible
to simulate experiments that are difficult to perform. It is also
very effective for analysing phenomena that occur. This is how the
PhET window looks. We will now click on the orange tab which says
“Play with sims....>”
 PhET
Opens in the Firefox Web Browser. When you install the Ubuntu public
software, PhET simulations are already downloaded on your machine, so
you do not need internet access.
PhET
Opens in the Firefox Web Browser. When you install the Ubuntu public
software, PhET simulations are already downloaded on your machine, so
you do not need internet access.
How
to open a simulation
As
an example a simulation in Physics is shown below.
This
will open a page of simulations with an index on the left. Click on
Physics and Motion under Physics on the index. You will see all the
simulations listed here.
 Now
select Energy Skate Park .
Now
select Energy Skate Park .
This
simulation shows total energy is conserved and how Potential
Energy-Kinetic Energy conversion takes place.
When
we click on this simulation the application will prompt you to either
Open or Save it locally.
As
all files are already saved locally click on open to start the
simulation.
Lesson
plan using a simulationThe
simulation window will open which looks like this.
 The
simulation settings in more detail below.
The
simulation settings in more detail below.
- There is a track along which the skater can move.
- We can choose the skater; the mass.
- You can choose to add measuring tapes; this will help measure distance. If you mark the potential energy reference, you can see where the PE is zero. The grid will help plot the position.
- You can also choose to see the path – the points will be marked on the simulation as the skater goes back and forth. The display of KE, PE and total energy can be shown through a bar graph. The “pie chart” gives you the legend.
- You can also plot the energy changes with respect to time as well as position of the skater. One key parameter in the simulation is gravity.
- You can simulate this experiment on the moon, Earth or Jupiter. You can also simulate it in space. The value of “g” in the box will change when you click on these different options. Notice that gravity is given as N/Kg; what we refer here is acceleration due to gravity and has the units m/s2.
- We can also add track friction (not visible in this snapshot) and demonstrate what happens to the skater.
Process
- Now start the simulation; after adding the grid.
- Add add the PE reference at 0 metres to be 0.
- Now we will click on the Bar Graph: This will show the changes between PE and KE. Notice that the thermal energy is zero.
- Energy Position Graph Energy-time graph. This will display the PE and KE with respect to position above the ground.
- The Energy Time Graph will show the PE and KE swings across time.
- Notice that in all these graphs the KE reaches zero; but the PE is never zero. The PE is never zero because we the lowest part of the track is still above the ground; we have defined the ground as the PE reference of zero. A snapshot of these graphs is given below.

 Now
we will look at what happens to the skater when you add track
friction and we plot all these graphs.
Now
we will look at what happens to the skater when you add track
friction and we plot all these graphs.
This
is how the graph will look as the skater slows down due to friction
and the KE reduces to zero.
Now
the skater has come to rest and the KE has come to zero.
 Now
you can reset the simulation and run it for different values of
acceleration due to gravity.
Now
you can reset the simulation and run it for different values of
acceleration due to gravity.
Questions
for discussion:
What
do we mean by PE reference?
What
does change in PE mean with respect to the reference?
What
are the implications of adding friction?
Can
you connect this to the gravitational force of attraction?
Step
About STEP
STEP
is an interactive tool for Physics; it can be used for simulating
complex interactions in mechanics.
Installing Step
Please see the Install New Software section to install it if it is not available on
your Ubuntu system. You will need to be connected to the internet for
this.
Opening STEP
On the desktop click
Applications >
Science > Step OR Applications >
Education> Step
The
STEP Window
This
is how the STEP window looks. The main components :
 Palette
– which contains the objects, interactions and components
Palette
– which contains the objects, interactions and components
World Scene - where the objects interactions and
components are added to create the simulation
Properties Window – Where properties of objects from
the palette can be viewed and edited
History Window – Where the history of the simulation
is recorded
Simulate Button – To start and stop a simulation
Lesson Plan using a simulation
Purpose
Learn to create a simulation in STEP. This activity will
simulate free fall of an object.
Process
- Click on a Disk in the palette window and then click on the world scene to add the object
- Once an object has been added, an interaction can be added to the object
- Click on Weight Force in the palette window and then click on the disk in the world scene . A red line will appear indicating that the interaction has been added.
- Now click on Simulate to view the simulation.
- To restore the objects to their original position click on undo
- Observe the disk properties in the properties window and discuss
 To
save a simulation in STEP ,
To
save a simulation in STEP ,
- go to menu item File -> Save As
- All files will be saved with the extension “step”.
- Once you save a simulation, you can simply open a simulation and demonstrate.
K Tech Lab
About K Tech Lab
K
Tech Lab is a free software which helps to make different types of
circuits (electronic & electrical) and conduct experiments.
Various electronic components like resistor, diode, switch,
transistor, micro controllers etc. can be run using this software.
Since it works in GUI mode, it is very easy to handle. The components
required for electric circuits can be easily dragged into the work
area using a mouse. When we join the pins using mouse, the circuit is
formed. The properties of each component is displayed when bring the
pointer above it. Students are not able to do some experiments which
involve real devices and consumables, even in groups. But these
experiments can be done in KTech Lab environment. Thus loss due to
the damages and lack of consumables can be avoided. Using this
software students can easily form the circuits and can repeat the
experiments a number of times.
How
to Install K Tech Lab
- You will require Internet connections
- Go to [[13]]
- Click on the green download button and click save.
- The file ktechlab_0.3-6_i386.deb will be downloaded.
- Go to Ubuntu Menu Places > Home Folder
- Select Downloads folder
- Double click on ktechlab_0.3-6_i386.deb, the software will be installed
Introduction to K Tech Lab Interface
First in the File Menu Option Select File > New
and Select Circuit as shown below


K Tech Lab Window

Component Tab
This tab contains different electronic components that
can be used in K Tech Lab. It includes various electrical components,
discrete components, switches, output devices, logic components,
connection, Integrated Chips etc.
Sources : This
section contains various voltages, current sources.
Discrete : Resistors,
Condensers, Diodes, transistors etc. are available here.
Outputs : Output
components such as LED, Signal Lamp, devices like Voltmeter, Ammeter,
Oscilloscope etc. are arranged in this section.
Work Area: This
is the space for building the electronic circuits.
Oscilloscope: It
helps to recognise the signals with wave form in graphical mode.
All components can be dragged and dropped in the Work
Area to create a circuit.
To connect the components to make a circuit select
either 'Automatic' or 'Manual' as shown below. Please use Automatic
as a beginner.
 Automatic
- Select 'Automatic' from the connection routing mode in the
toolbar. The pointer changes its shape when brought to the lead of the component to be connected. The drag and reach near the lead of the other component. The colour of the line changes and the connection is completed when the mouse is released.
Manual : Select 'Manual' from the connection
routing mode in the toolbar. To connect the leads of the electronic
components in this mode, bring the mouse pointer near the first lead.
The mouse pointer changes, then click at the point and drag in the
direction we require. To have a bend
in the circuit click and move the mouse according to our
need. When we reach the next lead the colour of the line changes,
then click and complete the connection.
To change the orientation of the electronic
components: Right click on the
component, which is in the work area, and then change the orientation
of that electronic component as required.
Activity 1: Basic Circuit
 Purpose:
To learn to make a basic
circuit with battery, switch, signal lamp and voltmeter
Purpose:
To learn to make a basic
circuit with battery, switch, signal lamp and voltmeter
Process
- Drag and Drop a a battery, switch (SPST) and a signal lamp in the work area.
- Use 'Automatic' connection and the mouse to connect the circuits as shown below.
- Click on the switch to see the lamp glow.
- Add a voltmeter and observe the reading when the switch is turned off versus on.
- Save a K Tech Lab Circuit file
 Save
File : Select File >
Save and enter file name
Activity_1 and save
the file. It will save with a .Circuit extension. Click on Save
Save
File : Select File >
Save and enter file name
Activity_1 and save
the file. It will save with a .Circuit extension. Click on Save
To open a file select File > Open and select
file to open
Discussion Points
- Discuss this with reference to a torch.
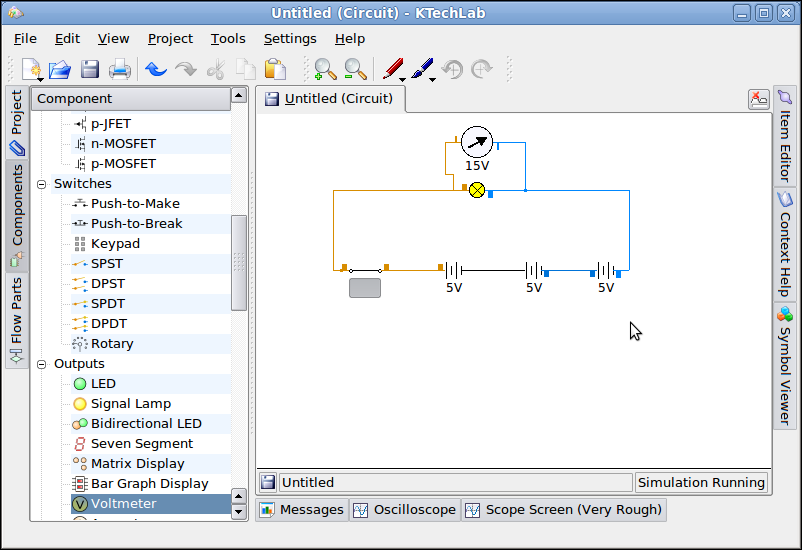 Discuss what happens when the circuit is broken (switch is off), so children understand that a switch breaks a circuit.

Activity 2: Cells in Series/Parallel
Purpose: To
connect cells in series and observe the voltmeter and ammeter
readings readings
Process
- Drag and Drop 3batteries, switch (SPST), a signal lamp and voltmeter as shown in the figures in the work area.
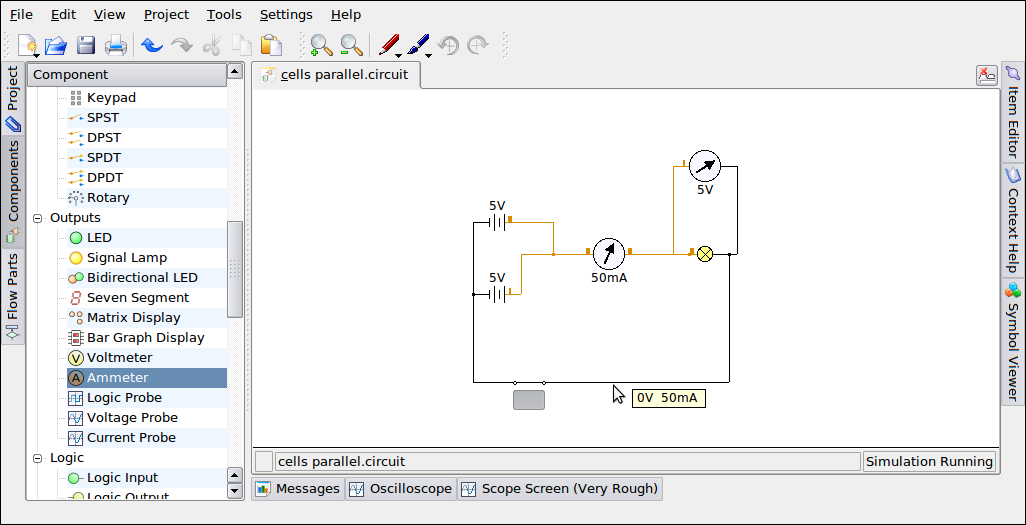 Use 'Automatic' connection and the mouse to connect the circuits as shown below, first the cells in series, then the cells in parallel.
- Click on the switch to see the lamp glow.
- Observe the reading of the voltmeter when the switch is turned off/on versus on.
- Save the file as Activity_2

Discussion Points
- You may discuss what happens to the current and voltage (potential difference) when connected in series .
- Compare water flowing through a pipe, and current flowing through the circuit and see if it can be explained this way.
Activity 3 Ohms Law Verification
Purpose
To verify Ohms Law
Process
 Drag and Drop a batteries, switch (SPST), an ammeter and voltmeter as shown in the figure here.
- Use 'Automatic' connection and the mouse to connect the circuits as shown below.
- Click on the switch and record the voltmeter and ammeter readings
- Click on the resistor and change the value of the resistance and record the readings of the meters.
- Click on the battery and change the voltage of the battery.
- Record the different readings.
- Save the file as Activity_3

Social Science
KGeography
About KGeography
KGeography is a Geography educational tool that allows
you to explore maps by continents, countries. Children can explore
states, their capitals, flags etc of each country.
Purpose
In an interactive and fun way allow children to explore
the world maps and create activities to enhance the children's
knowledge about a specific continent, country or state. Can introduce
children to concept of direction (north south east west), routes
etc...
How to Install KGeography
Please see section on how to Install New Software in this document.
Activity 1: To open and use the basic Explore Map
option.

- To explore a continent or country click on File > Open Map and select a country and click OK
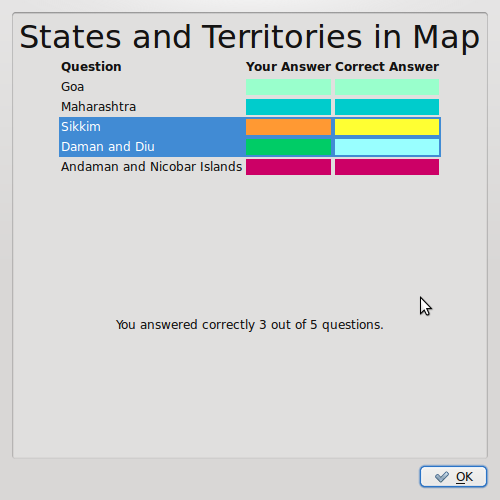 Place mouse over the region in colour and left-click to view Name and Capital

Computer Lab Activity Ideas:
- First explore India, and all the states and capital
- Point out the islands of India and talk about what islands are.
- Explore North South East West directions
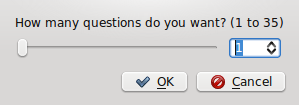 Talk about what a capital of the state means, also talk about the capital of the country.
- Ask if someone has to travel from place A to B (Bangalore, Karnataka to Puri, Orrisa) what states they need to pass and which direction they need to travel.
- Identify the smallest and largest states
- What states are called the “Seven Sisters”. What is Karnataka called ?

Activity 2 : Test yourself
- To test yourself , select any tab (Location of States and Territories) in Test Yourself as seen in image in previous page.
- The window below will appear, select the number of questions (1 to 35) and select OK
- The question will appear on the left hand panel
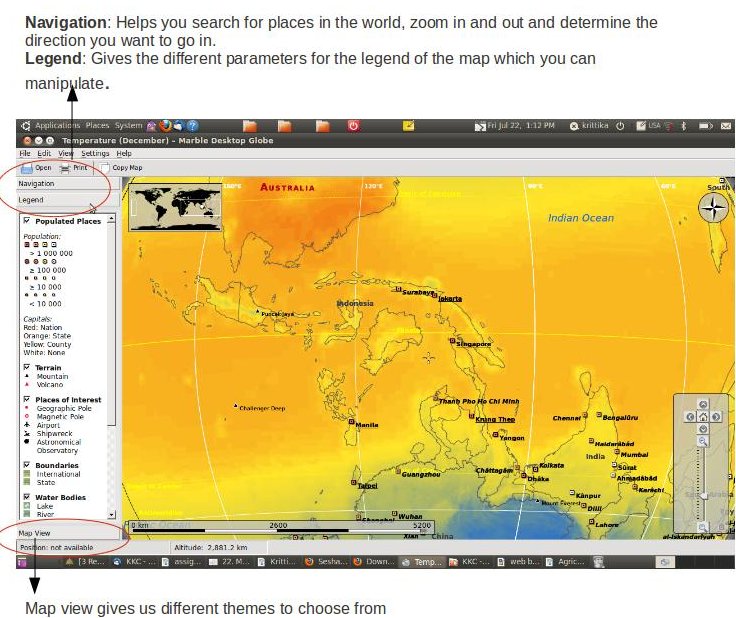 When all questions are completed the results are shown below. Each state is marked by a distinct colour and the result shows the correct answer and what the user marked.

Marble
Marble is like a desktop Atlas that you can use to learn more about Earth. You can zoom in and out looking at different places in the world. There are different thematic map here: A classroom-style topographic map, a satellite view, street map, earth at 'night and temperature and precipitation 'maps. All maps include a custom map key, so it can also be used as an educational tool for use in class-rooms. For educational purposes you can also change date and time and watch how the starry sky and the twilight zone on the map change. Not only do you get globe view, but you can change it to a Flat Map as well.
How
to install
- Go to system – Administration – Synaptic Package Manager.
- Type Marble in the search bar.
- It will usually be the first option that you get. Right-click – Click on Mark for Installation.
- Click on Apply
- Once this is complete, Marble will be available in Applications – Education – Marble.
 How
to Measure Distances
How
to Measure Distances
To
measure the distances between two places on the earth, right click on
the first location and click on “add to measure”. Click on the
second location.
- A red line is drawn between the two locations and the distance can be seen on the top left corner in a box.
- How to Set the time
- You can change the time to whatever you like on Marble. Go to View – Sun Control
- Use this window to play around with the time

- How to Download new maps
- Go to file – Download Maps. Click “install” on the maps you want to download. (you need to be connected to the Internet for this). For more information on how to use Marble, please click [[14]]
KStars
About KStars
KStars is a Desktop Planetarium for KDE. It provides an
accurate graphical simulation of the night sky, from any location on
Earth, at any date and time. The display includes upto 100 million
stars, 13,000 deep-sky objects,all 8 planets, the Sun and Moon, and
thousands of comets and asteroids.
To access KStars click on Applications > Science>
Kstars
 Activity
1 Solar Eclipse
Activity
1 Solar Eclipse
Purpose
To view the solar eclipse as seen in Bangalore on
January 15th 2010.
Process
- Set the location as Bangalore by selecting file menu option Settings > Geographic or pressing Ctrl+G
- Select Bangalore, India as the location.

- Set the time by selecting file menu option Time > Set Time or pressing Ctrl+S

- Press Ctrl+F and find the sun on the map.

- Press the play/Pause button to start the simulation, and keep the time at 10seconds
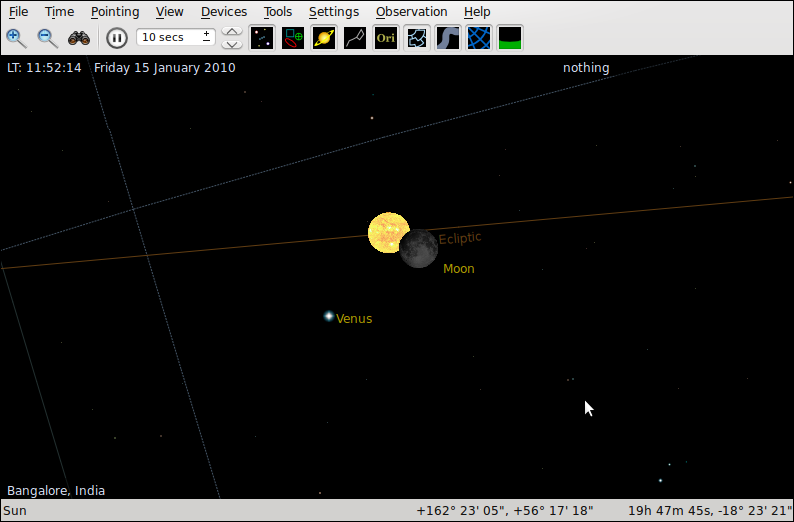

Activity 2 Solar System
Purpose
View the solar system. And see the revolution of the
planets around the sun.
Process
- Set the location as Bangalore by selecting file menu option Tools > Solar System or pressing Ctrl+Y
- Press Play button to simulate the movements of the planets
- Use the scale to place an orbit of any planet at 0 , when the planet is at position 0, note the clock measure and stop the clock when it comes back to zero position to measure how long the planet takes to complete one revolution.

Mathematics
Geogebra
Introduction to Drawing in Geometry
In many of our schools we are seeing children struggling
to grasp mathematics concepts. Sometimes explaining concepts such as
point, line, plane, chord, radius become very vague for children and
hence prevents them from grasping the concepts completely and hence
they struggle to progress in the subject.
There are many new methods that are being adopted to
make concepts less abstract in mathematics like using pictures,
cutting shapes out of cardboard etc... Often these aids are very time
consuming. IT based tools allow us to easily manipulate drawings and
allow children hands-on experience and visual stimulation to make
mathematics come alive and be less vague.
Geogebra is a good example of a computer aided tool,
which helps us in learning Geometry, Algebra and Calculus. It is a
free software, which functions in GNU Linux Operating System.
Geogebra cannot
replace children using the compass box to draw. The children in
classes must use
the compass box and pencils to draw and construct. This tool must be
used by teachers to animate some concepts and theorems to enable them
to use it as a teaching aid to further their own teaching
methodologies.
About Geogebra
Geogebra is dynamic mathematics computer aided tool for
schools that combines geometry, algebra, and calculus.
One part of Geogebra is an interactive geometry system.
You can do constructions with points, line segments, parallel lines,
line intersections, polygons, circles and more.
Another part of Geogebra allows you to enter equations
and coordinates directly. Thus, Geogebra has the ability to deal with
variables for numbers, vectors, and points.
You can also see the algebraic expressions of the
figures you draw and change the values in algebraic expressions to
dynamically see the change in the geometry figure and vice-versa.
Opening Geogebra
 On
the desktop click Applications > Science >
Geogebra or Applications > Education> Geogebra.
On
the desktop click Applications > Science >
Geogebra or Applications > Education> Geogebra.
Installing Geogebra
Please see the Install New Software section to install it if it is not available on
your Ubuntu system. You will need to be connected to the internet for
this.
The Geogebra Window
The figure shows the default Geogebra Window. The
details of each section are explained below.
Menu Bar: Typical
windows command menu bar. We will be using the File command
only.
Tool Bar: Has
all the tools (compass box) to use in the graphic view
Display for Tools: It
tells you which tool is active to use on the graphic view
Graphic View: Used
to draw the geometric figures. This window can never be closed.
Algebra View: Shows
the algebraic expressions. This window can be closed if you are
working only on geometry.
Input Bar: This
is used to enter more complex mathematical expressions that may not
be available on the Tool
Bar. (Not used in this
training session)
Commands: To
use along with the Input Bar, to select from a list of available
commands. (Not used in
this training session)
Tool Bar
 We
can consider the Tool Bar to be like a compass box. Today we will
consider the Geogebra tools that correspond to using a pencil, a
ruler and a compass in a compass box.
We
can consider the Tool Bar to be like a compass box. Today we will
consider the Geogebra tools that correspond to using a pencil, a
ruler and a compass in a compass box.
 To
see the list of related tools , click on the arrow at the bottom
right hand corner of each tool as shown below.
To
see the list of related tools , click on the arrow at the bottom
right hand corner of each tool as shown below.
Basic Use of Tools (Refer to above diagram, left)
- Activate a tool by clicking on the button showing the corresponding icon.
- Open a toolbox by clicking on the lower part of a button and select another tool from this toolbox.
File:Resource Book html m1b350d49.pngGraphic Window with Grids Displayed (Refer to above diagram,right)
- Place the mouse pointer over the graphic 'view 'area. Right Click and check the Grid option. To remove the grid view, un-check the option. See diagram below.
Activity 1: Drawing pictures with Geogebra
Purpose: To
familiarize oneself with the Geogebra window and some of the basic
geometry tools.
Process
Use the mouse and the following selection of tools in
order to draw figures on the drawing pad.
Start
by drawing the following : [ A
Point, A Line Segment, A Square, A House, A Circle]

|
Hint Box
|
|
Activity 2 : Saving/Opening Geogebra files
Purpose
Save
and retrieve Geogebra Files.
Process
- Open the File menu (Menu Bar) and select Save.
 Select the folder Your Name > Workshop > Geogebra in the pop-up dialogue window.
- Type in a name for your Geogebra file.
- Click the Save button to save the file.

To Open an existing Geogebra file select menu File > Open. A Open Window (just like the save window) pops up. Select the folder that you had saved the file and look for the file with extension '.ggb' in the box on the left side and click Open.
|
Hint Box
|
|
Activity 3 (Measurement)
 Purpose
To
learn to use the measurement tools Angle and Distance and
Length.
Process
- Open file 'Activity_1.ggb'.
- To measure select the tools from the Angle toolbar. Use these tools to measure the following
- Measure the Length of the Line Segment (Distance or Length)
- Measure the Angles of the Square (Angle)
- Measure the Circumference of the circle (Distance or Length)
|
Hint Box
|
|
Activity 4 Triangles
Purpose
To verify that the sum of the interior angles of a
triangle are 180 degrees.
Process
- Draw three points A, B, C (New Point tool)
- Draw three line segments AB, AC, BC (Segment between two points tool)
- Select the Angle tool to measure each of the interior angles of the triangle.
- Now verify that the sum of all the interior angles equals to 180 degrees.
- Select one of the vertices of the triangle (A,B or C) and move the points (Move tool) to change the shape of the triangles.

|
Hint Box
|
|
|
Constructive Corner
| ||||||||
|
Activity 5 (Explain different types of polygons)
Purpose
To demonstrate the different types of polygons .
Process
- Create a slider by clicking on the Slider tool
- Select Radio Button: Number, Name: a, min: 3, max:10, Increment: 1 and press Apply.


 Select the tool Regular Polygon and mark the two points A and B of one side of the polygon on the drawing pad. You will be prompted with a window as shown. Please put the slider name “a” in the box provided and press OK.
- Select the Insert Text tool and write the text: A polygon with three sides is called a TRAINGLE as shown in the figure along-side and press OK.
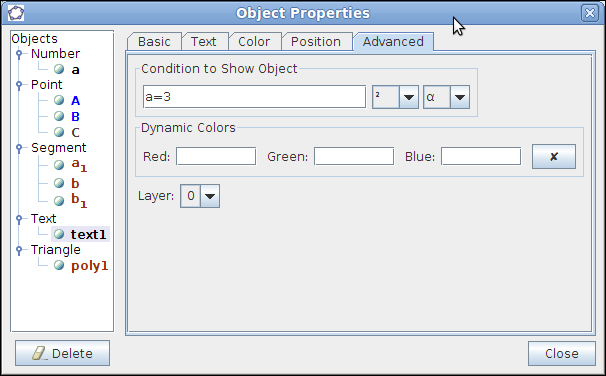
- Right click on the text created and select object properties. Click the Advanced tab. Enter a=3 in Condition to Show Object and press OK.
- Repeat steps 4 and 5 for as many polygons 7 more times to show up to 10 sided polygon.
- Select the move tool and demonstrate the different polygons.


|
Constructive Corner
|
|
Activity 6 (Explain different terms related to circle)
Purpose
To enable understanding of different terms and
definitions related to a circle.
Circle: The
collection of all the points in a plane, which are at a fixed
distance from a fixed point in the plane, is called a circle. The
fixed point is called the centre
of the circle and the fixed distance is called the radius
of the circle.
Process
- Draw a Circle using the circle with centre through point tool
- Draw multiple line segments using the line Segment tool where one point is on the circle centre and the other point anywhere on the circumference of the circle.
- Observe the value of the line segments.
A circle divides the plane on which it lies into three parts. They are: (i) inside the circle, which is also called the interior of the circle; (ii) the circle and (iii) outside the circle, which is also called the exterior of the circle. The circle and its interior make up the circular region.
Process
- Draw a Circle using the circle with centre through point tool.
- Select the circle, right click and select object properties.
- Select the colour tab in the object properties window and choose a colour
- Select the style tab in the object properties window and change the line thickness and filling values.
- Then explain the three parts described above.


Chord: If you take two points P and Q on a circle, then the line segment PQ is called a chord of the circle. The chord, which passes through the centre of the circle, is called a diameter of the circle. A diameter is the longest chord and all diameters have the same length, which is equal to two times that of the radius .
Process
- Draw a circle using the circle with centre through point tool.
- Draw many chords for the circle using the line segment tool that do not pass through the centre of the circle.
- Draw multiple chords of the circle using the line segment tool that pass through the centre of the circle (Diameter).
- Draw a line segment that represents the radius of the circle.
- Then explain the three parts described above.
KTurtle
About Kturtle
Kturtle is a tool to understand basic concepts of
programming in computers. The commands are simple and can be
visualized by children and hence understood easily. It can be seen as
giving instructions to a robot (the turtle) and making the turtle “do
what you want it to do”.
Purpose:
Introduce children to the basic idea of programming and
the generic logic constructs. Can make the concept of computer
programming less intimidating for both teacher and student. In
today's digital world, mathematics education may be seen as may
areas of learning coming together. These parts are conceptual
understanding of the mathematics , using the algorithms to
internalize and apply the conceptual understanding pattern
recognition and logical reasoning especially to understand theorems
and proofs. K Turtle helps teachers build logical reasoning and
pattern recognition with children. As it is visual, many geometric
properties can also be understood through the use of K Turtle, like
making the turtle draw a square requires the child to understand the
properties of a square. Thus it is very useful to teach logical
reasoning side by side with mathematics. This tool provides a
interactive and easy method to do the same with children starting in
the upper primary classes.
Activity 1
 Open application Applications > Education >
Kturtle and introduce the user to the following windows, editor
and canvas.
Open application Applications > Education >
Kturtle and introduce the user to the following windows, editor
and canvas.
Editor : Space for entering the commands, please note
the different colours that are used for keywords (blue) and the
quantities (red) etc...
Canvas: Is see the turtle in action when the command
being executed.
Now introduce four simple commands reset ,forward,
backward, turnleft, turnright
Reset :Clears the canvas and the turtle is
positioned in the center of the canvas facing forward.
Forward <Number of pixels) : Turtle
moves forward by the number of pixels specified
Backward <Number of pixels) : Turtle moves
backward by the number of pixels specified
turnleft <Number of Degrees>: Turtle turns
left (anti clockwise) by the number of degrees specified
turnright <Number of Degrees>: Turtle turns
right (clockwise) by the number of degrees specified
Note: You can also go to menu option Tools >
Direction Chooser.
Type the following commands in the Editor window:
 Reset
Reset
forward 100
turnright 90
backward 100
turnleft 90
forward 50
Do the following:
1. Click Save As Save the
Activity 2 : Using the commands from activity 1
create a Square
Reset
Forward 100
Turnright 90
Forward 100
Turnright 90
Forward 100
Turnright 90
Forward 100
Turnright 90
Investigation
Talk about repeated
commands and what they think should be done and lead them to the
command Repeat <No of Times > { <List of Commands}
Redo Square program as
|
Reset
|
Activity 3 : Using the commands from activity 1 &
2 discuss how a CIRCLE may be created.
Investigation:
- What is the definition of a circle really.
- What is the relationship between the number of times the command is repeated and the command that is within the repeat loop.
- Can we change the numbers, what happens
|
Reset
|
Table 1: Circle Program
Activity 4 Bringing some colour to the canvas.
Introduce the following commands , can also go to menu
Tools > Color Picker for selecting colour

canvascolor <Amount of Red>, <Amount of
Green>, <Amount of Blue> : Changes
the colour of the canvas
pencolor <Amount of Red>, <Amount of Green>,
<Amount of Blue> : Changes
the colour of the pen
(pencolor 0,0,0 is black)
penwidth <thickness of the pen)
Investigation
Learn the concepts of colour mixing with the primary
colours red, green and blue
Activity 5 :
Create a flower or some Rangoli Pattern as shown below
or any other pattern they come up with

|
reset
|

|
reset
|
Record My Desktop – A tool to record the desktop
- It is a free and open source screen-casting software.
- It is a desktop session recorder for GNU/Linux.
Launching the Application

Note:
If you do not have RecordMyDesktop in
Sound & Video, you have to install it using Ubuntu Software
Center.
- Go to Applications → Ubuntu Software Center.
- On the top right corner, type “RecordMyDesktop” in the search.
- Click on it and select Install.
- This process shall take some time and upon completion, RecordMyDesktop will appear under Sound & Video.
The Main Window
- Once the application is launched, the main window of RecordMyDesktop appears (as shown in the screen shot).

- On the top-right corner, we can see two scale widgets, labelled as “Video Quality” and “Sound Quality”. These control the quality of the encoded file (bitrate) and not that of capturing.
- Beneath the video and sound quality settings, there is a large button named “Advanced”. Clicking that will bring a new window, that will allow you to set a vast number of options, and fine tune the behaviour of the program.
Advanced Settings
All options in this window are applied when you close it. If you start a recording and the “advanced” window is open, it will close itself and any changes you've made will immediately be applied to your current session.
Files

Performance
Sound

Misc

Using RecordMyDesktop
Upon launching RecordMyDesktop, a small red button appears on the top panel of your desktop using which we can start, pause and stop the recording.
![]()
Start the recording
- To start the recording, click on “Record” in the main window (or) click on the red button and select “record”.
- This will create a window along your desktop border indicating the recording has started.
 The red button will now be like a square button.

- During recording,you can pause the recording by clicking on the red button and selecting “pause”.
- This will pause the recording and there will be two vertical parallel lines on the top panel indicating the recording has been paused.
- To resume the recording again, click on the parallel lines and select “continue recording”.
Stop the recording
- To stop the recording, click on the red button select “stop”.
- This will stop the recording and a new window will appear called “record my desktop encoder”.
- This will take some time and prepare your video to be viewed.

Note:
- Do not press “cancel” when your video is being encoded.
- If you do so, the recording will not be encoded and the video cannot be viewed.
Other Options
Show/Hide Main Window
- Click on “Select Window” in the main window (or) click on the red button on top panel and select “Show/hide Main Window”. This will hide the main window of RecordMyDesktop.
- To make the main window visible again, select the same option.
Select Area On Screen
- To record a specific area of your screen, select the option “Select Area On Screen”.
- Use your mouse by dragging it to select the area you want to record.
About
- Click on the red button on top panel and select “About”.
- A small window will appear giving information about RecordMyDesktop.
Quit
- To close the RecordMyDesktop application, click on “quit” in the main window (or) select the “quit” option under the red button options.
Installation of Ubuntu
Preface
This section will help you to understand the following:
- What is Edubuntu?
- What are the requirements to setup Edubuntu?
- How to install it?
- How does it work?
- Other configurations on Edubuntu (OpenOffice, Kannada setup etc)
What is Edubuntu?
Edubuntu, is the Ubuntu Education Edition which is designed for use in classroom and schools.
- LTSP - Linux Terminal Server Project (LTSP) is a free and open source add-on package for Linux that allows many people to simultaneously use the same computer.
What are the requirements to setup Edubuntu?
- You will need the Edubuntu 12.04 LTSP DVD (which has been given to you)
- Hardware Requirements – minimum 1GB RAM and 160 GB Hard Disk
How to install Edubuntu?
- Insert DVD in your CD/DVD-ROM device and reboot the computer in order to boot from the CD.
- Note: Hit the F8, F11 or F12 key (depending on your BIOS) to select the CD/DVD-ROM as the first boot device in the boot sequence order.
- The following steps show how to set your DVD as your first boot device:
- By pressing the DEL or F2 OR F12 key (depending on your BIOS) when your computer is starting you should see something like this.
- Using the arrow keys select Boot and press enter to access the Boot Device Priority menu.

 Press enter on the highlighted 1st Boot Device and select CD/DVD ROM from the menu.

- In this BIOS you have to press F10 to save and exit any changes that you have made. Press enter and the changes will be saved and you will exit the BIOS.

'Note: The images shown may vary in your machines. You may not have the exact options, but you will have similar names/menus/options.'
When your computer is starting it will now boot from the
CD.
Installation
Starting the Installation Process
Insert the selected installation media and start the computer up.
Select
the option install - start the installer
directly.
We
will include screen-shots for the rest of the installation process.
- Use the arrows on the keyboard to select the English language and then press the Enter key.
- In the next step, the following points will be checked –
- enough space available for the installation – this is important
- your system is connected to the internet – this is not required
- your system should be connected to the power source – this is important as the installation can take a long time (as shown below in the screen-shot). Click Forward
Edubuntu Options and Partitioning
- On the Disk Setup page, you can choose how Edubuntu should be installed.
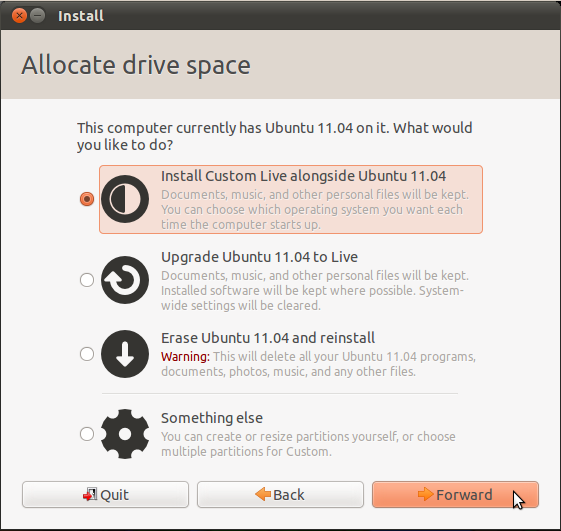 Edubuntu installs a complete operating system to your computer.
- You can choose to install Edubuntu side-by-side with your existing operating system, erase the entire disk and start from scratch. The preferred option would be to choose the option Install them side-by-side, choosing between them each start-up. Click Forward.

After this step, the installation begins. Few more steps have to completed, as shown below.
Note
– The order of the following steps may vary during the installation
in your machines.
Select
your time zone
In the next
step, you will be presented with a world map. Select the India
map
by clicking on it. Click
Forward.

Select your keyboard layout
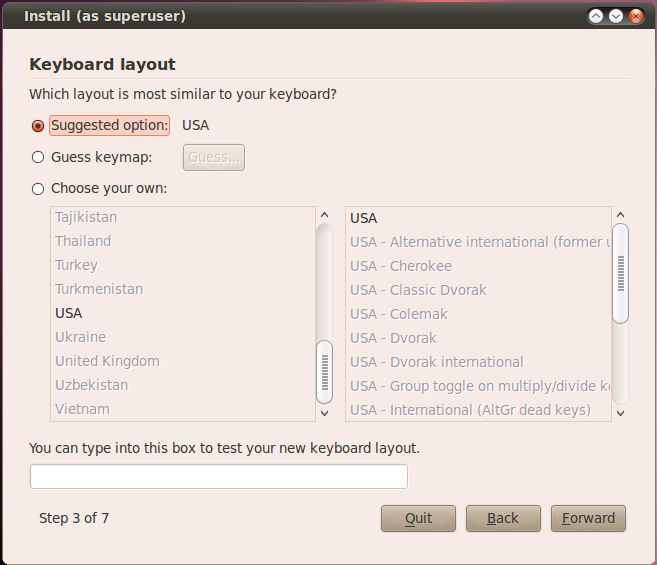 In this step, you have to choose the keyboard layout. The default keyboard layout is USA and it is selected by default in this step as shown below.
- Click Forward (Default Keyboard Layout - USA).
- Click on Forward.

- This will install Edubuntu along side Windows and you will be able to use both the operating systems without any loss of data.
Enter User Details
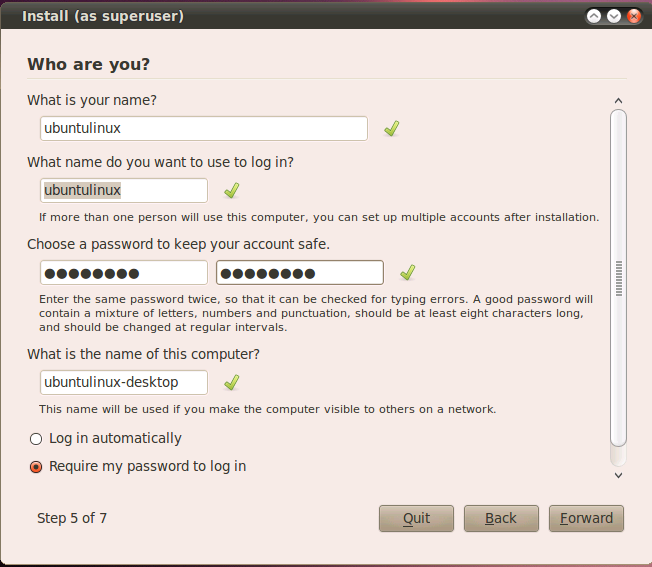 In the user setup dialog, you will be requested to set up the administrator user on the system.
- The user name cannot start with a number, and must be lowercase letters only.
- If you make mistakes, the installer will warn you about it. It is recommended that you require a password to log in to the system.

Installation Complete
- After the installation is complete, click on Restart Now
- Restart your system now and your DVD tray will open automatically.
- Remove the DVD and press ''Enter''.
Your server machine with Edubuntu, version 12.04 is now ready for use. You can proceed to install the educational tools on the server given on another CD
Additional Settings after Installation
- The tool PhET is already installed on your system now. To add it to the menu
- Click on Applications → System Tools → Preferences → Main Menu. On the left hand box, select education or science menu and click on the New Item button. In the box that appears
- Type
FAQ
Please visit [[15]] . There are also FAQ's in Kannada on this website.