Difference between revisions of "GIMP manual"
| (10 intermediate revisions by 3 users not shown) | |||
| Line 1: | Line 1: | ||
| − | + | *To download this GIMP manual click[http://karnatakaeducation.org.in/KOER/en/images/3/33/GIMP_document_for_KOER.odt | here] <br> | |
| − | Basic | + | *To download complete detailed manual click [http://www.subdude-site.com/WebPages_Local/RefInfo/Computer/Linux/LinuxGuidesOfOthers/appsImagePhotoTools/gimp_docs/GIMP_Tutorial_2-2-6_2009_Schneider_12pgs.pdf here] |
| − | tools in GIMP | + | * GIMP tutorials Click [http://www.gimp.org/tutorials/ here] |
| + | |||
| + | Basic tools in GIMP | ||
<br> | <br> | ||
| − | This document can be used to get a | + | This document can be used to get a brief overview of the tools available in GIMP. |
| − | brief overview of the tools available in GIMP. | ||
<br> | <br> | ||
== GIMP == | == GIMP == | ||
| − | + | GIMP is a powerful and complex open source image editing programme. The GIMPs tools are displayed as icons on the toolbox. A user can identify a tool by hovering over it. The name of the tool will appear below. Clicking on the icon will select that corresponding tool. | |
| − | GIMP is a powerful and complex open source image | ||
| − | editing programme. The GIMPs tools are displayed as icons on the | ||
| − | toolbox. A | ||
| − | user can identify a tool by hovering over it. The name of the tool | ||
| − | will appear below. Clicking on the icon will select that | ||
| − | corresponding tool. | ||
| − | |||
A beginner can utilise the following tools in GIMP: | A beginner can utilise the following tools in GIMP: | ||
| − | |||
| − | |||
| − | |||
| + | === Crop === | ||
Select the area that you would like to retain. The area can be | Select the area that you would like to retain. The area can be | ||
extended or reduced by selecting one of the sides. Once your desired | extended or reduced by selecting one of the sides. Once your desired | ||
| Line 28: | Line 20: | ||
double click inside the desired area. The photo will be cropped to | double click inside the desired area. The photo will be cropped to | ||
that size. | that size. | ||
| − | |||
The tool is used: | The tool is used: | ||
| − | |||
* to reduce the size of large images. | * to reduce the size of large images. | ||
| Line 43: | Line 33: | ||
that you want in this box. Or you could manually drag with the help | that you want in this box. Or you could manually drag with the help | ||
of clicking one of the sides and reduce to the size you want. | of clicking one of the sides and reduce to the size you want. | ||
| − | |||
The tool is used: | The tool is used: | ||
| − | |||
* to reduce the size of heavy images. It makes uploading on websites more easy. | * to reduce the size of heavy images. It makes uploading on websites more easy. | ||
| Line 56: | Line 44: | ||
be done using the move tool. Select the move tool. Select the image. | be done using the move tool. Select the move tool. Select the image. | ||
Click and drag to a suitable location. | Click and drag to a suitable location. | ||
| − | |||
The tool is used: | The tool is used: | ||
| − | |||
* when there is more than one element in the window you are working on. | * when there is more than one element in the window you are working on. | ||
| Line 70: | Line 56: | ||
below the tool box. The length of the text box can be adjusted after | below the tool box. The length of the text box can be adjusted after | ||
you finishing typing your text by selecting the corners and dragging. | you finishing typing your text by selecting the corners and dragging. | ||
| − | |||
The tool is used: | The tool is used: | ||
| − | |||
* to add a title or caption explaining the text is useful. | * to add a title or caption explaining the text is useful. | ||
| Line 82: | Line 66: | ||
'Image' option. Then click on 'Mode' and finally click on | 'Image' option. Then click on 'Mode' and finally click on | ||
'Grayscale'. This would make the image grey. | 'Grayscale'. This would make the image grey. | ||
| − | |||
The tool is used: | The tool is used: | ||
| − | |||
* to make a photo black and white. It is preferrable for printing purposes. | * to make a photo black and white. It is preferrable for printing purposes. | ||
| Line 96: | Line 78: | ||
resolution'. Enter in 72 pixels in both X and Y spaces. This would | resolution'. Enter in 72 pixels in both X and Y spaces. This would | ||
help reduce the file to a small size. | help reduce the file to a small size. | ||
| − | |||
The tool is used: | The tool is used: | ||
| − | |||
* to reduce resolution which helps in file size. | * to reduce resolution which helps in file size. | ||
| Line 105: | Line 85: | ||
<br> | <br> | ||
| − | |||
=== Transparent background === | === Transparent background === | ||
| Line 115: | Line 94: | ||
make your background transparent. If no, this tool cannot be applied | make your background transparent. If no, this tool cannot be applied | ||
to this image. | to this image. | ||
| − | |||
This tool is used: | This tool is used: | ||
| − | |||
* to make white backgrounds transparent. | * to make white backgrounds transparent. | ||
| Line 126: | Line 103: | ||
Import the image into GIMP. There is more than one way to do this. | Import the image into GIMP. There is more than one way to do this. | ||
| − | |||
'''One: '''Go to Color → | '''One: '''Go to Color → | ||
| Line 133: | Line 109: | ||
25 to 35. Saturation: Between 50 – 60. Lightness: Between 4 – | 25 to 35. Saturation: Between 50 – 60. Lightness: Between 4 – | ||
10. | 10. | ||
| − | |||
'''Two: '''Go to Filters → | '''Two: '''Go to Filters → | ||
Decor → Old photo. | Decor → Old photo. | ||
| − | |||
'''Three: '''Another method | '''Three: '''Another method | ||
requires you to first desaturate the image. For this, go to Color → | requires you to first desaturate the image. For this, go to Color → | ||
Desaturate. Then repeat the processes in method '''One'''. | Desaturate. Then repeat the processes in method '''One'''. | ||
| − | |||
| − | |||
| − | |||
| − | |||
| − | |||
=== Layers === | === Layers === | ||
The | The | ||
| − | importance of working on layers in a | + | importance of working on layers in a can |
| − | + | ||
| − | + | ===Reducing Image size=== | |
| − | + | *Right click on the image file and open with '''GIMP image editor'''. | |
| − | + | *Once the image open in a GIMP image tool. | |
| − | + | *Goto to '''file''' and click on '''Export as'''. | |
| + | *The dialog opens with the file name already typed/saved in the Name box. | ||
| + | *Better rename the file (for you reference)and click on the '''export'''. | ||
| + | *Now you will get '''export image as''' popup screen. | ||
| + | [[image:gimp-export.png | 440px]] | ||
| + | *Reduce the image Quality to make the image size even smaller by draging. | ||
| + | '''Note:A quality of 5o produces a reasonable image using much less disk space, which will, in turn, load much faster on a web page. Although the image is somewhat degraded, it is acceptable for the intended purpose.''' | ||
| + | *Now click on '''Export'''. | ||
| + | *Now, Your the exported image size reduced. | ||
| + | *Finally, here is a comparison of the same picture with varying degrees of compression: | ||
| + | <gallery> | ||
| + | File:gimp export1.jpg|Quality: 30; Size: 3.2 KiloBytes | ||
| + | File:gimp export 2.jpg|Quality: 50; Size: 9.2 KiloBytes | ||
| + | </gallery> | ||
Latest revision as of 02:17, 16 March 2015
- To download this GIMP manual click| here
- To download complete detailed manual click here
- GIMP tutorials Click here
Basic tools in GIMP
This document can be used to get a brief overview of the tools available in GIMP.
GIMP
GIMP is a powerful and complex open source image editing programme. The GIMPs tools are displayed as icons on the toolbox. A user can identify a tool by hovering over it. The name of the tool will appear below. Clicking on the icon will select that corresponding tool.
A beginner can utilise the following tools in GIMP:
Crop
Select the area that you would like to retain. The area can be extended or reduced by selecting one of the sides. Once your desired area is selected (the remaining area will turn grey or darker), then double click inside the desired area. The photo will be cropped to that size.
The tool is used:
- to reduce the size of large images.
- to remove unnecessary areas in a photo.
Scale
Open the image that you want to work on in GIMP. Select the scale tool and click on the image. The image would then have tiny boxes on every side. Another box will pop up. You can insert the measurements that you want in this box. Or you could manually drag with the help of clicking one of the sides and reduce to the size you want.
The tool is used:
- to reduce the size of heavy images. It makes uploading on websites more easy.
Move
After scaling an image, if you want to add another image to the frame, you would have to move the first image to the side. This can be done using the move tool. Select the move tool. Select the image. Click and drag to a suitable location.
The tool is used:
- when there is more than one element in the window you are working on.
Add text
Select the Text tool (a capital A). Now, drag the tool to were you want to insert text. A tiny box pops up. Type your text in the box. The size, colour, style of the text can be changed in the settings below the tool box. The length of the text box can be adjusted after you finishing typing your text by selecting the corners and dragging.
The tool is used:
- to add a title or caption explaining the text is useful.
Grayscale
Select the image. Go to the menu bar on top and click on the 'Image' option. Then click on 'Mode' and finally click on 'Grayscale'. This would make the image grey.
The tool is used:
- to make a photo black and white. It is preferrable for printing purposes.
Scale image size
Select the image. Go to the menu bar on top and click on the 'Image' option. Then click on 'Scale image...'. This would show you options of 'width and height' along with 'X resolution' and 'Y resolution'. Enter in 72 pixels in both X and Y spaces. This would help reduce the file to a small size.
The tool is used:
- to reduce resolution which helps in file size.
- to make photos for uploading on websites (should not be used for printing).
Transparent background
Open the image you want to work on. Once the image is open, go to File → Save as → and save it as a .png file. Once this is done, go to Layer → Transparency → and see if the option 'Color to Alpha' is active. If yes, then click on it and say yes. This will make your background transparent. If no, this tool cannot be applied to this image.
This tool is used:
- to make white backgrounds transparent.
- to remove backgrounds from logos.
Sepia photos
Import the image into GIMP. There is more than one way to do this.
One: Go to Color → Colorize. A dialogue box will pop up. Adjust the bars to your desired levels. Else let the values be around Hue: between red and yellow – 25 to 35. Saturation: Between 50 – 60. Lightness: Between 4 – 10.
Two: Go to Filters → Decor → Old photo.
Three: Another method requires you to first desaturate the image. For this, go to Color → Desaturate. Then repeat the processes in method One.
Layers
The importance of working on layers in a can
Reducing Image size
- Right click on the image file and open with GIMP image editor.
- Once the image open in a GIMP image tool.
- Goto to file and click on Export as.
- The dialog opens with the file name already typed/saved in the Name box.
- Better rename the file (for you reference)and click on the export.
- Now you will get export image as popup screen.

- Reduce the image Quality to make the image size even smaller by draging.
Note:A quality of 5o produces a reasonable image using much less disk space, which will, in turn, load much faster on a web page. Although the image is somewhat degraded, it is acceptable for the intended purpose.
- Now click on Export.
- Now, Your the exported image size reduced.
- Finally, here is a comparison of the same picture with varying degrees of compression:
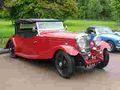
Quality: 30; Size: 3.2 KiloBytes
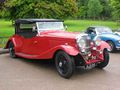
Quality: 50; Size: 9.2 KiloBytes

