|
|
| Line 1: |
Line 1: |
| | =Download Handouts= | | =Download Handouts= |
| − | #[http://karnatakaeducation.org.in/KOER/en/index.php/File:Freemind handout.pdf PDF]] | + | #[http://karnatakaeducation.org.in/KOER/en/index.php/File:Freemind_handout.pdf PDF] |
| − | #[[:File:Freemind handout.odt]] | + | #[http://karnatakaeducation.org.in/KOER/en/index.php/File:Freemind_handout.odt ODT] |
| | | | |
| | =What is a mind map?= | | =What is a mind map?= |
Revision as of 16:46, 17 November 2013
Download Handouts
- PDF
- ODT
What is a mind map?
Mind mapping is a highly effective way of getting information in and out of your brain and to enable. Mind mapping is a creative and logical means of mapping out ideas and exploring the connections between concepts and ideas. Freemind is one such mind mapping tool. This allows us to create concept maps around an idea and to explore the connections between various ideas. Teachers can use this to plan for lessons or to discuss in the classrooms.
To use Freemind, from the desktop menu select Applications > Office > Freemind.

Creating a mind map
|
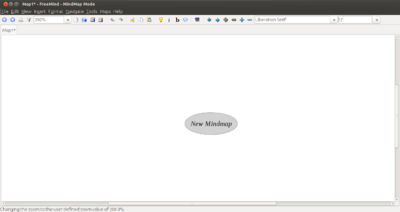
- Once Freemind is open you will see a window like this.
- The new mind map is the root node and you can give it any name you want.
- The name of this root node will be the name of the mind map.
- Once you have given it a name, you can save the mind map.
|

|
- Once you click on save, you will see a window like this.
- You can save the folder you want to select the folder you want to save it on.
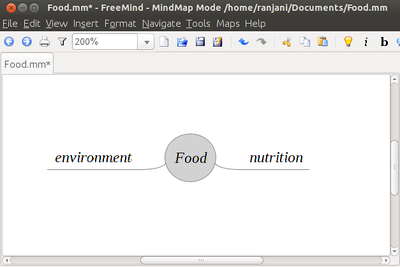
- Here the mind map is named Food and is saved under home/ranjani/Documents
- Now you see that the mind map is named Food and the root node is called Food.
|
|
- To insert other words that are connected, you can enter them as child nodes.
- To enter these nodes, you can use the "Enter" key or "Insert" key after
selecting the node to which the child nodes must be added.
- Here, the child nodes have been added after selecting the node "Food".
- The two child nodes added are called sibling nodes and the main node is called parent node.
|
|
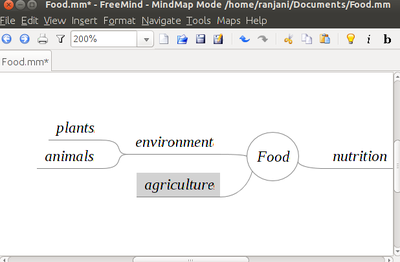
- You can keep adding child nodes to any node.
- For example you can add child nodes to the node called environment by
selecting and using "Insert" key.
- You can also add a sibling node to environment by selecting the
node environment and using "Enter" key.
- "Plants" and "Animals" are child nodes for "environment"
and "agriculture" is sibling node for "environment.
|
|
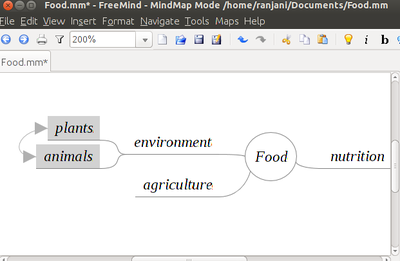
- When you discuss concepts, we notice that sometimes concepts are connected,
and we want to link them to study in detail.
- For doing this we can add a graphical link (an arrow) to connect two nodes.
- To do this select two nodes and select Insert Option from the menu bar, and add graphical link.
- You can click on the arrow and move it around.
|
|
- We will also see that sometimes these concepts are very large
and we may want to create a new mind to study them.
- For example, in this mind map we may want to create a new mind map
called agriculture to study.
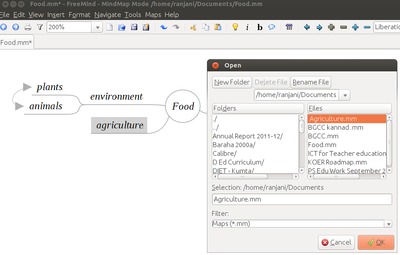
- After we create a new mind map called agriculture,
we can insert a "file link" to open the new mind map when the node "agriculture"
is clicked.
- To do this, we click on node called agriculture and click on "Insert".
- Under Insert, click on "Hyperlink - File chooser".
- This will open a window from where you can select the document
name to be opened.
- This can be a mind map or picture or video.
- We can also insert weblinks to any node for additional information.
|
|
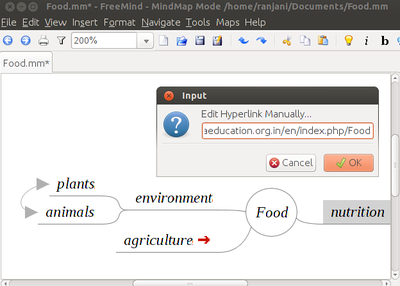
- To do this, you select the node to which additional information
is to be added and click on "Insert".
- Under Insert, click on "Hyperlink - Text field".
- It will open a window in which you can enter the hyperlink manually.
|
|
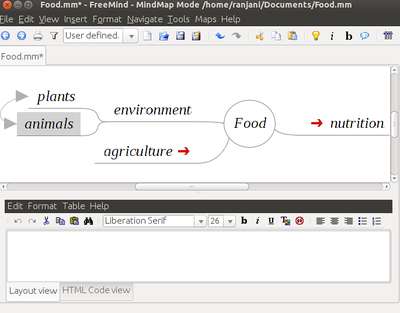
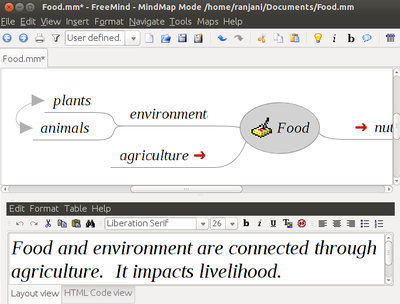
- You can also add notes to a node to add more description to a node.
- To to this, you need to go to "View" and select "Note Window".
- This will open a box where you can enter text.
- You can adjust the size of this box.
- To enter a note, select a node and enter the notes below in the note window.
|
|
- The completed mind map with links and notes will look like this below.
- You can select the Format and Navigate to change colours.
- You can select layout and also to move the nodes around.
|
Exporting a mindmap
Once you create a mind map, you can view and edit it as a mind map. You can also export it as a text document or an image. You can click on "File" and click "Export". And then choose from the various exporting formats.


