DEVICE AND NETWORK SETUPS ON UBUNTU
Block Access to Unwanted Websites in Ubuntu
Want to block access to certain websites from your machine running Ubuntu or Linux Mint? It’s easy to do it by editing the host file.
With the hosts file, you can tell Ubuntu to redirect the specific websites to 127.0.0.1. So that the web browser returns below error:

- To do so, edit the /etc/hosts with your favorite editor. Press 'Ctrl+Alt+T on your keyboard to open terminal. When it opens, run below command to edit the hosts via gedit:
sudo gedit /etc/hosts
- Add below lines to the end of the file. Exclude the http:// and change the domain names.
Examples :-
127.0.0.1 www.websites1.com
127.0.0.1 www.websites2.com
127.0.0.1 websites3.com
127.0.0.1 morewebsites.com

- Save the file and re-launch your web browser. Done.
How do I setup Thin client in Phase-1 and phase-2 schools
Note:below mentioned setup is only for the server
1.Go to the right top panel, Left click on network icon,
select the Edit connection.

2.Click on the Wired tab and there click on Edit button.

 Back to Top
How to connect a printer in ubuntu 12.04 ?
- Applications=>> System tools=>> system settings
- click on printer icon
- "Add" then Select you Printer name then Printer model in the next page and by clicking Add button to complete this process.
Not: After following this steps with HP printers and still not able to print, please follow the below steps.
How to set up Hp printers through hplip?
- Download hplip from here
- Open a terminal(applications>> accessories>> terminal)
- Type sh hplip-3.14.6.run command/copy+paste in terminal press Enter
- If it asks for a password, please enter your Ubuntu login password
- then follow as it shows.
- Once it complete all the steps, follow the general printer setup steps.
How to fix your Internet connection in Ubuntu Linux
Check the basics first
Before you blame Ubuntu, try connecting to the Internet on other devices. If they're experiencing the same problem, it isn’t with Ubuntu—it’s with something else. For example, you may need to reboot your router, modem, or both. It’s always worth checking these fundamentals before delving into further troubleshooting.
Some laptops have hardware switches that can be toggled to quickly enable or disable Wi-Fi. If your Wi-Fi doesn’t seem to be working at all, check your laptop's hardware Wi-Fi switch.
If you’re using a wired connection, ensure the ethernet cable is plugged firmly into both the computer’s ethernet port and the router’s ethernet port. Sure, this may seem a bit obvious, but it’s easy to miss a bumped switch or loose cable.
Configure your connection settings in NetworkManager
NetworkManager connects to Wi-Fi networks and automatically configures wired network connections when you plug in an ethernet cable. Before NetworkManager, you’d have to do this with terminal commands.

If something isn’t working properly, you may still have to configure NetworkManager. Click the network connection or Wi-Fi icon on the panel at the top-right corner of your screen to access the NetworkManager menu, then choose a network. If you need to view information about your connection for troubleshooting purposes—your computer’s IP address, for example—click Connection Information.

If your local network connection isn’t working, ensure the Enable Networking and Enable Wi-Fi options are selected here in the menu. These options let you quickly disable and enable your connections, which is useful for putting your laptop into airplane mode. If you accidentally disabled either, you won’t have an Internet connection until you re-enable them.

Configure your connections by clicking Edit Connections. You’ll see a window with one or more connections, depending on how many network adapters you have in your computer. Select a connection and click Edit to modify its settings.

Ensure the ‘Automatically connect to this network when it is available’ option is enabled on the General tab. If it’s disabled, NetworkManager won’t automatically connect to a wired or wireless network when you boot your computer.
NetworkManager uses Dynamic Host Configuration Protocol (DHCP) by default, so your computer will attempt to get connection settings—IP address, DNS servers, and default gateway—automatically from your router or Internet service provider.
For networks that require a static IP configuration, you’ll need to visit either the IPv4 Settings or the IPv6 Settings pane and select the “Manual” method. (If you’re not sure which you’re using, you’re probably still using IPv4.) Enter the details your connection requires here—your ISP or network administrator can tell you what to enter if you don't know.
 .
.
For more information about this Click here
Still If Internet is not working
follow below steps
- Open terminal (ctrl+Alt+t)
- type sudo gedit /etc/resolv.conf, press enter.
- Once the resolve.conf files opens copy paste the following lines in it.
nameserver 8.8.8.8
nameserver 8.8.4.4
- click on save and close the file.
How do I connect to a wireless network on Ubuntu?
-
To connect to a wireless network:
- Ensure that your wireless device is turned on.
- Click the Network Manager icon in the system notification area. If you are connecting to a network for the first time, security details may be needed. If so, a dialog box will open. Enter your security details as follows:
- In most cases the security type will be detected automatically. If not, select the security type from the Wireless Security drop-down box. This will depend on how the wireless network is set up. Examples of security types are WEP, WPA and LEAP.
- Enter the password, key or other authentication details as appropriate. These are usually case-sensitive. If you don't know your wireless key, it may be printed on the bottom of your wireless router.
- Click Connect. If you are prompted again for your security details, you may have entered them incorrectly, or there could be a problem with your wireless setup.
How do I connect to a wired (LAN) network on Ubuntu?
-
You will be connected to a wired network automatically when you plug in the network cable.
Manually entering your network settings
- Right click the Network Manager icon in the system notification area and click Edit Connections.
- Click the Wired tab, select the connection and click Edit.
- Click the IPv4 Settings tab and choose Manual from the Method drop down list.
- Click Add and enter your IP address and other details. Enter the address of your DNS server too.
- Click Apply. The network should now connect if you entered the settings correctly.
How to connect Datacrds in ubuntu 12.04
This is by far the simplest way to configure a USB modem to connect to internet. No additional drivers or software are necessary.
- Plug your USB Modem into an USB port. The LED light starts blinking and in a while once your modem is recognized you will be able to see an option – New Mobile Broadband (CDMA) connection/New Mobile Broadband (GSM) connection on clicking the Network icon just besides the sound icon on top panel.
- Once you click that, you will see this screen which will show your device name. Click ‘Continue’ on the dialog.

- In the next screen select country as ‘India’. This will help Ubuntu list Indian service providers in the next screen.

- In the ‘Choose your Provider’ screen select your service provider. In case it is not listed (BSNL EVDO is not listed) enter it manually in the space provided. In case of EDGE/GPRS/3G connection the service providers list will be long.

- The choose your billing plan screen appears only when using a EDGE/GPRS/3G connection. If you are configuring a 3G modem, say BSNL you will be required to select proper zone (Eg. OldSouthZoneA…) to use proper APN settings.
- The last screen is to confirm all the settings and apply them. Click Apply here.
- Connected and now you can browse.
How to setup MTS Data card on UBUNTU 12.04
Follow the steps to configure the data card on UBUNTU 12.04
Samsung/iPhone net connection
Note: We have required the following things to connect a Internet through Android/iPhones:
a. Activate GPRS in the connecting Phones.
b. Ubuntu installed Computer with wireless card.
In Mobile Phone
1. Go to Mobile settings ----> Wireless and Networks -----> Tethering and portable hotspot -----> Check the portable Wifi-hot spot ---> go to portable wi-fi hot spot settings ----> select Configure portable wifi hotspot----> note down the password by checking show password below or you can change the default password also.
In computer
2. In top pannel left click on Network icon(Rightside of the top pannel) Select the Network name starting with the Androd select it will ask you for the password, which you noted above noted password type and click on Connect. Now it will try to connect your mobile internet.
How to make multiple Ubuntu copies Using K3B
Please follow the steps to make multiple Ubuntu dvd'S


How to make a pen drive bootable
-
Note: In order to make a pen drive bootable pen drive, one requires the following:
- a. Minimum pen drive capacity of 4 GB.
- b. ISO image of UBUNTU.
- c. Once booted, make sure that no new data is saved.
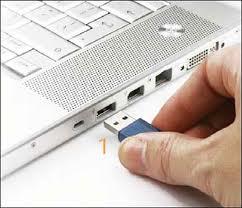
- 1. Insert the pen drive into the USB port of your computer as shown below.
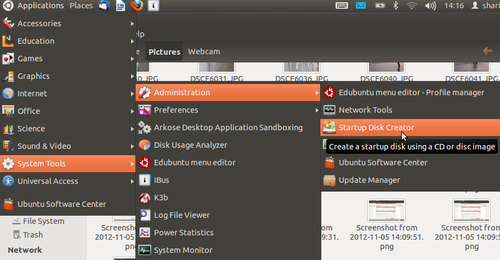
- 2. Go to Applications---->system tools---->Administration---->startup Disk creator,as shown
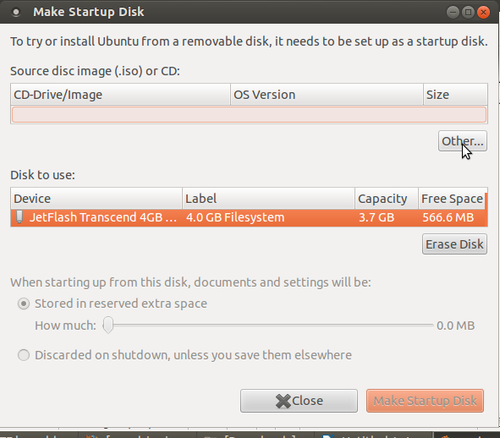
- 3. Once system detects pen drive, click on other. Show the path where you stored the ISO UBUNTU image file.
- 4. Click on Make Startup Disk, as shown in the image below.
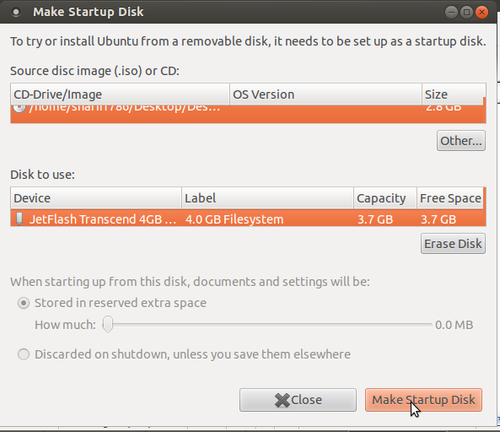
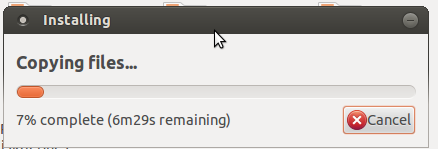
- 5. After clicking, the 'installing' process would begin. Once the installation is complete with the figure showing 100%, click on the quit option.
Your pen drive is ready for installing UBUNTU on your computer.
Back to TopHow do I connect to the Internet via a Wireless Data Card (Mobile Broadband)?
-
Mobile Broadband means any kind of high speed Internet connection which is provided by an external device such as a 3G USB stick or mobile phone with built-in HSPA/UMTS/GPRS data connection.
Most mobile broadband devices should be recognized automatically when you connect them to your computer. Ubuntu will prompt you to configure the device:
- The New Mobile Broadband Connection wizard will open automatically when you connect the device.
- Click Forward and insert your details, including the country where your Mobile Broadband device was issued, the network provider and type of connection.
- Give your connection a name (it is up to you what name you choose) and click Apply.
- Your connection is now ready to use. To connect, click the Network Manager icon in the top right of the panel and select your new connection.
- To disconnect, left click the Network Manager icon in the top right of the panel and click Disconnect.
-
If you are not prompted to configure the device when you connect it, it may still be recognized by Ubuntu. In such cases you can add the connection manually:
- Right-click the Network Manager icon in the system notification area and click Edit Connections.
- Select the Mobile Broadband tab.
- Click Add.
- This should open the New Mobile Broadband Connection wizard. Enter your details as described above.
OR
Most of the data cards available in the market are designed to work on windows and mac computers. Few have drivers (software) to work on GNU/Linux too! However for the data cards that do not have GNU/Linux drivers, here is the most generic and simple solution..
1. Connect the data card to the USB port.
2. Open the 'Terminal' (Application → Accessories → Terminal)
3. Two additional software are required for this activity. So use internet (may be wifi or cable) to download these software packages. In the terminal window, at the $ sign, type sudo apt-get install wvdial and when prompted for a password, type in your login password (you will not see a thing on the screen, don't worry just key in your password)
4. The next software package that we have to install is call usb-modeswitch. This package is very important because most of the datacards when plugged in acts like storage devices and not datacards and this package switches the devices' mode from storage device to a datacard. You can download this package from http://www.draisberghof.de/usb_modeswitch/usb-modeswitch-1.2.0.tar.bz2 and you'll need another file which can be downloaded from here http://www.draisberghof.de/usb_modeswitch/usb-modeswitch-data-20111023.tar.bz2. A supporting package called libusb is required too. This can be downloaded by typing sudo apt-get install libusb at the $ symbol in the terminal.
5. The two files downloaded needs to be unzipped (uncompressed). If you are not sure of where the files are, check your Downloads folder under the home folder. Right-click on the downloaded files and select extract here. Once this is done, go back to the terminal and type the following commands
cd ~/Downloads/usb-modeswitch-1.2.0
sudo make install (you'll have to enter your login password after this)
cd ~/Downloads/usb-modeswitch-data-20111023
sudo make install
sudo apt-get install libusb-dev
6. Now we need to configure wvdial. In the terminal at the $ symbol type sudo gedit /etc/wvdial.conf. This will open a text editor which might have some text in it. Replace the text with the following[Dialer Defaults]
Init1 = ATZ
Init2 = ATQ0 V1 E1 S0=0 &C1 &D2 +FCLASS=0
Modem Type = Analog Modem
Baud = 9600
New PPPD = yes
Modem = /dev/ttyUSB0
ISDN = 0
Username = <type your reliance number here> or internet (if it is a tata photon datacard)
Password = <type your reliance number here> or internet (if it is a tata photon datacard)
Phone = #777
Stupid Mode = 1
7. Once this is done, at the $ type sudo wvdial to connect to the internet
–> WvDial: Internet dialer version 1.60
–> Cannot get information for serial port.
–> Initializing modem.
–> Sending: ATZ
ATZ
OK
–> Sending: ATQ0 V1 E1 S0=0 &C1 &D2 +FCLASS=0
ATQ0 V1 E1 S0=0 &C1 &D2 +FCLASS=0
OK
–> Modem initialized.
–> Sending: ATDT#777
–> Waiting for carrier.
ATDT#777
CONNECT
–> Carrier detected. Starting PPP immediately.
–> Starting pppd at Thu Nov 5 15:45:26 2009
–> Pid of pppd: 3205
–> Using interface ppp0
–> pppd: 0$P
–> pppd: 0$P
–> pppd: 0$P
–> pppd: 0$P
–> pppd: 0$P
–> local IP address 115.184.194.33
–> pppd: 0$P
–> remote IP address 220.224.141.145
–> pppd: 0$P
–> primary DNS address 202.138.103.100
–> pppd: 0$P
–> secondary DNS address 202.138.96.2
–> pppd: 0$P
You are now connected to the internet
8. You can start browsing now and remember not to close the terminal window. To disconnect you'll have to press Ctrl C. Back to Top


